REMAINS OF THE AUSTRALIAN COASTAL ARTILLERY BATTERIES - PORT MORESBY WWII
 |
 |
 |
| Idlers Bay gun emplacement | Paga Hill 6-Pr gun | Bootless Bay gun emplacement |
Port Moresby lies on the southeast shore of Papua New Guinea and is built around
Fairfax Harbour, the island's largest harbour. During World War 2 Port Moresby was coveted by both
sides for control of the Coral Sea and the South Pacific Ocean.
Allied harbour defences consisted of several army batteries and a naval anti-submarine
indicator loop installation as harbour protection. This webpage is concerned with the gun emplacements around Port Moresby. For more details on the construction and about indicator loops see my Port Moresby defences webpage. For more details on the 32 Anti-aircraft Battery at "Ack Ack Hill" Port Moresby see my Port Moresby 32 Ack Ack Battery webpage. See also Bomana War Cemetery.
There were four coastal batteries protecting Port Moresby: Paga Hill, Baskilisk Battery at Idlers Bay, Bootless Bay & Gemo Island.
 |
If you have any feedback please emai mel: Thank you to Kell Nielsen for many of the original photos and captions. |
 |
Richard Walding |
|
Kell Nielsen |

LOCATION OF THE GUN BATTERIES
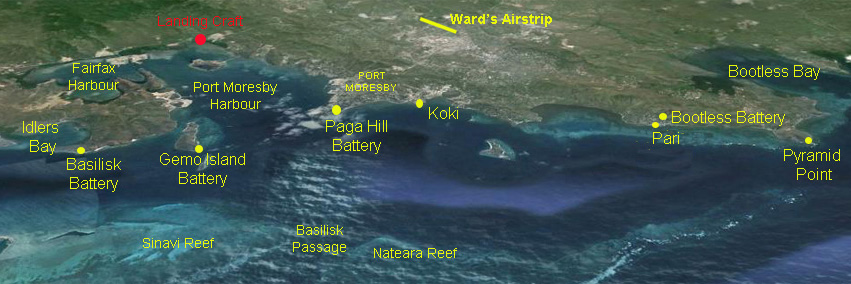 |
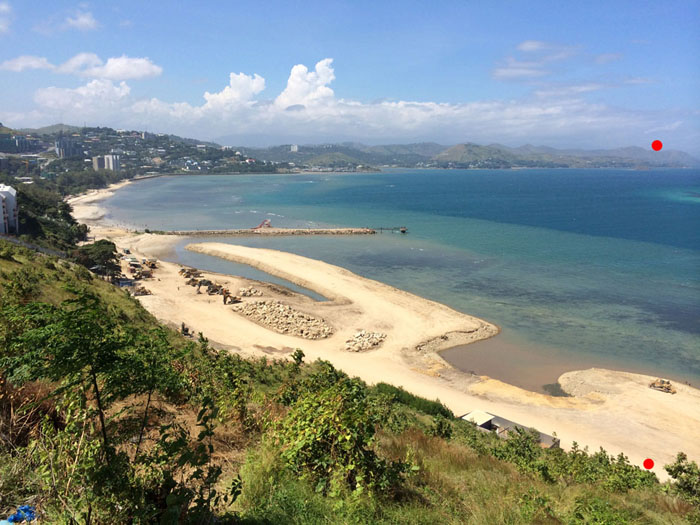
There were four coastal batteries protecting the Port Moresby area: Basilisk Battery near Idlers Bay, Gemo Island Battery, Paga Hill Battery and Bootless Battery (on Drysdale Ridge near Pari Village). The observation post for Bootless Battery was on Pyramid Point. The red dot at the top of Fairfax Harbour marks the location of the Landing Craft (in later photos). Boera Battery is not shown on this map but is described later in this webpage. Of most concern was the possibility of enemy ships (including submarines) entering via Basilisk Passage through a gap in the reef. The 6" guns of Paga Hill Battery were installed to deal with this. |
 |
 |
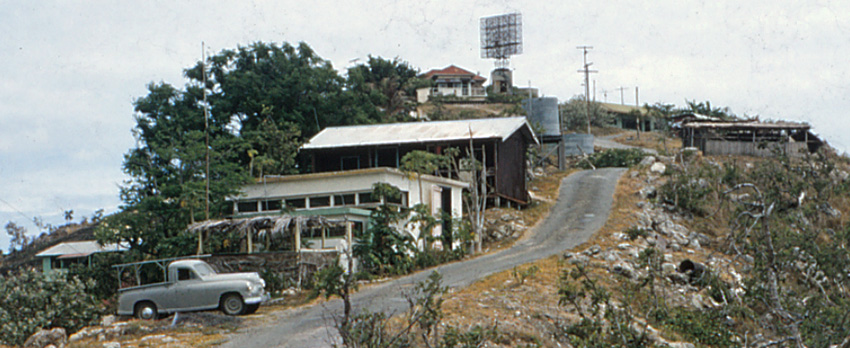
Travelling to the old wartime sites always attracts a curious crowd. Kell Nielsen on his GasGas Trial bike, August 2007. |
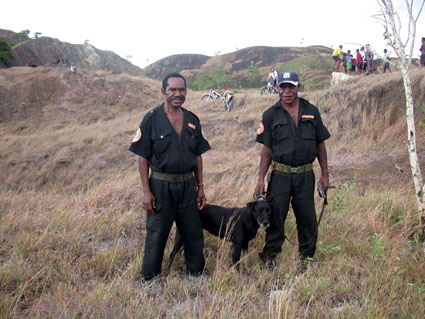
However, it is always wise to have some help. Our intrepid explorers felt safer when they were accompanied by guards with a dog. Kell Nielsen, 2007 |
WHAT THE JAPANESE KNEW BEFORE THE WAR
Japan's strategic planning of its war operations was based upon intelligence gathered by the armed services and their overseas agents over a considerable period of time preceding the outbreak of hostilities. When the Japanese forces struck on 8 December 1941, they possessed a fairly accurate knowledge of ground, air, and naval strength in the areas attacked, of the locations of airfields and fortifications, and of the terrain and climatic conditions under which they would have to fight. Detailed reports by military intelligence agents who toured the southern areas prior to the war were also in the hands of the Japanese Army planning staffs. One such report, made by Major Tetsuo Toyofuku on the basis of personal observation in March 1941, covered British New Guinea and was used as the basis of an intelligence study on this area compiled by the Japanese Army General Staff. The study known as "Military Data on British New Guinea" was reproduced by (Japanese) General Headquarters, Southern Army, in 1942 for use in the Papua and New Guinea operations. An extract from the Japanese study shows the assessment of Port Moresby's artillery defences was very accurate (see below). Their knowledge of naval defences was equally accurate and can be read on the Naval Defences webpage. For more on the role of the 53 Battalion at Port Moresby see 53 Battalion webpage.
| Military Preparations: Information obtained by observation of the actual
area follows: (a) Garrison Strength: Army: There is a barracks at Granville East (approximately 1 kilometer northeast of the city), which, judging from its size and the amount of equipment, can accommodate approximately 1,000 men. The present garrison appears to be composed wholly of infantry troops, without artillery. Others: A Royal Australian Artillery Detachment (2 Officers, 38 non-commissioned officers, and privates, who arrived with 6-inch guns) apparently is stationed on Ela Hill and will be reinforced, judging from the fact that the number of barracks on the hill is being increased. (b) Installations: A road for military use has been built to the top of Ela Hill, and two 6-inch guns are placed on top of this hill. The main line of fire of these guns apparently is directed toward Basilisk Passage. The guns are exposed on top of the hill. According to information, they will be increased by two more guns. In addition to the Kila Kila airfield, approximately 4 kilometers east of Port Moresby, an airfield for military use, approximately 11 kilometers from Port Moresby (location unknown), is expected to be constructed. A single road parallel to the coastal highway, and halfway up the hill of Tuaguba, is being constructed. |
Note: Paga Hill was also known as "Ela Hill" for some time.
PAGA HILL DEFENCES
 |
 |
Township of Port Moresby |
Close up of Paga Hill as it was in 1944 |
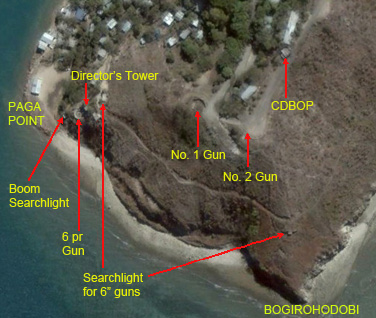
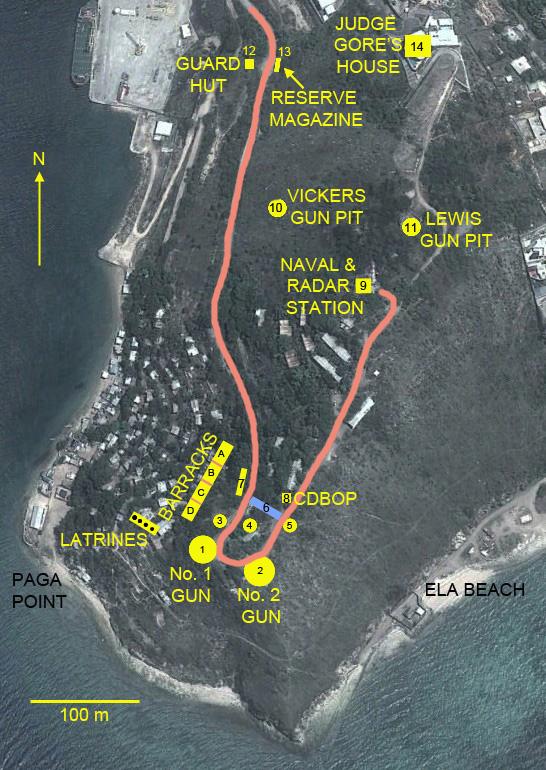
The location of the various elements that make up the Paga Hill defences are shown on the map above.
NO. |
DESCRIPTION |
#1 |
Water Tank |
#2 |
Boom Section - Searchlight (90 cm Mark V Coastal Artillery Searchlight) |
#3 |
Boom Section - Gun Emplacement (Twin 6 Pounder guns) |
#4 |
Boom Section - Director's Pedestal/Observation Tower |
#5 |
Paga Heavy Battery - Defence Electric Light, No. 1 (DEL) for 6" Guns |
#6 |
Paga Heavy Battery - Defence Electric Light, No. 2 (DEL) for 6" Guns |
#7 |
Paga Heavy Battery - No. 1 Gun (6-inch Mark XI) |
#8 |
Paga Heavy Battery - No. 2 Gun (6-inch Mark XI) |
#9 |
Paga Heavy Battery - Machine Gun Posts (Lewis & Vickers) |
#10 |
Paga Heavy Battery - Close Defence Battery Observation Post (CDBOP) |
#11 |
Paga Heavy Battery - Reserve Magazine |
#12 |
67th Anti-Aircraft Searchlight Company - Searchlight No. 1 (150 cm Sperry) - on top of CASL |
#13 |
67th Anti-Aircraft Searchlight Company - Searchlight No. 2 (150 cm Sperry) - on top of CASL |
#14 |
Royal Australian Navy - Naval RDF (Radar) and Loop Control Hut (for Indicator Loops) |
#15 |
Royal Australian Navy - Naval Power Hut (possibly) |
#16 |
Royal Australian Navy - Naval Workshop (possibly) |
#17 |
Allied Officers' Club - Ela Beach (formerly the Native Hospital) |
- |
32 Heavy Anti-Aircraft (Ack-Ack) Battery - Tubaguba Hill (Ack Ack Hill) |
PAGA - 13 HEAVY BATTERY - 6" GUNS
The first plans for Port Moresby's gun batteries were made in the end of the nineteenth century when many south pacific nations were in fear of the Russians raiding or invading their countries, however, no guns were installed at Port Moresby. As German militarism increased in Europe in the late 1930s, it was decided to bring the battery to readiness.
Defence plans for both Papua and the Mandated Territory had been in existence since the early 1930s, although little had been done to implement them. In 1937 the Resident Magistrates in Papua - responsible for the control of the administrative Divisions - were instructed to prepare secret registers of white British subjects and ex-members of the Armed Native Constabulary capable of rendering service in the defence of Papua.
With war in Europe a reality, the Defence Plan for Papua clearly had to be revised, and Major Kenneth Drummond Chalmers (Royal Australian Artillery) was given the responsibility for this task, in co-operation with the Lieutenant-Governor of Papua, Sir Hubert Murray. As it stood, the Defence Plan contemplated that in the event of invasion, the Administration would be transferred to the inland station of Kokoda, where non-combatants would also take refuge. Active guerrilla warfare against the invaders would then be carried out by the men of the Armed Constabulary.
On 14 March 1939 the Australian government decided to construct a heavy battery at Paga Hill as a matter of urgency. Major Chalmers arrived in Port Moresby with a subordinate officer and 38 men of 13th Heavy Battery of the Royal Australian Artillery, to assume the position of officer commanding Port Moresby harbour defences. A small team of engineers surveyed the Paga Hill site and on March 24 a detachment of 38 soldiers from the 13th Field Regiment arrived to install the two 6-inch Mark XI guns (#7, #8). These guns had a barrel length of 25 ft (7.6 m) and could fire a 100 pound (45 kg) shell of Lyddite (HE), armour-piercing or shrapnel a distance of 18,000 yards (16 km). This was suitable for defending against enemy ships coming through Basilisk Passage.
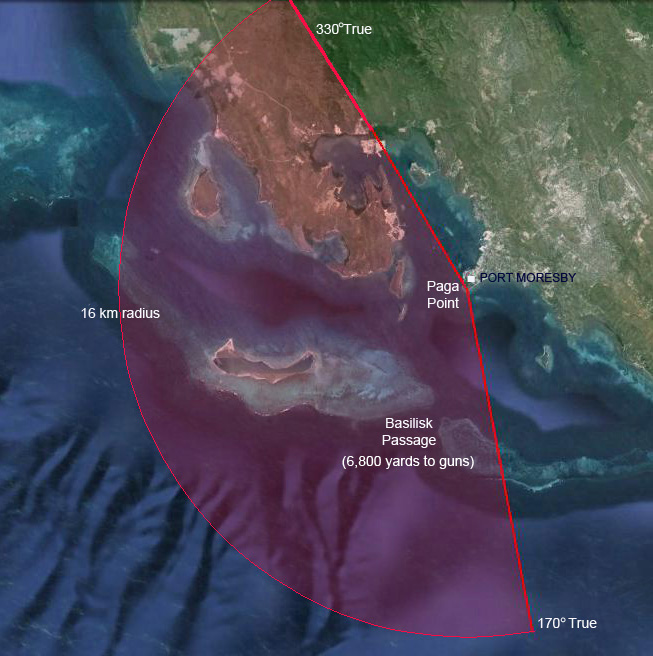 |
| The two 6" guns at Paga Point were aligned on a bearing of 105° True. The arc of the guns was for Gun 1: 355° through South to 135°; and Gun 2: 335° through S to 110°. These angles are relative to the Zero Line of the guns which was at 195° True - that is, at right angles to the gun line bearing. The True bearings of the gun arcs would then be for Gun 1: 190° True through South to 330° True; and Gun 2: 170° True through South to 305° True. The True bearings for the gun arcs are shown on the photo above. |
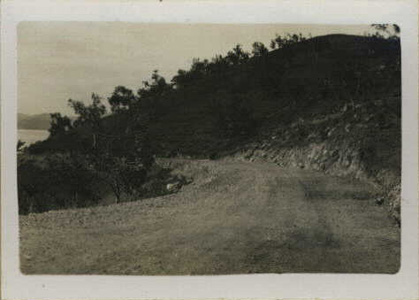
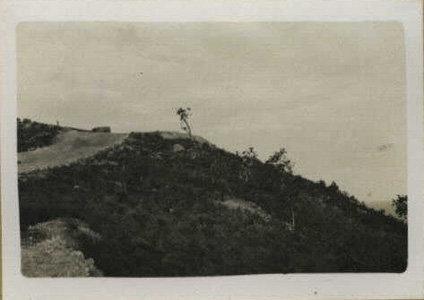
With the help of a team of 140 prisoners from Badili gaol they had completed a road from the town to the summit. They constructed an extension to the road (Chalmers Crescent) around Paga Hill and right up to the 110 metre high crest of the hill. A gun emplacement was built that commanded the approaches to Basilisk Passage, the main shipping route through the reef to Port Moresby harbour (see map below). On the 1st June 1939, the Australian Minister for Defence Brigadier Geoffrey Street announced pubicly that the two guns were ready for action. Further supplies were sent from Sydney aboard HMAS Swan on June 8 1939 for Port Moresby (and Darwin).
Major Eric Scriven (EGB
Scriven VX28449), Supervising Officer Fortifications (SOF) of the Australian
Army Staff Corps (AASC) was asked for a report on progress. He was in Port
Moresby from 28 July 1939 for four days and produced his report a week later.
The photos he took make interesting viewing. They are not available from the
Australian War Memorial but are tucked away in his report. Here are some of them with
his captions:
 |
 |
| "Paga Hill looking East". Major Scriven drew two arrows on the photo: the left one is "Battery Position" and the rightmost is "DEL position" (Defence Electric Lights, ie searchlight). He was referring to the 6" guns and the DEL for them (#5). The DEL had yet to be installed as none were available. | "Road to Battery". Major Scriven noted that the road was "well constructed" and of appropriate width. |
 |
 |
| "Ground behind No. 1 Gun". These were the temporary gun positions awaiting proper emplacements later. The DRF (Depression Range Finder) was on a pedestal in the open. | "No. 2 Gun from No. 1 Gun". Major Scriven noted that he could see no reason that the permanent emplacements should not be in the same position as the temporary positions. Gun 2 is at a slightly higher elevation (40 m) than Gun 1. |
 |
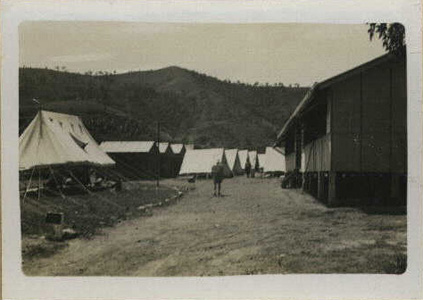 |
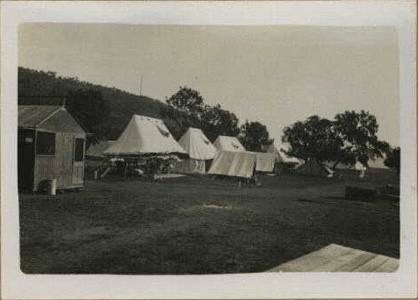
| "Konedobu Camp". Shown here is the temporary camp consisting the "Driller's Huts" (left) which accommodated the garrison (3 men per hut) and the tents used for the remaining soldiers and stores. | "Konedobu Camp" - temporary garrison camp with the tents on the left and the 70 ft x 30 ft hut used for the kitchen, dining and recreation. |
 |
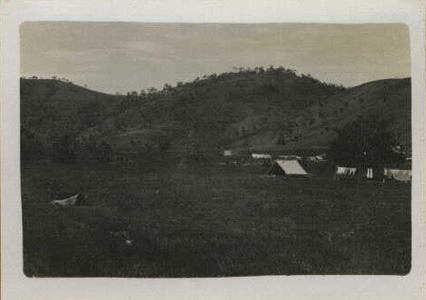 |
| "Konedobu Camp - Driller's Hut and Mess Hut". Major Scriven recommended that a new camp be set up on the golf links which was higher and drier. | "Looking East from the Camp Site". You can see how low and swampy this would become in the wet season. Major Scriven reported that if all men didn't get into huts before the next wet season there would be "grave medical problems". He noted that they would have to be shifted to the hotels but as they were full the huts were an absolute must. |
Major Chalmers had the Royal Papuan Constabulary (RPC) act as guards and sentries over the Paga battery, the magazines at Gabatu Island, and the wireless station, aerodrome, oil depots and defence headquarters. On 12 January, 1940, Major Chalmers wrote to Sir Hubert Murray asking for the services, for the duration of the war, of Leonard G. Logan, the Headquarters Officer of the Royal Papuan Constabulary, for the purpose of training the proposed Papuan military unit made up of volunteers from the RPC.
On 19 April, 1940, Logan was authorised to recruit for the Papuan Infantry Battalion, with a raising date of 1 June, 1940. Logan was appointed to full-time duty with the Australian Military Forces on 27 May, 1940.
Major Eric George Barnett Scriven was promoted to Lt Col on 1 July 1940. On 30 June 1941 he inspected the aerodrome and fixed defences at Koepang on Dutch Timor (now Kupang, at the southern end of West Timor) with the Dutch Territorial Commandant of Timor and Dependencies, Lt Col WEC Detiger of the Royal Netherlands Indies Army (KNIL). They were about 6 miles from the town of Loli (about 120 miles from Koepang) when the driver lost control of the car and it rolled down the side of the hill. Major Scriven died at the scene.
One major problem was the location of the Reserve Magazine for the storage of ammunition away from the Battery itself. In August 1939 the Reserve Battery was stored in the European Gaol on the island of Gabatu Motu Motu - about 3 km to the west - and in a temporary gaol on the mainland. Thus, a Reserve Magazine (#11) was built 300 m behind the main guns.
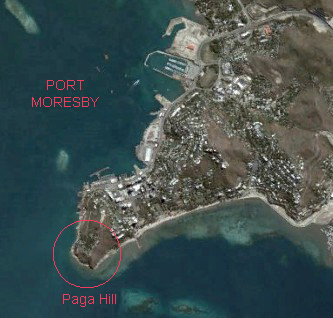
A 46 acre parcel of land (Por 82, District 8) was taken over as a defence reserve on 4 September 1939 and became known as the Royal Australian Artillery (RAA) Fortress Area. Click link in the caption below to see a larger image.
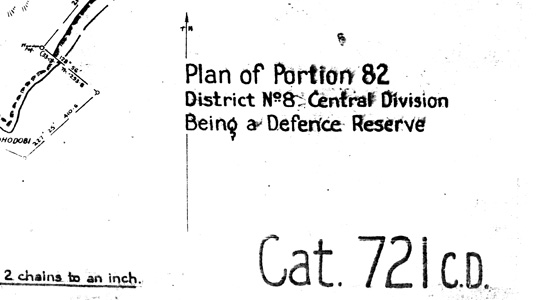 |
The survey for the resumption of the land was done by C. L. Schrader on 1 August 1939. [NAA MT1135/1, 37]. Click here to see or download full size images of this plan. |
On 20 October 1939 War Cabinet of the Australian Government telegrammed the Papua Administration requesting their view on the "adequacy or otherwise of the present defences of New Guinea on the basis of the existing war with Germany and Japan remaining neutral" [Item 56, Page 37]. It was acknowledged that defences needed improvement - and quickly.
The 6" Guns of Paga 13 Heavy Battery
The Paga Hill site was surveyed by W. E. Davidson in October 1939 and the permanent layout recommended: two 6" Mark XI Guns (former 9 ton Naval guns numbered 2201 and 2292) and magazines, gun floor shelters for both European and Native soldiers, and a DEL (Defence Electric Light, ie searchlight). To the rear (about 80 m away) were casualty rooms, workshop and store, a Close Defence Battery Observation Post (CDBOP) which also housed a Battery Plotting Room (BPR); and a shower and latrine block. War Cabinet (18 June 1940) asked if there was the possiblity of invasion of Australia by the Japanese and whether action should be taken to reinforce Port Moresby (and Darwin) [Minutes, p252]. A sum of £12000 was approved for construction of the battery (about A$1 million in 2013). The two guns were initially installed on temporary mountings in June 1939 but permanent mounts were recommended as a matter of urgency.
It was acknowledged that the Paga Battery could only fulfil a Close Defence role an close only the one entrance through the reef (Basilisk Passage). It could cover the channels at Clerke Patches and at Hardy Creek, but Liljeblad Passage, Padana Nahue, is out of reach.
PAGA HILL FORTIFICATIONS
One of the soldiers employed on the construction of the fortifications was Harold Jesser (QX53205). He had joined the CMF in April 1940 and was a Sergeant with the Fortress Engineers at Cowan Cowan on Moreton Island near Brisbane. Harold went to Port Moresby in May 1940 as a Corporal in the Royal Australian Engineers. Most of the labourers under him were Papuan Infantry Battalion (PIB) soldiers (see photo below). After the Paga Hill gun emplacements were built, Harold Jesser transferred into the PIB as a Lieutenant. His son Peter Jesser said that his father led a PIB patrol on the first wartime crossing of the Kokoda Trail: "Dad and the PIB actually put the wartime track on the map in January 1942. He won the first Military Cross to be awarded in PNG in WWII for his work behind the lines after the Japanese landings at Buna and Gona on 22-23 July 1942". Lt Harold Jesser fought on the Kokoda Trail until being wounded at Deniki on 9 August 1942. He rose to the rank of Major and stayed with the PIB until he was demobilised in 1946.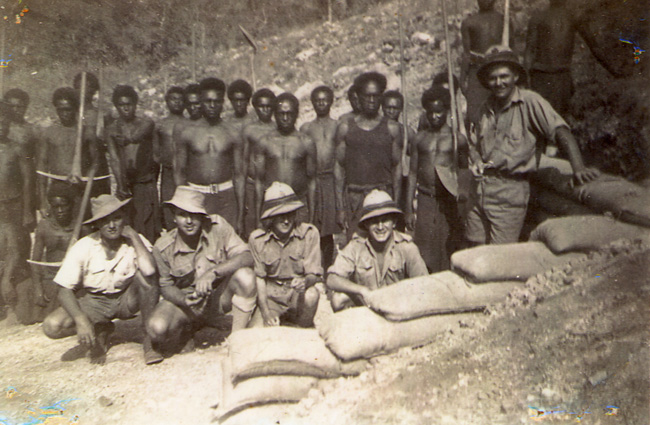 |
| Australian Army Engineers and Papuan Infantry Battalion (PIB) soldiers in Port Moresby. Harold Jesser is standing on right. (Peter Jesser) |
 |
Dragging one of the 6" guns on to temporary mounts - Paga Hill, 1939. The photo shows one of the guns on skids and rollers with Gemo Island in the background. These breech loading 6-inch Mk. XI coastal defence guns were built in about 1910 as a piece of the original HMAS Sydney's armament. Notice the police wearing pith helmets. They were most likely giving the gun transport truck an escort from the wharf to Paga Hill. SLQ184734 |
THE GUNS.
By November 1940 excavation for the No. 2 gun began; this gun is the higher of the two and was located at an elevation of 208 ft (63 m) above sea level. There was a problem getting a stone crusher to make the aggregate for the emplacement and long delays were experienced. By December 1940 the No. 2 Gun emplacement was complete, along with the Command Post (elevation 230 ft or 70 m, position 227.5 ° True) the BOP (195° True) and the European Gun Floor shelter. The No. 1 gun was kept ready for action (on temporary mounts) during this time and then by the start of 1941 it had been installed on permanent mounts at an elevation of 173 ft (53 m). The only problem that remained was the installation of the hydraulic hoists in each of the two the ammunition shelters. It was difficult to get the design and construction right so the army decided to make the hoists themselves. The hydraulic ammunition hoists were finally installed in early 1942 at a cost of £400 ($11,000 today).
 |
 |
The No. 1 Gun (#7) at Paga Battery (27 March 1944). There was a 3 foot high parapet wall under the opening and earth sloped away from the top of it. The entire emplacement was dug into the hill side to a depth of 15 ft at the rear. The mounting allowed all-round traverse, however, as can be seen, there is a 7 ft wide x 3 ft deep window which restricts this to the main defence area. AWM 071500 |
The No. 2 Gun (#8) on the same date. The arrangements were the same as for the No. 1 Gun. You can see the ammunition standing in front of the recesses. A hydraulic hoist was used to bring it from the underground shell-store and magazine. There was also an gun floor shelter to the rear (underground) for the watch on duty. A larger gun floor shelter for watches off-duty was behind the emplacement. Beside this was the artillery store, casualty room, oil store and engine room (in a row). AWM 071491 |
THE CLOSE DEFENCE BATTERY OBSERVATION POST (CDBOP) - also known as the Command Post (CP).
The CDBOP (#10) was was completed by March 1941 and was located 80 metres behind the two 6" guns so as to not block their field of view. The construction of the Command Post also hit a hurdle. Six-core communications cable was required but none was available as it was in short supply and being consigned elsewhere for higher priority defences. The only solution was to send 6000 ft of telephone cable and then disconnect all private phone in Port Moresby and connect all the cable together.
The CDBOP housed a number of facilities: In the Battery Observation Post (BOP) to the upper rear, a 9 ft Barr and Stroud Range Finder was installed and used until the designated Position Finder was available. The Royal Australian Navy's "Port War Signal Station" (PWSS) was incorporated into this room of the BOP. Underneath was a Battery Plotting Room (BPR) and to the front - and a foot lower down so as to not obscure the view from the BOP - a searchlight switch room (DEL Switchroom) for controlling the Heavy Battery's Searchlights. The battery first saw action in February 1942 with the start of Japanese air raids.
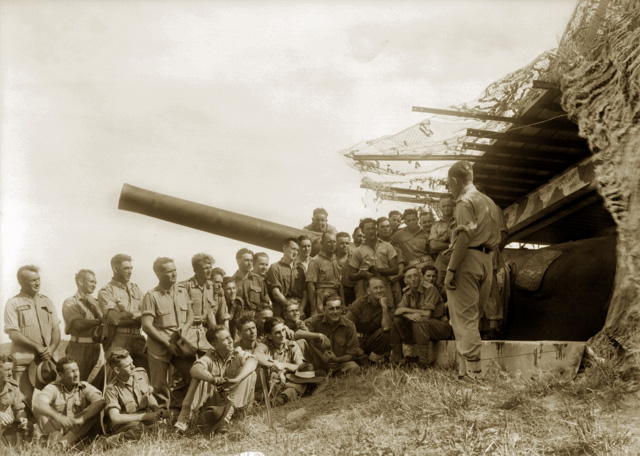
THE BATTERY LAYOUT
After the guns were placed on permanent mounts and the CDBOP constructed, building the rest of the battery got underway. With the first air-raid by the Japanese on 3 February 1942 the necessity for trenches was urgent. After they were dug, then came the gun pits and the barracks. By 1943 the battery was complete and the layout is shown below. There were still no searchlights and the Boom Section Gun Emplacement (the "Twin Six-Pounder Gun Emplacement" for covering the anti-submarine harbour boom net) had not begun.
 |
The 13 Heavy Battery (Paga Heavy Battery) at Paga Hill in 1943. |
 |
The tunnel (structure #6) off Chalmers Crescent just near the CDBOP [June 2014]. Up until late 2014 it provided a home for many locals. It was demolished as part of the redevelopment of Paga Hill. |
THE GUNNERS OF PAGA BATTERY - 1st DETATCHMENT
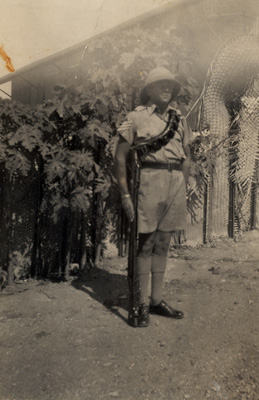
The first detatchment of gunners to man 13 Heavy Battery arrived in September 1940. One of these gunners was Gilmore Lucas [QX35759]. He recently responded to my request in Reveille [the official bi-monthly magazine of The Returned and Services League of Australia (RSL) - New South Wales Branch] for first-hand information about Paga Battery. From his home in Brisbane Gil provided detailed descriptions of his time at Paga, as well as Bootless Battery (more later), and at Forts Bribie, Cowan and Lytton. After the war he served with the army in Japan and Korea - and as Lt Col Lucas he was presented the Military Cross by the Queen in 1954 for gallantry and leadership as a rifle platoon commander during Operation Blaze in Korea (in July 1952).
GIL LUCAS'S WAR
Gilmore Lucas joined the militia in Victoria in 1937. In 1938 he applied for entry into the Permanent Force and was "attested" on 25 January 1939 at the age of 17¾ years. Gil began his training at Fort Lytton at the mouth of the Brisbane River and from there he was sent to complete his artillery training at Fort Cowan on Moreton Island and then to Fort Bribie on the northern tip of Bribie Island. In September 1940 he tried to enlist in the AIF for overseas service. Gil said "The rest of the men at Bribie all got into the AIF because they were old enough. I was too young. A very kindly old Major who ran the battery said 'Lucas, I will send you up to New Guinea; that's the best place for you at this stage. You can cool your heels there for a while'." The Major was Percy Dodgson - quite accustomed to the vagaries of appointments in the army. It was he, Dodgson, who after decades of illustrious service as an artilleryman with the Australian Army (including a stint in France in WW1) was retired in August 1939 as Commander Coast Defences, 1st Military District in Brisbane. He didn't complain as he knew he was nearing retirement - being 52 - with the retirement age of 55. The army had just reduced retirement age to 50 for Majors and Dodgson was out with three week's notice. It caused quite a sensation in Defence circles. So Dodgson was too old at 52 but once the war started he was called back into service (after 6 months retirement) as Commander Coastal Defences (CCD) Northern Command and Officer Commanding 8 Heavy Battery at Bribie Island. He stood down as CCD in July (replaced by Major John Whitelaw) but kept his Command of Fort Bribie. By the end of the year he was out again, given permanent leave from Christmas. So in September 1940 Gil Lucas took the wise counsel of Dodgson and was soon on his way to Port Moresby.
 |
 |
 |
Gil outside the shower huts at Konedobu Camp Port Moresby - 1940. The huts were an all-metal construction and were unlined and uninsulated. |
Gil - as Sergeant - 1941 - standing outside the Sergeant's Mess. Note the matting used for the fence. A wood fire was used to heat water. Natives were employed to do jobs - such as the washing which entailed bashing the wet clothes on the cement path. |
Gil - down at Ela Beach - 1940. This photo was taken by his mate Peter Bramley NX134423 - a Yorkshireman formerly of Darwin. |
Gil's story continues:
"A fellow named Watson and I headed back to Brisbane and caught a ship named Montoro at the Bulimba ferry terminal. It was owned by Burns Philip. We arrived in Moresby a few days later. Our camp was at Konedobu - in metal huts - over near the Golf Course and Government House. Up on Paga Hill there were just the two 6" guns as well as the Command Post right on the top of the hill. There was also a long hut built into a scarp cut into the side of the hill facing the harbour; it was for our accommodation - just below the guns. The guns were on temporary cruciform mountings - like they were at Bribie at the start. They had steel gun shields to protect the men but there was no concrete gun emplacement - that didn't come until much later. The guns were out in the open; no camouflage. There was a small magazine near the them. The ammunition was close enough so that it could be brought over as needed. |
 |
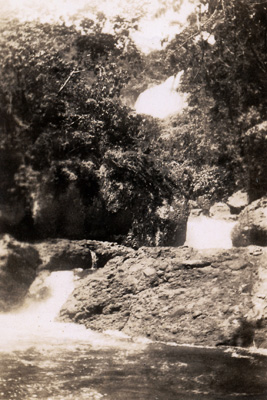 |
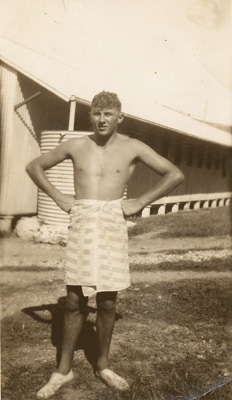
| Port Moresby 1940 from Paga Hill. Note the the white structure near the top of Tuaguba Hill. This was the town's water supply - made from sheets of galvanised iron nailed to a wooden frame. Later, a pumping station was built at Bomana. (Gil Lucas) | Rouna Falls - on the Laloki River in the hills behind Port Moresby - 1940. When they had time off, soldiers would often swim here. |
 |
 |
"European" Swimming Pool at Port Moresby - 1940. This shark-proof enclosure was built by the administration prior to WW2. It is located on the harbour between Port Moresby and Hanuabada. Soldiers, including Native Soldiers, would swim here when off-duty. The hut in the centre is the change-room. (Gil Lucas) |
Fire at the BNG (British New Guinea) Trading Company office and store in Port Moresby - 1940. Next door was the Steamships Trading Company. Gil Lucas said a lot of cheap liquor was available after the fire. |
 |
 |
"Christmas Eat" - Konedobu 1940. The locals would dress up for Christmas celebrations. Gil Lucas said "They celebrated it more than we did". |
"Big Christmas Eat" at Konedabu 1940. The men would dress up and perform ceremonial dances around Konedobu Camp and Hanuabada Village. |
 |
 |
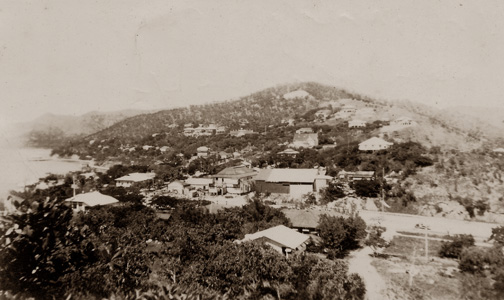
Konedobu Camp 1940. The mountain to the right is Tuaguba Hill on which the Ack-Ack Battery was stationed. Gil said the vegetation was sparse and dry here but 20 miles away it was thick rainforest. The houses to the left are those of the Administrator Hubert Murray. After Port Moresby was bombed for the second time on 5 February 1942, the Australian Cabinet decided that civil administration would end on 14 February 1942. The next day Murray vacated his house and left for Australia. |
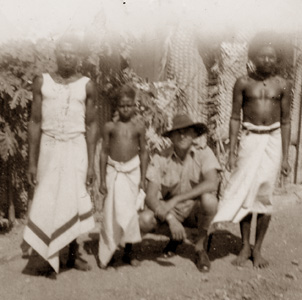
Gil and some Mero (boys). The little boy beside Gil was called "Mero Maragi" which is Motuan for "Little Boy". This young men worked in the Sergeants' Mess at Kondduba Camp - cleaning and serving. 1941 |
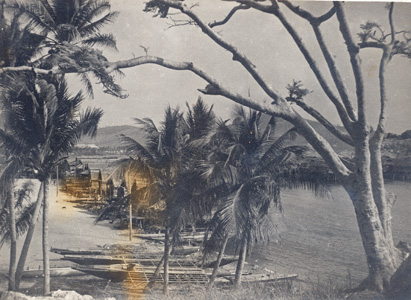 |
Hanuabada Village 1940. This was a postcard made by a local photographer in Port Moresby. Gil Lucas explained "It looks clean but it actually wasn't clean at all. All the waste was dropped into the sea". |
We take up Gil's story again when he was posted to Bootless Battery in 1944.
THE GUNNERS OF PAGA BATTERY - 2ND DETATCHMENT
The second detatchment of artillerymen for Paga Battery arrived aboard the Aquatania on 3 January 1942 and the first detatchment (see above) left the port on the same ship. The new arrivals stayed through until the next relief in September 1943. Their average age was 24 years; the oldest being Battery CO Major Albert Baker at 38 years, and the youngest was Gnr Len Taylor just 18. Their names are included in the list below. It was compiled with the assistance of Bob Gebhardt in 2014. He thinks he may have missed a few (well, he says 'I am 92'). If you can add some more names, make corrections or complete the names, please advise.
W/O |
Allen, John Robert Allen QX35050 | Gnr |
Kissick, Royal Edward | |
Major |
Baker, Albert (CO) QX35042 | Gnr |
Kunde, Robert Harrington | |
Gnr |
Ball, Leslie Maurice NX192411 | Gnr |
Laffey, Arthur James | |
Gnr |
Bingham, Eric John QX48830 | Gnr |
Lawless-Pyne, John William | |
Gnr |
Bulmer, John Malcolm Q89038 | Gnr |
McAndrew, Norman Henry | |
Gnr |
Busk, Allan Vincent QX42235 | Gnr |
McKenzie | |
Gnr |
Campbell | Gnr |
McLeod, Arthur | |
Sgt |
Carey, Cornelius (Con) | Gnr |
Meehan, John Francis | |
Gnr |
Chaikowski, Tom | Lt |
Mills, Samuel Walter (Sam) | |
Gnr |
Comerford, Alan James | Gnr |
Miscamble, Arthur Ernest | |
Gnr |
Crowther, Arthur Albin | Lt |
Neal, Raymond Eddy | |
Gnr |
Davis, James Charles (Jim) | Gnr |
Nitschke, Graham Roy | |
Gnr |
Duggan, William Henry | Gnr |
O'Connor, Ernest Michael (Ernie) | |
Gnr |
Dwyer, Robert | Gnr |
O'Connor, Thomas Patrick (Tom) |
|
Gnr |
Ezzy, Arthur John | Gnr |
Parry, Kenneth Davidson | |
Gnr |
Felsman, Leslie Clive (Les) | Gnr |
Payne | |
Gnr |
Fogg, Dudley Alexander | Sgt |
Prentice, Garth | |
Gnr |
Frame, William Robert | Gnr |
Roser, Norman | |
Lt |
Gauvin, Lewis Henry (Harold) | Gnr |
Seibright, George Raymond | |
Gnr |
Gebhardt, Robert Frederick (Bob) | Gnr |
Smith, Jack | |
Gnr |
Gellatly, James (Jim) | L/Bdr |
Steele, John Henry | |
Capt/MO |
Grimmett, Lansell Leonard (Lance) | Gnr |
Stockill, Harold Vincent | |
Gnr |
Guley, Colin William | Gnr |
Taber, Stanley Albert | |
Gnr |
Haack, Frederick | Gnr |
Taylor, Leonard Charles (Len) | |
Sgt |
Hines, John Robert (Bob) | Gnr |
Tripcony, Herbert Henry | |
Bdr |
Hosking, Allan Victor | Gnr |
Turner, Stanley Anthony | |
Bdr |
Johnson, Leslie Francis (Les) | Gnr |
Weir, William Alexander (Bill) | |
Sgt |
Kennedy, Jack (Cook Sgt) | Sgt |
Wilkins, Thomas John (Tom) | |
Gnr |
Kirwin, Anthony Thomas (Tony) | Gnr |
Wright, Allan Kitchener |
 |
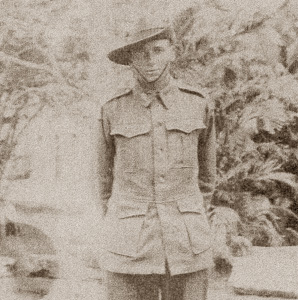
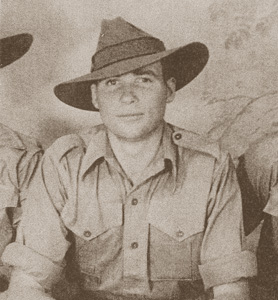
Gunner Arthur James Laffey QX4200 from Pomona, Queensland, taken in about October 1943. Arthur would always talk about his patrols into the jungle on the southern end of the track and being in contact with Japanese snipers in the trees. This leads us to think he must of been attached to the 53rd Battalion or even with the Ack Ack Bty who had gunners patrol partly into the track. Photo courtesy of his great grand-daughter Matilda Law. |
Gnr Arthur James Laffey taken in his 'ceremonials' at his sister's home in Gympie just before he left for Papua-New Guinea - September 1943. After the war he married his wife Beryl and they settled in Kenilworth, Queensland. He worked on the family farm prior to joining the Army and continued farm work post Army. (Matilda Law) |
Gnr Arthur James Laffey (seated) with others most likely from Paga Heavy Battery - about October 1943. Everyday they used to joke about the Japanese coming and when the Japanese actually came for the first time no one believed it and thought it was a joke. (Matilda Law) |
BOB GEBHARDT'S WAR
One of the Paga Gunners was Bob Gebhardt as mentioned above. In a series of interviews with me he reminisced on his time there. He gives us an insight into life at the Battery in 1942 and 1943 and also describes his decision to join the army in 1941.
| At the beginning of October 1941, I decided to change direction in my working life. When my last mob of cattle was delivered to Winton Saleyards, I sold my horses and equipment, caught a train to Brisbane to enlist in the Army. My new adventure had begun. I had never been on a train, never been in a big city and never seen the sea. So it was all going to be very interesting for me. As we approached the Queensland coast I couldn't believe how green it was compared to the dry, brown outback. I was up at daylight the next morning waiting to catch a glimpse of the ocean at Gladstone. It was the biggest waterhole I had ever seen. I had always been able to see the other side of the waterholes in the bush. I arrived at Roma Street station in Brisbane still a civilian and had been told by the Winton Doctor to stay at the People's Palace. |
Bob described how he was ripped off by a cabbie and then written up in the Courier Mail as a wide-eyed bushie off to fight Hitler.
The transcript of his first evening
in Brisbane can be found here.
"The next morning I reported to the Army at the Exhibition ground and was given another medical. There were a lot of us lined up and the officer in charge was taking down all our particulars, such as age, next of kin etc., and when it came to religious denomination, the bloke in front of me said "Aw, I'm not too fussy about that sort of thing, just put me down for whatever you're short of". Later that day some of us were called before the Orderly Officer, who said "Some of you blokes have given me your age as 21. We have to be sure of that before we can send you overseas; but don't worry, if you are not 21, you can still go as long as you have your parent's consent". He then looked straight at me and said "I believed you at the time, but we have telegrammed your father in Broken Hill and he has replied 'definitely not, he's only 19'." "It was a blessing in disguise because that day they were drafting reinforcements for the 8th Division in Singapore which was captured some months later by the Japanese. So I owed my dad one for that. I was in a bit of a quandary now, I had sold my horses and equipment, I had travelled 1400 km and didn't want to go back to the bush. So the officer said "tell me where you are staying and I will try and work something out for you". I went back to the People's Palace and told them I had been knocked back by the Army. They were ecstatic and said "Good, you can now join our Army". They offered me a job driving the lift." "Could you imagine me in a cage all day inside a building with no sunlight or fresh air after being out in the wide open spaces? I thanked them but held off. I may have needed the job in an emergency. There's an old saying "Don't throw out the dirty water until you've got the clean". Later that day a call came through from the Army Officer to report back to the Exhibition ground. He said they could place me in the Militia for 90 day training without my parent's consent and they would review my position after that. I was then given a regimental number and taken by Army truck to Fort Lytton, on the Brisbane river, where I became a Gunner in the Royal Australian Artillery. I was issued with more clothes than I had ever owned, such as singlets, socks and underpants, which we never wore in the bush, and a sewing kit called "Housewife, 1, troops for the use of", in Army language. The hat was so big I had to stuff a folded newspaper inside the sweat band to stop it falling down over my ears." |
 |
 |
Bob Gebhardt - one uniform for leave... |
... and one for work. |
| "We had two uniforms, one for leave and ceremonial parades and the other for work, called Fatigues. It consisted of an ill-fitting khaki jacket and pants and a floppy cloth hat, every time we wore the hat our mates giggled at us, so it was christened a "Giggle hat". The volunteer ladies at the community centres did a great job trying to make our uniform fit when we were on leave. I was only 10 stone and with a height of 5ft 11 in., looked like a scarecrow in uniform. When we got our hobnail boots a Sergeant took us to the nearest tap, where we filled them with water. He then took us on route march and by the time we got back the boots fitted our feet, it's a good trick. We were issued with an oversized hessian bag called a "palisade" which we filled with straw and used as a mattress on the duck boards in our tent. The city blokes that I was sharing the tent with were moaning about not having a proper bed and mattress. I thought it was a luxury after sleeping on the hard ground in my skinny swag, I said "you blokes don't know when you're well off". They looked at me and said "Where did you come from?" The .303 rifle and ammunition we trained with were relics from the first world war. Some of the bullets exploded and some were duds. When I pulled the trigger for the first time, there was a tremendous noise in my ears and a kick to my shoulder like a mule." |
"I couldn't understand why we needed something so loud and heavy. In the bush, all we carried was a point 22 rifle; it was light, quiet and very accurate and could kill anything from a rabbit to a bullock. When we got to New Guinea we discovered that the Japanese rifle was also only a point 22. After six weeks of intensive training we boarded the Katoomba and sailed to New Guinea. As we walked up the gangway we were given a pocket bible and a navel orange by the Red Cross and three identity discs by the Army with the instructions to tie one around your left leg, one around your right arm and the other one around your neck. In the event of being torpedoed at sea, they would be able to identify the bits. After a few days at sea I had time to reflect on what was happening. The amazing thing was that most of the loudmouths and brave-hearts that I had enlisted with were missing. They were not on board. They had dodged the draft by finding some excuse to stay at home. We landed at Port Moresby on the 7th December - the day that the Japanese bombed Pearl Harbor." |
A good description of the entrance comes from Bill Morphett who recalled sailing into Port Moresby Harbour aboard the Aquitania on 3rd January with 4500 troops of 30 Infantry Brigade AIF (mostly 39, 49 and 53 Battalions) including the 23 Heavy A/A Battery. They were a part of a convoy that also included two merchant ships, and the escort ships HMAS Perth, Canberra, Australia and Achilles. Bill wrote:
| The most prominent land marks were the Owen Stanley Ranges in the distance with peaks above the clouds, green hills up to 900 feet, flanking the Harbour, and the Hanuabada native village. Passing through the Coral Reef the first hill to port side was Paga Paga. This salient had heavy naval guns embedded there, pointing in the direction of the Coral Reef entrance. The second hill was cone shaped. No defence systems guarded Moresby apart from the fixed naval guns. |
Bob Gebhardt continues:
| "We were marched ashore in full battle dress and paraded up the main street of Moresby with the local Papuans lining both sides of the road. The young women wore only grass skirts, and our blokes couldn't take their eyes off them. Our Sergeant-in charge kept yelling "Eyes front - keep your eyes to the front". He marched us right through the town and halted us in front of the "Infectious Diseases Hospital" and warned us of the consequences of native co-habitation. One look at the leprosy and various skin diseases was enough for us. We never gave it another thought. The civilian population were evacuated back to Australia on that same ship." |
LIFE AT PAGA BATTERY
| [Bob continues] "Our New Guinea force consisted of two separate units. One to defend Pt. Moresby and the other to go on to Rabaul and reinforce the heavy battery there. But the Japanese beat us to it capturing it and slaughtering most of the people. The remainder of the people were shipped back to Japan to work for them, their ship was torpedoed by a U.S. submarine and all lives were lost. Meanwhile back in Moresby, we were frantically digging gun pits and slit trenches. We filled thousands of sandbags, almost digging up nearby Ela Beach. We even dug a tunnel right through Paga Hill to use as an emergency casualty station and store room." |
Bob said that the ground was so hard - like glass - and was impossible to dig. They tried to dig gun pits for the anti-aircraft guns at Paga Hill but couldn't get down very far. He said that's why they used so many sandbags - to get a decent height around the gun pits. The rocky soils of the coastal hill zone around Port Moresby frustrated everyone who had to dig holes - for gun pits, to level off for gun emplacements, for tunnels and latrines and garbage pits. It is a whitish glassy rock known as cherty limestone and produces almost no soil. What soil is there is just loose altered rock that lies on the hill slopes. It is fine-grained and thus impermeable (but there are narrow bands of fertile sloping alluvial soils between the hills that the locals use for their gardens). Paga Hill is this fairly bare of vegetation but has a semi-deciduous thicket of plants: the main ones being straggly 'gyrocarpus' (commonly known as 'shitwood', 'stinkwood' or 'twirly-whirly tree'), some tulipwood and a little rose myrtle; not much in the way of cover for the wartime emplacements at Paga.
Tokyo Rose called us "The Moresby Mice". We didn't have long to wait, the Jap bombers came from the newly acquired airfield at Rabaul, which was now just up the coast from us. My position at the time was aircraft spotter and gun crew and on one raid I counted 100 bombers escorted by 20 fighters. Their main targets were the wharf, power station and our installations. They had control of the air at that stage and we could do very little to stop the destruction. But it wasn't all bad, when their bombs split open the warehouses and stores, all the Xmas goodies that were in stock for the civilian population were there for the taking. We helped ourselves to frozen pigs, turkeys, ham, puddings and grog and carted it all back to our camp. Some of the blokes overindulged on the grog and were unable to carry out their duties. Our Commanding Officer [Major Albert Baker] ordered a tent inspection to get rid of it. His Batman, who was also in on the grog, warned us, so we got all the bottles from under the duck boards and hid them in the long grass around our tent lines. The next morning the C.O. did an inspection and found nothing. He then walked out to the long grass and waving his swagger stick around said to the Orderly Officer "I want all this grass burned from around the camp, in case we may get an incendiary bomb in it; burn all the grass now". We lit the grass and bottles of spirits were exploding everywhere. The C.O. watched it for a moment, then walked off with a smirk on his face. My mate said to me "I wonder how he knew"? I said "that's why he's a Colonel and we are only Gunners". The Japanese capture of Port Moresby was scheduled for the 12th of May 1942, my 20th birthday. Their invasion force started out from Rabaul but was turned back by the joint efforts of the Australian and American airforce. |
| The turning point for Australia was the Battle of the Coral Sea. Our General Blamey arrived from his headquarters in Melbourne. We stood on parade in the sweltering sun, in full uniform, blokes were falling over from malaria and dysentry. As he walked along our ranks he commented on how well we looked and told us we could now change over from the Militia to the AIF. Everything changed for the better when the Americans arrived with their never-ending supplies of men and equipment. They even had ice cream making and doughnut machines. It was a big event to be invited to their camp for a meal. They were very generous people. The Negro soldiers were used mainly for unloading ships and driving their trucks. The wharf in Moresby was a prime target for the Jap bombers. One day the air raid alarm sounded as they were unloading one of their giant Liberty ships. The gangway to the wharf was crammed with blokes trying to run ashore, so this bloke grabbed a rope that was hanging over the side of the ship to lower himself down to the wharf but it wasn't tied to anything and he went crashing down, he hit the wharf and bounced to his feet like a rubber ball and took off for the slit trench. He said to me "Ah didn't know where ah was goin' but I was goin' mighty fast". Another bloke was yelling as he was running for the slit trench, ' "Lordy-lordy, grease these here legs so it can keep up with this here body". Their truck drivers leapt out of their loaded trucks leaving them in the middle of the road, an easy target for the Japs. Our truck drivers were taught to disperse, get them off the road, wherever possible. When asked about this, the American Negro said "Uncle Sam's got plenty of trucks, but there's only one me." After nearly two years in New Guinea we returned home on the Canberra. It was 7th September 1943". |
THE 3RD DETATCHMENT - SEPTEMBER 1943 TO JULY 1944
The second detatchment (above) generally departed Port Moresby aboard HMAS Canberra on 7 September 1943 for Sydney where they would man the Coastal Artillery at the various batteries around the harbour entrance. The Canberra returned to Townsville laden with the second detatchment of gunners who had been manning Sydney defences. HMAS Canberra departed Townsville on 25 October for Port Moresby. The two photos below were taken on 6 June 1944 prior to the closure of the battery.
 |
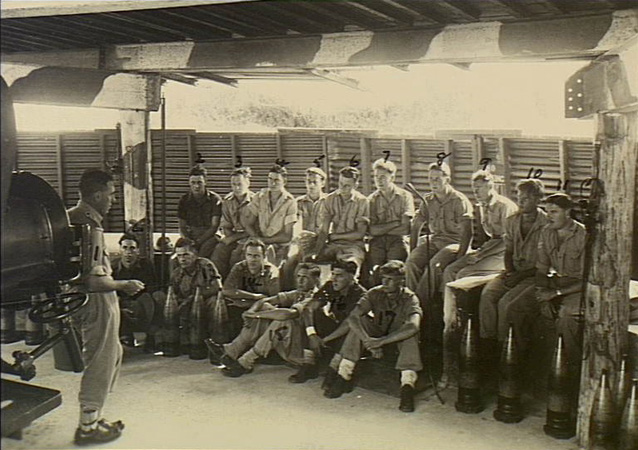
| The exterior of the gun pit where Chaplain F. M. Hill, of St John's Church of England, holds a Padre's Hour for members of the Paga Battery. Names are shown below. AWM 100500. (David Eastman, 6 June 1944) |
| Far Right: NX146117 Chap. Hill (1) | NX173119 Gnr J. Cooper (12) | VX140829 Gnr S. M. Dell (23) |
| Standing (L to R): | NX169570 Gnr R. E. Jones (13) | NX103474 Gnr M. J. Moore (24) |
| NX117694 Gnr S. Merchant (2) | N180911 Gnr N. J. Etienne (14) | BX116588 Sgt A. N. Swan (25) |
| NX149300 Gnr J. Tait (3) | V166833 Gnr F. W. Moore (15) | NX122693 Gnr R. J. Hartnett (26) |
| NX148234 Gnr T. Drayton (4) | NX117114 Gnr C. L. Sutcliffe (16) | NX109421 Bdr S. J. Carroll (27) |
| NX116394 Gnr T. W. Horton (5) | V150329 Gnr J. P. Bickerton (17) | N176998 L/Bdr C. E. Conn (28) |
| N180934 Gnr A. J. Pickering (6) | N303526 Gnr N. W. Whitfield (18) | N257425 Bdr G. A. Robinson (29) |
| NX106885 Bdr J. H. Richards (7) | VX100997 Gnr R. W. Burkitt (19) | NX114738 Lt R. G. Smith (30) |
| NX165845 Gnr B. J. Watt (8) | NX124690 Gnr H. N. Pickette (20) | VX100998 Sgt N. F. Dennett (31) |
| VX101003 Gnr K. J. C. Lowther (9) | NX108655 Gnr T. W. Heriot (21) | VX110454 Gnr R. S. Haddon (32) |
| NX109427 Gnr N. E. Buckland (10) | Sitting (L to R): | VX110583 Gnr A. W. Barnes (33) |
| NX129975 Gnr A. S. King (11) | NX166175 Bdr F. A. Hamilton (22) | NX140578 Sgt A. J. MacGillivray (34) |
 |
| The interior of the gun pit where Chaplain F. M. Hill, of St John's Church of England, holds a Padre's Hour for members of the Paga Battery. Left to right: Back row: NX143963 Gnr J. R. Wood; V230149 Gnr J. G. Branson; NI07186 Gnr McPherson; TX3232 Gnr C. Rowlands; NX172046 Bombardier F. J. Fay; VX86192 Gnr M. H. Boughton; TX15456 Gnr M. T. Rowlands; NX105913 Gnr F. L. Burgess; NX177633 Bdr K. A. Baker; NX19600 Sgt J. G. Medwin. Front sitting: NX117114 Gnr C. L. Sutcliffe; NX115464 Gnr K. G. McLean; V150329 Gnr J. P. Bickerton; NXI09427 Gnr N. E. Buckland; NX165125 Gnr J. G. Cooper; VX101003 Gnr K. J. C. Lowther. Front standing: NX146117 Chaplain F. M. Hill. AWM 100501 ( (David Eastman) |
THOMAS FREDERICK CREWE
 |
 |
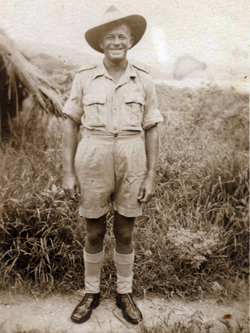
Bombardier Thomas Frederick Crewe, QX36674 |
|
Thomas Frederick Crewe enlisted as a Gunner at Townsville on 1 August 1941 and then served at the Kissing Point Battery in Townsville before being sent to New Guinea on 3 October 1942 as an acting Bombardier at the Paga Battery. He transferred to "R" Heavy Battery at Boera on 31 December 1943 before being repatriated to the Cape Pallarenda Battery on 11 April 1944, and was finally discharged at Townsville on 31 October 1945.
 |
 |
 |
| These photos of Thomas Frederick Crewe were taken during his posting to Paga Battery.He was posted to Paga Battery on 7 October 1942 until his transfer to "R" Australian Heavy Battery at Boera Head west of Port Moresby on 31 December 1943. He departed Port Moresby for Australia with the others from "R" Battery on 7 April 1944. My thanks to his son Paul Crewe for these photos and captions. | ||
Paga Battery was closed down in July 1944. The gunners (generally) embarked Port Moresby on 1 July 1944 per Boschfontein for Brisbane arriving 5 July. Many of the men joined the mobile "Letter" Batteries until war's end. For example, Gnr Norm Buckland was placed with "O" Heavy Battery and finally discharged on 9 May 1946.
THE SEARCHLIGHTS.
Two searchlights and two engines and generators were despatched on 27 September 1939 ex Sydney and arrived on 3 October 1939. Temporary engine rooms and emplacements were built and used until permanent arrangements could be made [MP 729/6]. These and the engine room to power them were built at a cost of £2000 ($133,000 today). It is not certain when and if these were ever finalised.
PAGA HEAVY BATTERY TODAY
POST WAR DEVELOPMENTS
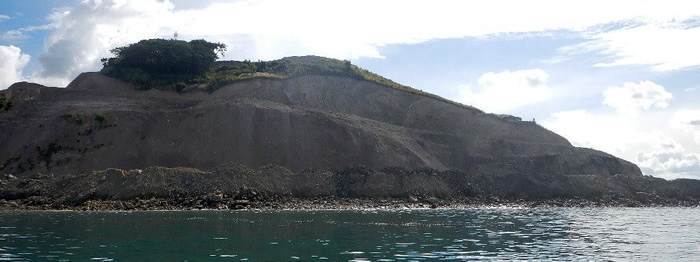
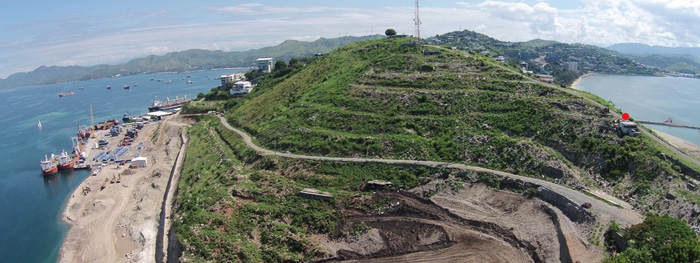
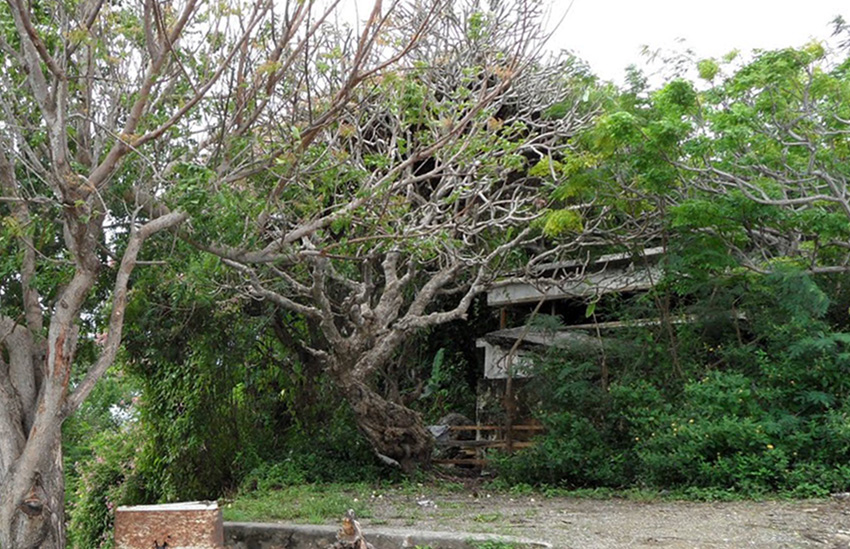
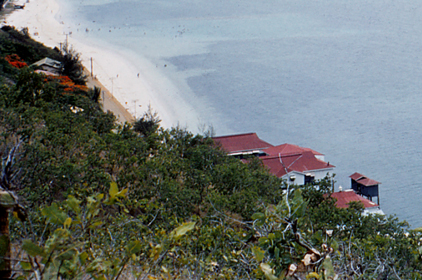
After the war, the Battery was decommissioned (in 1946), and the guns removed. The concrete structures of the battery and bunkers still remain as of February 2014, particularly the 6 pr Gun Emplacement and Director's Tower. Approval for a complete residential and commercial redevelopment of the site has been given. Work has already begun on this Paga Hill Estate and it is expected to be ready for the upcoming 2015 'Pacific Games' and completely finished for the 2018 'APEC' meeting in Port Moresby. You can read a newspaper article from The National (Jan 2014) written by Stanley Liria (a developer's representative) about the eviction of squatters being sanctioned by the National Court. If you plan to see any of the WWII structures you'll need to be quick - although more recent comments (March 2014) suggest that some of the wartime structures may be preserved.
 |
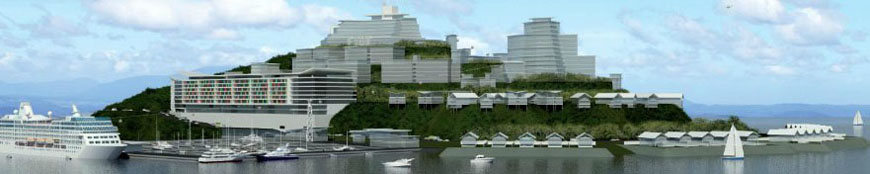 |
What the Paga Hill Development will look like. The top photo shows Paga Hill in 2007 (Kell Nielsen). The bottom is an artist's impression of the development as it will appear in 2018 - taken from the developer's website. |
Extract from the website of the Paga Hill Development Company (PHDC) PNG Limited (accessed 22 Sept 2015):
Today, remnants of concrete bunkers and batteries can be found dotted around the site. However, occupied as dwellings by the informal settlement, as well as having had no upkeep by local authorities, they have unfortunately experienced significant deterioration. As initially proposed back in 1996, PHDC is committed restoring these relics where possible, incorporating the attractions as part of public open space, public walkways and cultural centre precinct. |
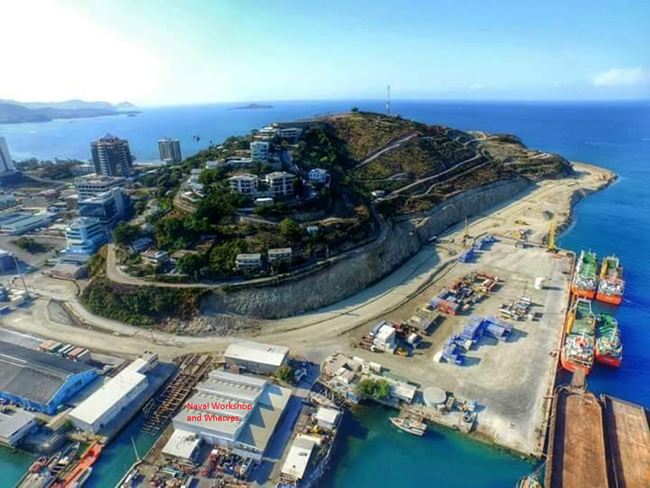 |
| Paga Hill - 2015. The HMAS Basilisk Naval Workshop and wharf is at the bottom centre. A photo of the workshop in 1944 is shown below. Kell Nielsen |
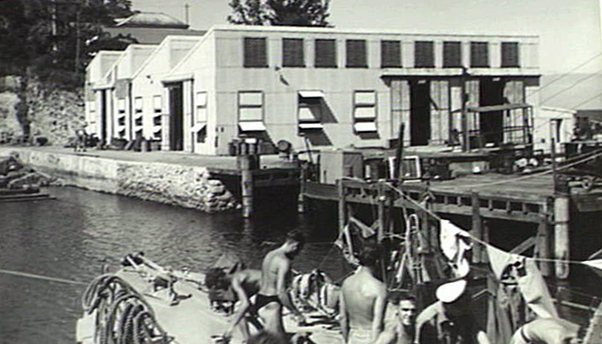 |
HMAS Basilisk Naval Workshop and wharf - 28 July 1944. AWM 074848 |
 |
Paga Hill in early 2015. Kell Nielsen |
 |
| Paga Hill - 12 April 2015. The antenna is just visible above the clump of trees. Photo courtesy of Peter John Tate. For Peter's comments on the development go to www.panoramio.com/photo/118603931 |
 |
| Paga Hill - 12 April 2015. The Photo courtesy of Peter John Tate. For Peter's comments on the development go to www.panoramio.com/photo/118603932 |
 |
| Paga Hill - 12 April 2015. The Boom Section Gun Emplacement and Observation Post is shown with the red dot. Photo courtesy of Peter John Tate. www.panoramio.com/photo/118603933 |
 |
| Paga Hill - 12 April 2015. There used to be a searchlight bunker where the red dot is. Photo courtesy of Peter John Tate. www.panoramio.com/photo/118603928 |
 |
| Paga Hill 2015. Photo supplied by Erscon - the engineering, development and management consultancy for the Paga Hill project. The Close Defence Battery Observation Post (CD-BOP) is shown by the red dot on the right. It was still there when this photo was taken. |
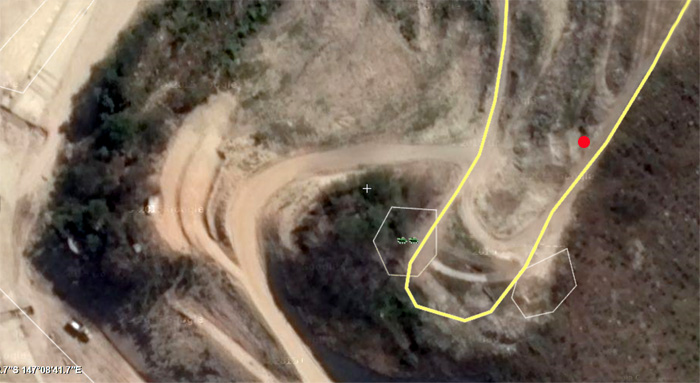 |
| What has happened to the CD-BOP? Kell Nielsen found this close-up of Paga Hill in a Wikimapia satellite search on 26 September 2015. It looks like CD-BOP has been removed (unless they camouflaged it - but this seems unlikely). It is definitely not in the satellite caption. |
 |
 |
| 0516 (Kell Nielsen) | 0520 (Kell Nielsen) |
 |
| 0515. Close up of the Boom Section Gun Emplacement and Observation Post. |
THE 6" GUN EMPLACEMENTS: ELEMENTS 7 & 8
 |
Element #7 - the No. 1 gun emplacement - is a large concrete structure overlooking the south eastern entrance to Port Moresby harbour. It is 18m in diameter and excavated into the hillside at an elevation of about 53 m. There are vertical concrete walls about 2-4 m high to the rear. The No. 2 gun was located about 30-40 m to the east - and at a slightly higher elevation (about 63 m). (Photo by Jon Sterenberg, AHMS, 2013) |
 |
Element #7. There are eight ammunition storage areas surrounding the No 1 gun platform but are partially demolished as the photo shows. They are about 1.5 m wide, 1.0 m deep and 0.40m high. (Jon Sterenberg, AHMS, 2013) |
The No. 2 gun emplacement (#8) has been completely removed.
THE CLOSE DEFENCE BATTERY OBSERVATION POST (CDBOP): ELEMENT 10
The CDBOP (#10) was located 80 metres behind the two 6" guns so as to not block their field of view. It is still there today although overgrown but habitable. It is a two story structure built in about June 1940 from drawings made up on 21 December 1939 and is sited to face 227.5° True. The upper level contained the Battery Observation Post (BOP) with a 9 foot Barr & Stroud Range Finder (and later Depression Range Finders on instrument pillars), and the lower level at the rear a Battery Plotting Room (BPR) with a 5' x 3' 6" plotting table. Off to the front and down about 30 cm was the the DEL Switch Room (for the Searchlights) and two RDFs (Radio Direction Finders, ie Radar). CSIRO were engaged in July 1941 to supervise the layout and installation of the RDF and radio equipment [NAA B6591] which was installed in a concrete hut 50 m away at the top of the hill. A shower/latrine block was nearby, as well as a workshop and store.
 |
| The "CDBOP" (#10) Command Post was located about 80 m behind the No. 2 gun (in a northerly direction along Chalmers Crescent). It is the white building in the middle with a flat room; and the blue room off the front (just behind the Hillman Mk VIII ute). You can make out the 7 ft x 3 ft steel blast door facing the road. The RDF (Radio Direction Finding or Radar) antenna has unimpeded view over a wide area. It is belived to have been a US Army Radar unit RS412 with a 104 mile radius. There is also a RDF Engine Room about 50 yds down the road but hidden from view. This photo was taken in 1956 by Robert Walding (Kodachrome Transparency). |
 |
Element #10 - the "CDBOP" today. (Peter J. Tate - 18 June 2011) |
 |
 |
| The DEL (Searchlight) switch room of the CDBOP (#10). It is to the front and lower down. Note the steel door. It is now used as a home and a pergola has since been added to the front. (Peter J. Tate - 18 June 2011) | The Command Post part of the CDBOP (#10). It was about 20 cm higher than the DEL room to maintain a good view over the harbour and passage. Note Gemo Island in the background. (Peter J. Tate - 18 June 2011) |
SEARCH LIGHTS: ELEMENTS 5 & 6
Two Defence Electric Lights (DEL) or searchlights were built to support the Heavy Battery. One was built just below the No. 1 gun and the other was constructed around on Bogirohodobi Point about half-way up Paga Hill.
 |
 |
| The searchlight bunker at Bogirohodobi Point. The two pipes in the water at the base may have been the tether for the anti-submarine boom nets. (Jason Pini) | Close-up of the searchlight bunker as it is today. (Jason Pini) |
THE RESERVE MAGAZINE: ELEMENT 10
A Reserve Magazine was built 300 yards to the rear of the guns. It had the capacity to store 1000 rounds.
 |
The Reserve Magazine (#10) is along Chalmers Crescent looking back up to the top of Paga Hill. The walls are of 30 cm thick concrete. Note the crennulations on the top. (Matthew Kelly, AHMS, 2013) |
 |
 |
Looking into the Reserve Magazine (#10) - March 2013. (John P. Jewell OAM) |
Unidentified World War 2 remains nearby on Paga Hill - March 2013. (John P. Jewell) |
THE BOOM SECTION
The Boom Section defences were located down the hill from the 6" guns of the Heavy Battery. Whereas the Heavy Battery's role was to defend the harbour against ships and sumarines entering through Basilisk Passage (about 16 km to the south) the Boom Section had to defend the the Anti-submarine boom nets that strung aross the water from Paga Point to Gemo Island on the other side of the harbour's entrance. To do this they needed lighter guns of shorter range.
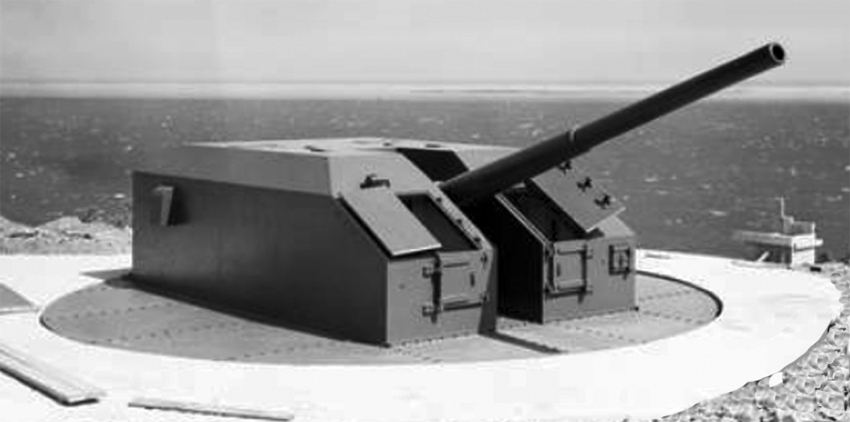
On 13 October 1941 twin 6-Pr 10 cwt guns were approved by War Cabinet to cover the naval anti-submarine boom across the harbour at a cost of £18700, although building them would take time [MP 729/6].
ANTISUBMARINE BOOM
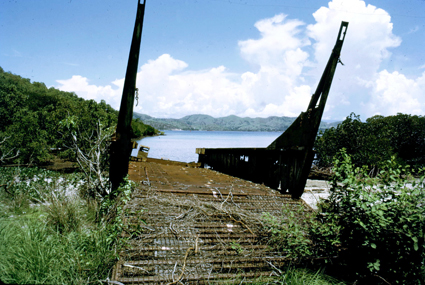
An antisubmarine boom net was installed across the shipping channel between
Paga Point and Gemo Island (as shown on the map at the beginning). The net was supported by
floats. Small motor launches were used to drag the boom to one side to allow
shipping to pass through. This was a vulnerable time for the port as Japanese
Midget submarines were known to follow submerged closely behind an entering
vessel and avoid the boom. This happened in Sydney Harbour in May 1943. The
photos below show the boom being operated.
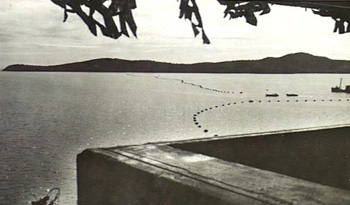 |
 |
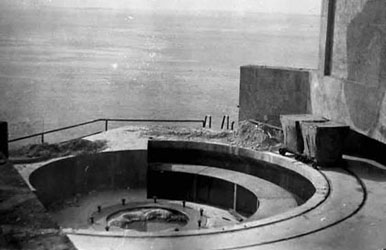
| The Anti-Submarine Boom viewed from Director Pedestal (#4) at Paga Battery, 27 May 1944. Gemo Island is in the background. The boom gate is in the open position to allow the ship on the right to depart. AWM071484 | The Anti-Submarine Boom viewed from the No. 2 Gun Emplacement (#8) at Paga Battery. The No. 1 Gun Emplacement (#7) can be seen in the clearing below. Taken 27 May 1944. AWM071499 |
 |
 |
| Another photo of the Paga Point boom. The two humps of Lolo Rua Island can be clearly seen to the left of Gemo. | Boom net being constructed in Sydney, Australia for use in Dominion harbours including Port Moresby. |
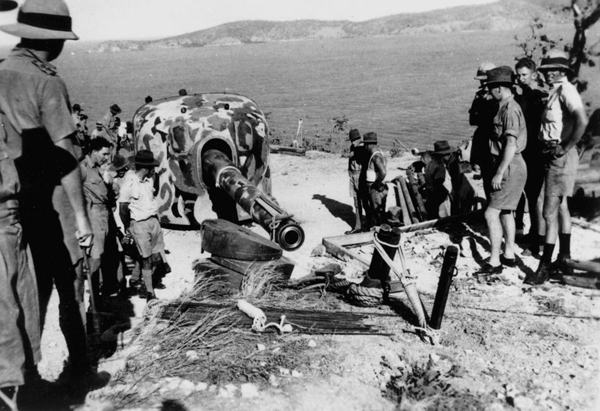
On 4 January 1944, it was reported that the Twin 6 pr guns were 50% completed. By the time it was complete it consisted of a Twin 6-pounder gun, its magazine, and its Director Tower. It was called the "Boom Section" gun emplacement (Elements #3 & 4) and was overseen by a Section Commander.
The main building (#3) had a gun floor on which was bolted the mounting. To the rear was a V-shaped structure (#4 lower) comprised of three parts: on the right of the gun floor was the ammunition store/magazine. To the left was the gun floor shelter with its amenities for the 'ready' detatchment. A square concrete tower (#4 top) -about 10 m high was in the centre of these two structures. It housed an observation post on the top level, and a searchlight directing station on the middle level.
The observation post (or "Director's Post) on the top contained the Director's Pedestal - a "Director" No. 13 Mark 1 - was mounted on a concrete pedestal inside. It had two telescopes - one for 'line' (left-right position) and one for 'angle of sight' (ie range, up and down). It also carried binoculars for the Section Commander. Using handwheels the two telescopes would be laid on the target. The Section Commander would make small corrections to these angles from his 'fall-of-shot' sightings with binoculars. The information was then transmitted electrically (by 'Magslip') to the gun layer at the mounting.
 |
 |
The observation tower (#4) behind the Twin 6 pr. The rear of the gun shield can be seen to the right (the sloping metal characteristic of this shield). The door leads to the magazine and artillery store. Note the half-inch thick steel plates with handles on the left. These are the "blast doors" that protect the ammunition. AWM 071505, 27 March 1944 |
The camouflaged emplacement (#3) of the Twin 6 Pounder at Paga Hill. To make it clear, the gun is outlined in red on the right. This gun is sometimes called the "Boom Section Gun Emplacement" in reference to its role in covering the boom nets crossing the harbour. An example of a 6 Pr and emplacement from NZ is shown further down the page. |
THE BOOM SECTION TODAY
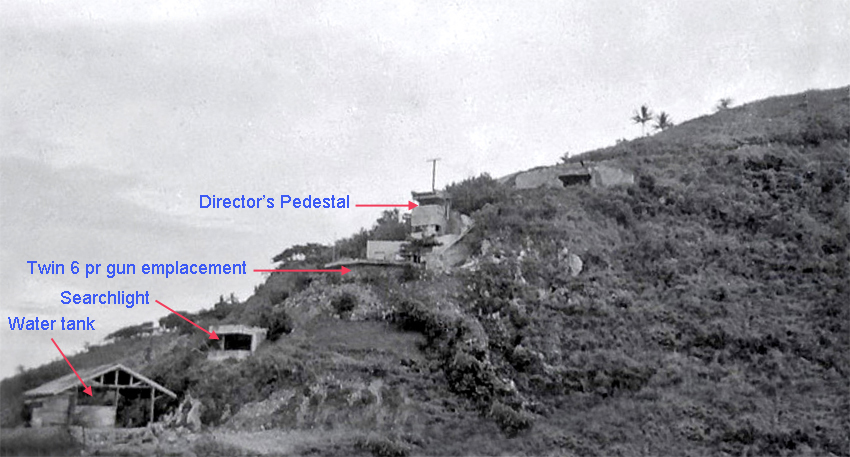 |
Paga Hill well after the war but sometime before 1967 (before it was overgrown). The building at the bottom left (#1) - almost on the beach - was for collecting rain water for the emplacements. Next up the hill to the right is the DEL "Boom" Searchlight emplacement (#2) and further up is the "Boom Section" 6 pr gun emplacement (#3) and observation tower (#4) - housing the Observation Post and Director's Pedestal. The uppermost structure is the emplacement for the DEL searchlight (#5) for the 6" guns. The 67 Anti-Aircraft Searchlight Company (67 AASC) mounted its mobile 150cm Sperry searchlight (#12) on top of the DEL bunker. (photo - Kell Nielsen) |
 |
Another view (taken in 1968) of the Boom Section structures on lower Paga Hill facing the harbour and looking out to Lolarua Island on the other side. These buildings were mainly for covering the naval boom across the harbour - hence the name. The roof at the bottom is a part of the (#1) structure covering the water tank (to keep it dark and keep algae from growing). You can see the power wires and poles for the pump. Next up (#2) is the Boom Defence Searchlight emplacement - boarded up with sheets of galvanised iron. In the middle of the photo is the twin 6 pr gun emplacement (#3) and observation tower (#4). Over to the left is the Boom Section ammunition magazine, and to the right is the DEL Searchlight emplacement (#5) for the 6" guns up the hill. (John Eckersley) |
BOOM SECTION GUN EMPLACEMENT AND OBSERVATION POST: ELEMENTS 3 & 4
 |
| The gun floor deck (#3) and observation tower (#4) of the Twin 6 pr. gun emplacement being inspected by Matthew Kelly - 10 September 2012. The doors in the centre lead to the magazine and artillery store. Note the Marston Mat propped up against the walls of the observation tower. The mat was perforated steel planks capable of being locked together at their edges. It was a simple technology that made an enormous contribution to winning the war - being used to pave airfields and roads and could be emplaced very quickly using unskilled labour. (Jon Sterenberg, AHMS, 2013) |
 |
| The gun floor deck (#3) and part of the observation tower (#4) of the Twin 6 pr. gun emplacement being inspected by Matthew Kelly - 10 September 2012. The concrete storage areas (outlined in pink paint) had thick steel blast doors to protect the ammunition. These doors can be seen in the B&W photo above (left) with metal handles. Note the circular holes in the Marston Mat. It was perforated this way to reduce weight, increase traction and to allow drainage. (Jon Sterenberg, AHMS, 2013) |
Because the 6 pr guns were only intended for engagement with targets at short range (over the anti-submarine boom), the mounting gave the guns only 7.5° elevations but could depress to 10°. It had a angular shield (see below) that gave protection from shell splinters and light gunfire from the front. The traversing and elevating gears were manually powered and adjusted on the basis of information coming from the Director by Magslip. A small telescope was used by the 'Number 1' (usually a sergeant in charge of the gun who could control the gun should the Magslip fail). There was also a telescope for the 'Safety Layer' who could stop the guns from firing should he see friendly craft likely to be hit.
As shown below (left) there were two guns in each mounting, set snugly beside each other in a single cradle but having independent recoil and recuperation systems. When the gun was fired it recoile and as it ran out again the breech automatically opened, ejecting the spent cartridge case. The 'ready' ammunition was in racks on two trolleys (see below) that ran on circular tracks set in the concrete floor, one trolley for each gun. The trolleys could be pushed around by hand as the gun was rotated, or latched to the rear of the mounting, and traverse with it. A well-drilled gun crew could fire 80 rounds per minute or more (40 from each gun).
 |
 |
A twin 6-pounder gun at New Zealand during WWII. It is included here to get a better idea of the size and shape of the gun shield. Note the rails sitting on top of the concrete apron (rather than being embedded - and suggesting an afterthought). A soldier would pass the ammunition from the trolley to another soldier standing in the gun well who would then pass it on to the gun loader. |
The Twin 6 pr gun emplacement at Fort Siloso on the western tip of Sentosa Island just to the south of Singapore Island. It is included here to show the structure. Also note the 10 high-tensile bolts that were buried deep in the concrete hold-fast. The gun's pivot mounting was bolted to these. Note the ammunition trolley on the rails. (Photo www.fortsiloso.com) |
The Boom Section from Port Moresby Harbour
 |
Another of Kell Nielsen's photos showing the location of the structures in the above photo by the red dots. |
_850W.jpg) |
Paga Hill August 2007. The red dot shows the position of the power pole beside which the WWII 6-Pr gun was located (see the photo below). Kell Nielsen |
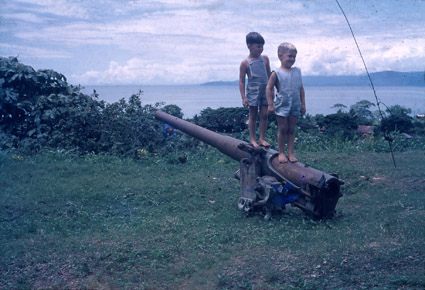 |
Paga Hill 6-Pr gun. Kell Nielsen believes that this is not a part of the "Twin 6 pr" guns further down the hill (see comment below). Ian and Greg Nielsen play on the gun in the 1950s. The wire on the right is the strainer wire for the nearby power pole. Photo by the boys' father - Vince Nielsen. |
Comment from Dr Nelson Lawry: The two lads are standing atop an 1890s 6-pounder 8 cwt gun (it is not a 6-pdr 10 cwt gun of WWII vintage). There is also no question about what the gun is doing there. Early in the war these old 6-pounders commonly served as examination or bring-to guns in Commonwealth ports all across the world. Do remember there was no light AMTB protection at Port Moresby until Boom Section, Paga Battery, and Gemo Battery, were completed, both in 1944. The old 6-pdr would likely have served thus until that time. [AMTB = anti-motor torpedo boat]
-850W.jpg) |
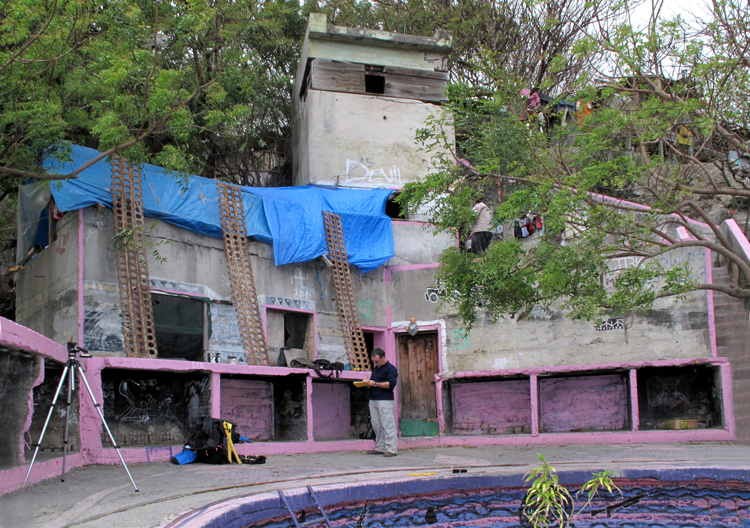
The lower gun emplacement (Element 3) at Paga Hill Battery where the Twin 6-pounder guns were located. You can see the steel rails around the edge of the gun well; they were for the ammunition trolleys. At the rear is the blast wall and steps up to the observation post and Director's Pedestal (Element 4). David Mosan, then aged 13, (pictured) lives with his family in the tower. Photo Ian C. Booth, April 2011. |
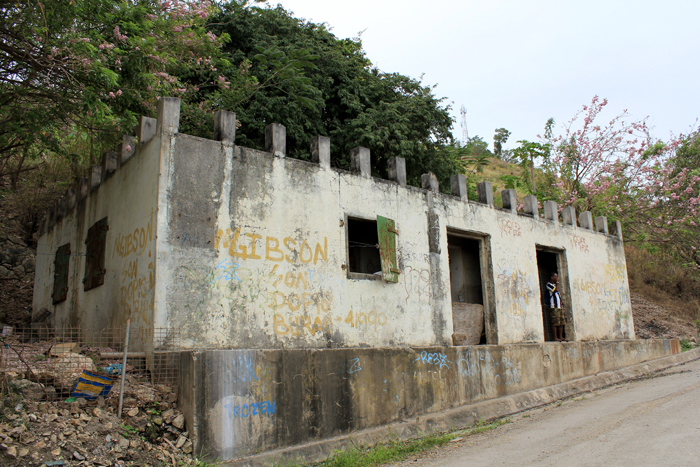
THE NATIVE HOSPITAL & OFFICERS' CLUB - ELEMENT 17
With the arrival of United States soldiers in to Port Moresby in early 1942, the Native Hospital at the base of Paga Hill - along Ela Beach - was renovated to make The American (or Allied) Officers' Club. A Native Hospital was first built there in 1905 but became so delapidated that in late 1920 it was replaced with a new one. It served the locals well and was staffed by nurses from Australia and had a doctor on standby. The average number of in-patients between the wars was 60 at any one time. The European Hospital up the hill had an average of two patients for the same time.
The building was a long, cool and spacious tropical building, with a central room of 48' x 21' and a 10' verandah around all sides. In each corner was a small room, one of which was used to lock up aggressive patients. Rubbish and organs were thrown into the sea.
With the arrival of military forces the hospital was closed and the building became an Officers' Club. The American Army renovated it and it was fitted with lounges, a bar, a dance floor and good catering facilities (see later photos).
.jpg) |
1. The Officers' Club can be seen at the water's edge on Ela Beach - at the base of Paga Hill. Photo by Vince Nielsen from his 1952-1959 collection. |
.jpg) |
2. Paga Hill during WWII. The red dots to the left mark the Officers' Club and other foreshore buildings.. |
.jpg) |
3. Photo taken just above Ela Beach on 11 July 1942 showing the Officers' Club off Paga Hill in the distance. These Australian soldiers were returning from a coastline patrol searching for the remains of Japanese bombers shot down in a dawn raid on Port Moresby. The planes were seen diving to earth in the distance and parties were despatched to capture any of the crews who may have bailed out safely. The War Diary records for that day: "71st Raid - Nineteen Jap bombers and eight Zeros attacking shipping today in Fairfax Harbor and fierce dogfights developed when our fighters intercepted, several of the bombers being attacked as they were releasing their bombs. Three bombers and one Zero were shot down for certain and three bombers damaged. Two of our fighters were lost and one damaged." However, although the soldiers did find one enemy two-engine bomber burning in Waigani swamp there was no trace of crew seen. AWM 025905 |
.jpg) |
4. Japanese raid (No. 73) on Port Moresby 24 July 1942. Bombs are seen bursting off Paga Point - with the Officers' Club not too far away. The Japanese flew south from their base at Lae or Rabaul and sometimes circled around so that they could strike Port Moresby on approach from the South-West. After dropping their bombs on ships in the harbour and the aircraf, fuel or ammunition dumps at "7-Mile" airfield they could head in a direct line home. Alternatively, the Japanese could bomb the airfield first and then drop remaining bombs on the harbour. In the above photo, the main damage was to Bomana Airfield (12 Mile Drome). AWM |
.jpg) |
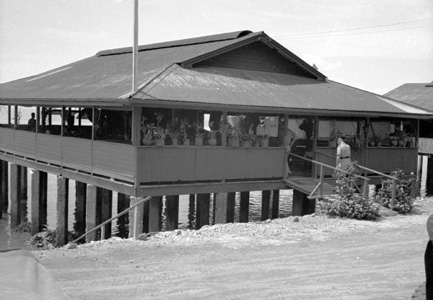 |
5. An exterior view of the Lounge Room of the Officers' Club at Port Moresby on 22 May 1944. The buildings - originally the Native Hospital - are positioned on pylons above the sea. AWM 073362 |
6. The same building - now known as The Allied Officers' Club photographed on 5 February 1944 by journalist Robert Doyle from the Milwaukee Journal. Note the pot-plants lined up on the rail. |
.jpg) |
.jpg) |
7. Ela Beach, Port Moresby 22 May 1944. Lieutenant R. Elliott, in-charge of the Officers' Club, taking the morning parade of native men employed at the club. AWM 100441 |
8. Ela Beach, Port Moresby 22 May 1944. The interior of the dining room at the Officers' Club where native employees are decorating the tables around the dance floor. AWM 100460 |
After the war, one room of the building was used for the Administration's free lending library, with books supplied by the Army Education Unit and also from the National Library of Australia's special service to outlying territories. However, the larger part of the building was used as the Returned Soldiers' Club. It became the town's community centre; all dances, meetings and social gatherings were held there, in a tropical setting. [Walkabout magazine, 1948].
.jpg) |
| 9. A group of foreshore buildings at the Ela Beach end of Paga Hill photographed during the war. There is a small wooden jetty in the centre of them. |
In 1948 it was returned to its former status as a Native Hospital and remained so until October 1957 when it was closed and its functions transferred to Taurama Road (6 km east) as the multi-racial Taurama Base Hospital. The building was then used as the District Education Office.
 |
 |
| 10. The foreshore buildings nearest Ela beach photographed by Robert Walding (Steamships Trading Co.) in 1956. Looking down from Paga Hill. | 11. The Paga Hill foreshore buildings can be clearly seen in this photograph taken from Ela Beach in 1956. (Robert Walding) |
 |
.jpg) |
| 12. Native Hospital at Ela Beach, Port Moresby,1953. (Terence Thornton. National Library of Australia: nla.pic-an22703325) | 13. The same building - in 1963. By then it was the District Education Office. (Bob Grieve) |
 |
 |
14. The District Education Office, December 1963 - formerly the Native Hospital (before and after the war) and Allied Officers' Club (during the war). Australian school teacher from Port Moresby, Diane Bohlen, recounts: "The children were on holidays and the schools were closed. We were told to report to the District Education Office in town. The office was an old building built over the water on stilts, seen here at the end of Ela Beach at low tide (far left)." (Photo: Charles Betteridge) |
15. The District Education Office (December 1963). Diane Bohlen said: "We walked along the jetty to the office where there was very little for anyone to do because schools were on holidays for 6 weeks. We did a little bit of filing and spent most of our time pretending to be busy. The posts that held up the building over the water came through the floor to the roof. Where they passed through the floor I could see down into the clear water. There were many colourful tropical fish feeding off the seaweed growing on the posts." The more distant building had already been demolished. (Photo: Charles Betteridge) |
.jpg) |
.jpg) |
| 16. Foundations of the buildings as they were in 1969 - photographed from Paga Hill Lookout near the Paga Club. (Kell Nielsen). Scroll down to the photo below to see Ela Beach photographed for this same location on 10 May 2014. |
17. The buildings had been unoccupied for some time so materials were salvaged from them by the locals for their own buildings. Whether this had government approval is a moot point. (Kell Nielsen, 1969) |
If you have more information about the Native Hospital, the Officers' Club or the District Education Office please let me know.
 |
| This picture of Ela Beach was taken on Saturday 10 May 2014. As you can see from this picture work is well and truly under way to cut the top off Paga Hill. The red dot to the lower right marks the location of the old Native Hospital (an American Officers' Club during WWII) - the stumps of which are seen in the photo above. There are no squatters to evict from their homes around this side so work on the redevelopment of Paga Hill is progressing quickly. However, it is not so simple around where the Gun emplacements are. Police and native squatters are locked in a constant battle as the police are trying to move them on. Visitors and sightseers are finding it difficult to move around the site freely. The second red dot (top right) is the location of the nun emplacements at Drysdale Ridge. |
TUAGUBA "ACK ACK" HILL ANTI-AIRCRAFT BATTERY
The main anti-aircraft defences for Port Moresby were located at Tuaguba Hill (or Ack Ack Hill as it was known by the men) - about 2 km to the north-east of Paga Hill. For further information see the Ack Ack Battery webpage.
 |
The 3.7" gun at Ack Ack Hill being dismantled, Port Moresby - 1944 (Laurie Ward) |
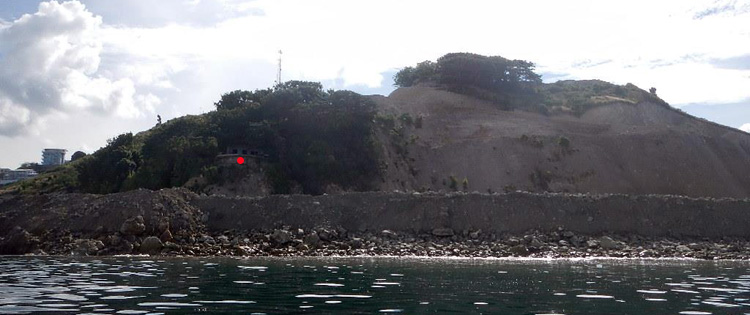
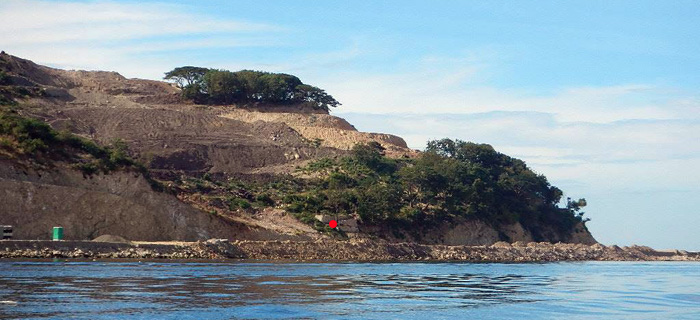
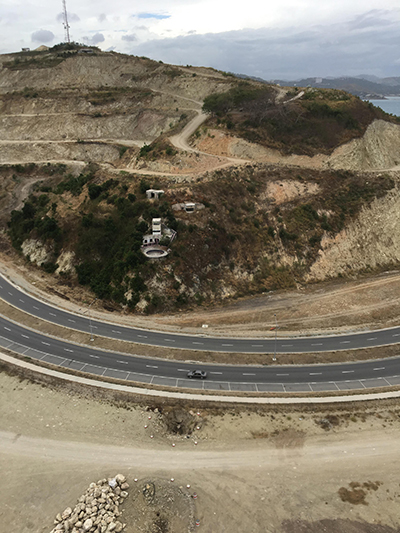
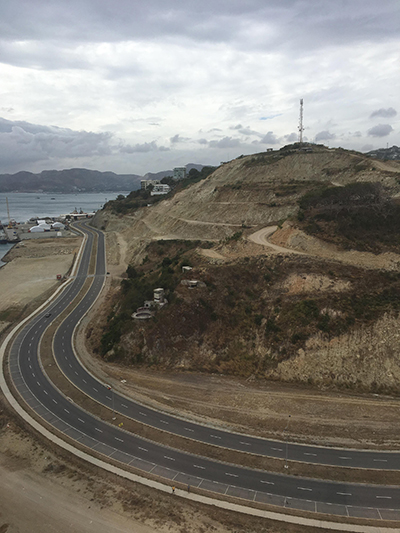
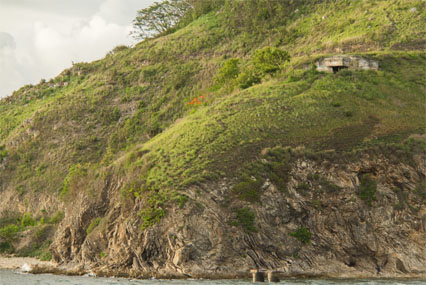
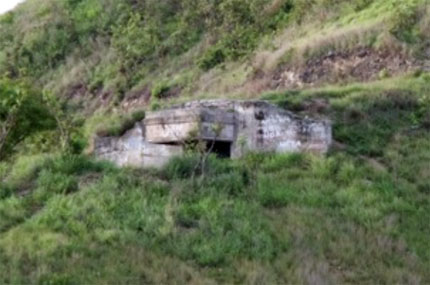
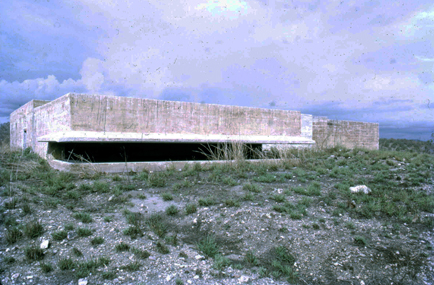
IDLERS BAY GUN EMPLACEMENT - BASILISK BATTERY
This was the largest of the Port Moresby batteries and was built by the 8th Army Troops Coy, Royal Australian Engineers in July 1944. Emplacements for three 5.25-inch guns were built but only two guns were installed. There was an observation post built on the hill top. The three gun positions overlooked Fairfax Harbor and Idlers Bay. Although coast defence mountings were provided, it should be noted that the 5.25-inch gun was naval both in origin and predominant use.
Kell Nielsen spotted the gun emplacements at Idlers Bay from the air while on a trip to Tufi in 1973 (to supervise piledriving for Commworks). He returned later that year to take the black and white photos below.
 |
Aerial photo from Google Earth showing the eight buildings that make up the Idlers Bay gun emplacement. |
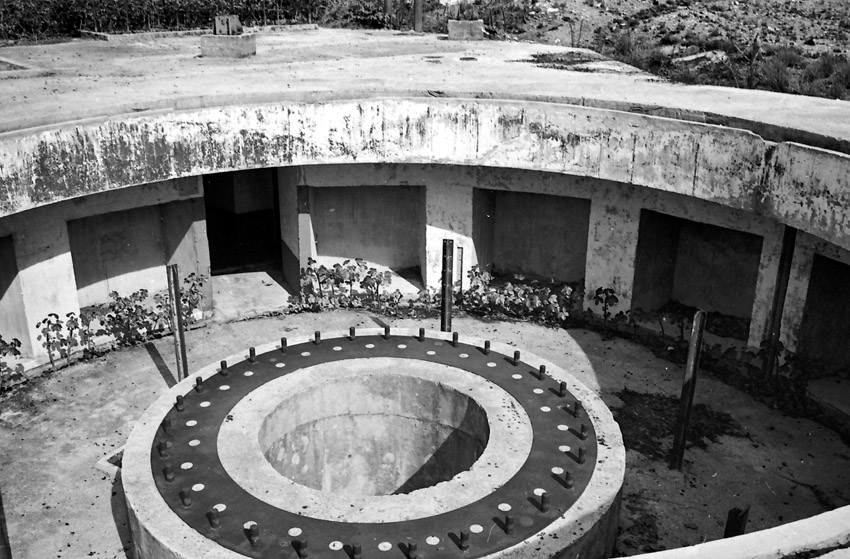 |
| Gun emplacement at Basilisk Battery (Idlers Bay) - showing the round concrete "cheese" (gun mounting) with the foundation plate and holding-down bolts. On top of this (in July 1944 when it was built) would have been the levelling ring, a lower racing ring, roller ring and rollers, and the traversing rack. The magazines in the background were for the storage of shells and explosive. Kell Nielsen took all of these black and white photos with a Miranda 35mm SLR he bought from the John Page Camera Store. The film was Ilford Pan-F, hence the fine grain of the negatives. (Kell Nielsen, 1973) |
 |
 |
It's really amazing how little rust is around this area - and only meters away from the sea. (Ernst Hiessleitner, 1973) |
Picture of Kell Nielsen inside the bunker taking a picture of Ernst outside. (Ernst Hiessleitner, 1973) |
-850W.jpg) |
Ernst Hiessleitner (pictured) took colour photos while at the Basilisk Battery gun emplacement. (Kell Nielsen, 1973) |
-613H.jpg) |
-613H.jpg) |
Once again Ernst is captured, this time at the entrance to the gun emplacement. (Kell Nielsen, 1973) |
Inside one of the hallways within the gun emplacement. (Kell Nielsen, 1973) |
 |
 |
One of the corridors leading from the gun to ammunition rooms. (Ernst Hiessleitner, 1973) |
The blue water is so well contrasted from inside the Control Bunker. (Ernst Hiessleitner, 1973) |
 |
Battery Observation Post at Basilisk Battery, Idlers Bay. (Kell Nielsen, 1973) |
 |
 |
Looking down on separate munition rooms. (Ernst Hiessleitner, 1973) |
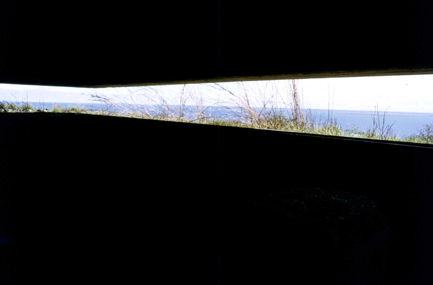
Looking west into the mouth of the 'Monster' - the Battery Obesrvation Post - BOP. (Ernst Hiessleitner, 1973) |
-850W_low.jpg) |
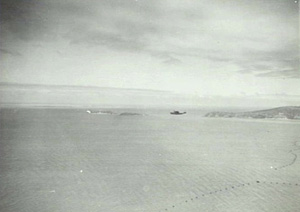
From the Basilisk Battery Observation Post Looking out over Fisherman's Island. (Kell Nielsen, 1973) |
-850W.jpg) |
Standing on top of the generator room at Basilisk Battery building looking east towards Lolorua Island (the two low islands to the right). Pyramid Point can be seen in the far distance (centre) over the top of Gemo Island. It was at Pyramid Point where the Bootless Bay 'C' Battery Observation Post was located. (Kell Nielsen, 1973) |
 |
The No. 2 gun at Basilisk Battery (801st Anti-aircraft and Coast Artillery Battery) 17 August 1944 ready for action with the exception of closing the left and right ports (AWM 75214). |
 |
 |
Why are all these Landing Crafts here? (Ernst Hiessleitner, 1973) |
Not much left of these Landing Craft. (Ernst Hiessleitner, 1973) |
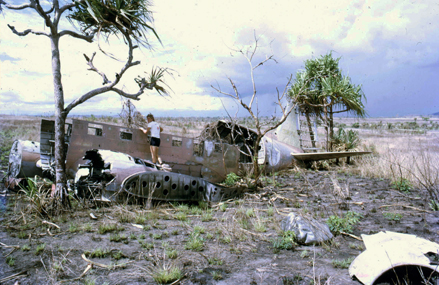 |
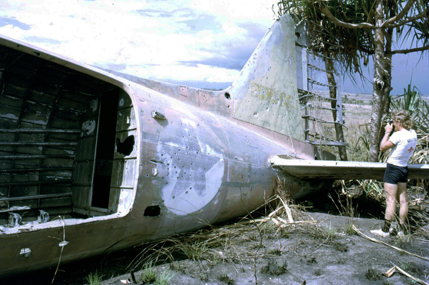 |
Plane wreckage near Idlers Bay. It simply ran out of fuel on the way to Wards Strip. (Ernst Hiessleitner, 1973) |
The roof of this plane was taken off for use as a firefighters prop. Kell Nielsen taking pictures. (Ernst Hiessleitner, 1973) |
LANDING CRAFT AT FAIRFAX HARBOUR
This next group of pictures were taken at the very top of Fairfax Harbour in 1970-1974. Kell Nielsen first saw them from the air on a return trip from Brisbane. As far as is known Ernie and Kell were the only people who went there. The roads around there were very poor and there were many different types of landing barges and other equipment there. It was a good 100 meters of walking through Mangrove swamps to get to them.
The origin of these landing craft is uncertain: all of the landing craft, including the gun ship, are said to look Japanese. The Australians and Americans were known to have used captured and refurbished Japanese landing craft in their own ops. More research is obviously needed.
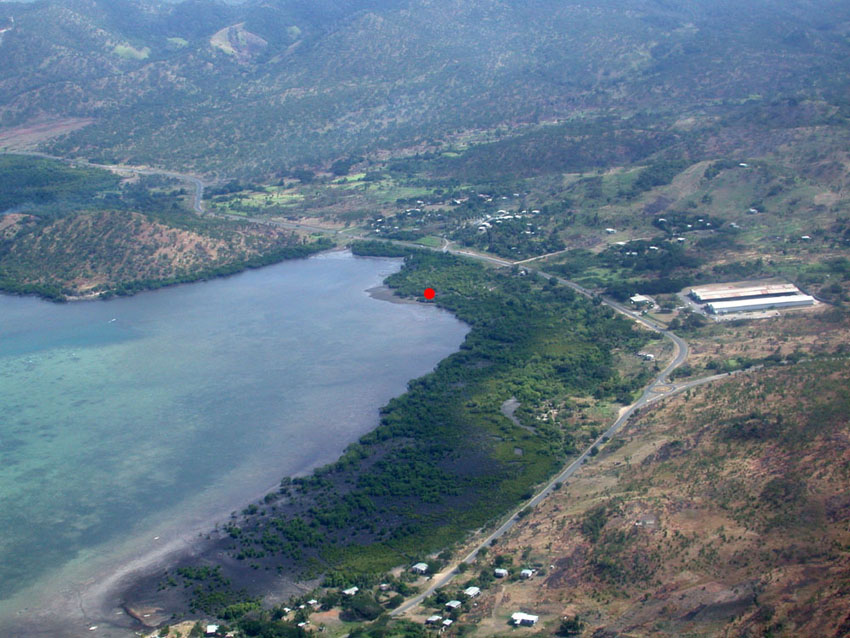 |
10. A red dot marks the spot where all the landing craft are located. The road just above it is the road to Nappa Nappa and the Basilisk emplacement at Idlers Bay. The road that heads to the right at the roundabout is to the Port Moresby Dump. This area is marked on the map at the top of this webpage also with a red dot. |
-850W.jpg) |
Photo 1. Kell Nielsen said "I always wondered why there were so many craft in one place - either blown there in a tropical cyclone or just dumped there to get them out of the way". |
-250W.jpg) |
-250H.jpg) |
3. This all-but-complete Landing Craft looked like it had been in full use just a few months earlier; only the chains that lift the ramp are missing. But as we all know it has been lying here since WWII some 30 years earlier. Kell Nielsen |
4. This Landing Craft may well have been hit by Japanese air raids. Three more water craft can be seen in the background (see also, below). Kell Nielsen |
-800w.jpg) |
6. This Landing Craft has not fared as well. It may well have been hit by Japanese air raids. Three more water craft can be seen in the background. POM (Port Moresby) was attacked many many times by Japanese planes. Their main targets were boats, ships and Jacksons Airport. The MV MacDhui being one ship permanently damaged by Japanese Planes inside Fairfax Harbour. She still lies in shallow water just in front of Hanuabada Village. (Kell has pictures). Kell Nielsen |
-250H.jpg) |
-250H.jpg) |
Photo 5.Kell Nielsen's good friend Ernst Hiessleitner taking his own colour pictures of the Landing Crafts. Kell Nielsen |
Photo 7. Ernst inside the landing barge taking colour photos.Ernie went on to more serious photography. He won the 'Brisbane Ekka Photography Contest' on at least four occasions. Kell Nielsen |
-850W.jpg) |
Photo 8. This picture is of a gun ship. It had a roof completely covering the entire ship. If you look closely at the picture you can see a serial number. (AB21420). Anyone able to identify this ship? Kell Nielsen |
BOOTLESS BAY BATTERY
The Bootless Bay Battery was constructed by 'C' Battery crews that arrived in Port Moresby in September 1942, and had been stationed first at Kila Beach, and then on Stokes/Maata Ridge. When this location proved unsuitable, it was decided to relocate the battery in September 1942 to a more permanent location, north of Pari Village on Drysdale Ridge overlooking Pyramid Point. Construction began on the battery in October 1942. Semi-permanant 'Panama' mounts for two American 155mm GPF guns were constructed along with trench systems, crew quarters and observations posts (at Pyramid Point). Test shots were fired on the SS Pruth on March 15, 1943.
Its primary role was to protect Bootless Bay, with a secondary role of supporting the Paga Point Battery in defense of Basilisk Passage. This battery was never used against enemy targets. The guns were removed sometime after WWII, and the battery is abandoned today. Also present was a 3.7-inch Anti-aircraft Battery on nearby Morris Hill (Zero Hill) known as the Morris Hill A/A Section. It was the site of a crashed Japanese Zero plane.
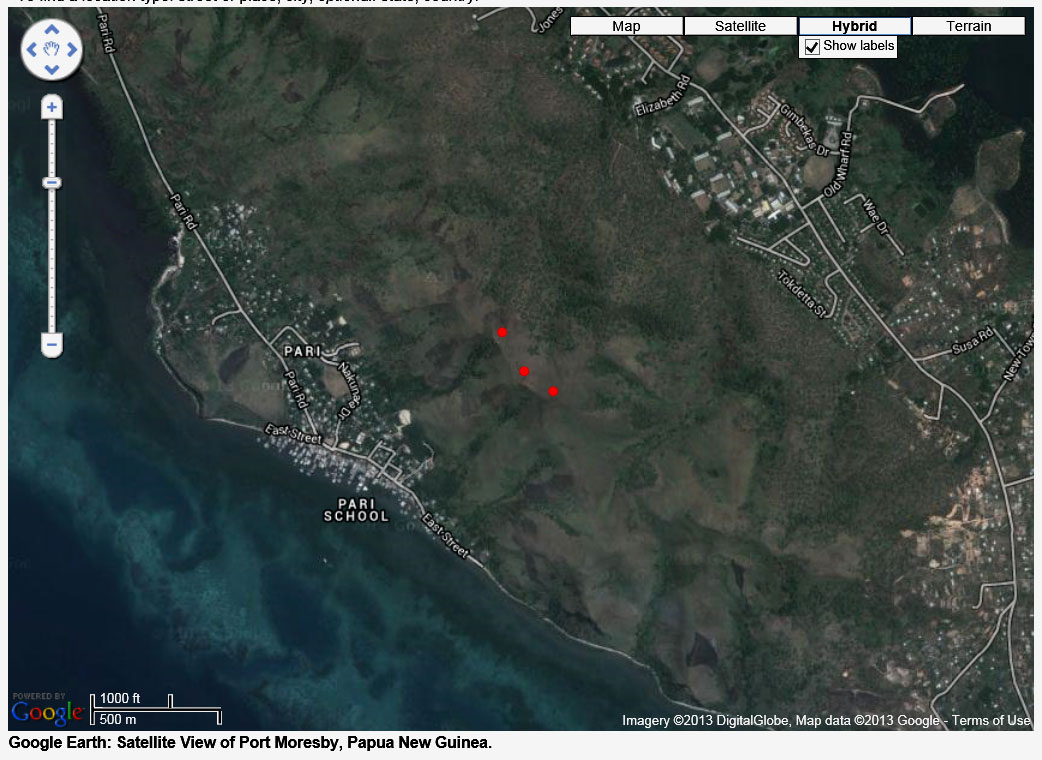 |
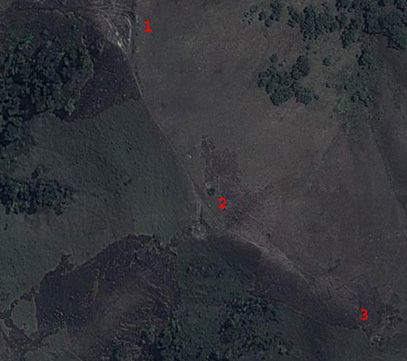 |
The three red spots show the exact location of the two Gun emplacements and the ammunition storage bunker on Drysdale Ridge at an altitude of 200 m. Pari Village is set on a small strip of Beach on the Southern side and Taurama Barracks is at the top of the picture - to the North. Pari is about 8 km SE of Port Moresby. Click the image above to see an enlarged view. |
This is a close up of the three features of the Gun Emplacement at Drysdale Ridge. #1 is Gun number 1; #2 is Gun number 2; #3 is the Ammunition storage. The Ammunition storage area was never completed as a Concrete Bunker (only the floor was Concrete). Maybe the three steep stone walls were considered as secure enough. There were 50mm steel water pipes cemented into the ground every 1800 mm around the three top sides of the bunker. These were used to stretch the camouflage netting over. |
The photos below were taken by Kell Nielsen on 28 August 2007 using a Nikon E996 camera.
_850W.jpg) |
1. Photo taken from Drysdale Ridge looking due west towards Port Moresby CBD. To the left of High-rise Building is Paga Hill and behind that is Gemo Island. One Tree Island is very easy to see due south of Koki Markets (not visible). Kell Nielsen |
_319H.jpg) |
_319H.jpg) |
2. Picture taken from the very highest point of Drysdale Ridge 200 meters East of the Ammunition Bunker. Kell Nielsen, 2007 |
3. This is truly a piece of history. The names of 7 of the workers who worked on the Drysdale Ridge Emplacements. No part of Bootlers Bay is visible from any part of Drysdale Ridge. Kell Nielsen, 2007 |
 |
4. Visitors Mark Hurd, Craig deWitt and Kevin Pini on GasGas Trials Bikes at the Bootless Bay No. 2 gun emplacement. Here, an American 155mm GPF gun on a 'Panama' mount was in operation. Photo taken by Kell Nielsen on 28 August 2007 using a Nikon E996 camera. |
_319H.jpg) |
_319H.jpg) |
5. Gun Emplacement # 2 with Pari Village clearly visible below at sea level. Riders are Kevin, Mark and Craig. Kell Nielsen |
6. The # 2 Gun Emplacement was cut into the ridge top by about 2 to 3 meters. Kell Nielsen |
_850W.jpg) |
7. Gun Emplacement # 2. The Ship Wreck Pruth can be seen on the second reef above the riderless GasGas Trials Bike. That bike belongs to Kell Nielsen who dismounted to take this photo. Kell Nielsen, 2007 |
_319H.jpg) |
_319H.jpg) |
8. This is Gun Emplacement # 1 where an American 155mm GPF gun on a Panama mount was also in operation. As you can see it is well and truly dug into the Mountain top. Kell Nielsen, 2007 |
9. Looking West from the highest point of Gun emplacement # 1. A track was dug into the Concrete Emplacement and another 4WD track was also constructed around the back for access to Gun Emplacement # 2 and Ammunition Bunker # 3. Kell Nielsen,2007 |
_850W.jpg) |
10. Kevin showing his skills beside the No. 1 Gun Emplacement - with the two coral reefs in the background. Kell Nielsen, 2007 |
_319H.jpg) |
_319H.jpg) |
11. Picture showing access point for supplying this emplacement with ammo. Kell Nielsen, 2007 |
12. The trail up to the Ammunition depot can be clearly seen heading from in front of Kevin up to the top left of picture. Kell Nielsen, 2007 |
_850W.jpg) |
13. This picture was taken from the next ridge west looking down on Taurama Barracks and Bootless Bay. Behind that is 'Hombrom Bluff' left and 'Varirata National Park' right. It is at Hombrom Bluff that 'Blamey's Garden' wasn situated. This was supposed to be General Blamey's wartime headquarters although it is also suggested that it was designed as a retreat for Blamey and selected officers. The Australasian Society for Historical Archaeology reports that it was built at the behest of Blamey, partly as a place of rest and recuperation, but also with a commemorative function for those that had served along the Kokoda Track [ASHA Newsletter, V43(1), March 2013, 27]. The site is currently covered with thick jungle and is accessible only with agreement of the local landowner. Kell Nielsen (2007) |
GEMO ISLAND BATTERY
Gemo Island Battery is accessible by boat only. It is located on the seaward flank of the island.
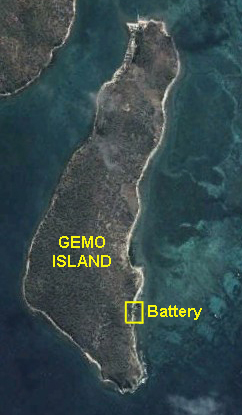 |
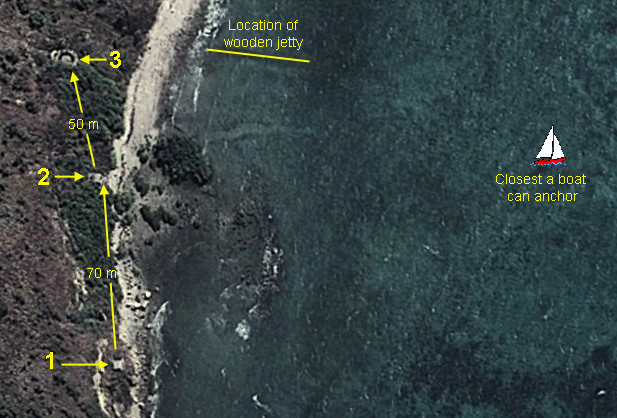 |
The battery is 350 m from the southern tip of Gemo Island. The island is about 1 mile long (1700 m). |
The CASL (searchlight) emplacement (#1), the cable hut (#2) and the gun emplacement (#3) on the eastern shore of Gemo Island. The location of the wooden jetty is also shown. The gun emplacement is on top of a hill north of the searchlight emplacement at an elevation of 75 ft (22 m). The position marked with the boat is about the closest you can get to Gemo - about 150 m.. |
It seems there is only one large gun emplacement on Gemo Island, although others claim there were two. There were more than a dozen buildings on and around the gun. Unlike other gun emplacements around Port Moresby, the one on Gemo has been safe from squatters, vandals and people filling it with rubbish. All the building materials were removed (stolen) in the 1950s and 60s. It seems highly unlikely anyone has been to this area since then for two reasons: firstly, you can only get there by sea and there is no easy water access by boat or canoe to the emplacement; and secondly, it is a very steep climb up to the top of the hill where the emplacement is. Kell Neilsen said that another reason people kept away from Gemo was because they were afraid of catching leprosy (a leprosy hospital was set up by Constance Fairhall and the London Missionary Society in 1937). Click here to see a first-hand report on the Gemo Hospital by Stu Hawthorne.
 |
The wooden jetty at Gemo Island. |
The photographs below were taken by Jason Pini during a day visit to Gemo Island on 10 November 2013. Jason lives in Port Moresby and sailed to Lolorua Island for some kite surfing and a beach BBQ with family and friends. They go there to avoid being harassed by rascals. As well, the parents feel the kids are safe to run around in safety. Yachts have to anchor a long way offshore from the structures and it is not practical to swim in to the beach (hence the need for a telephoto lens as used in these photos). The gun emplacement/s can't be seen from the water.
 |
Gemo Island gun emplacement - 1972. Photo by Mark (Bauple58) |
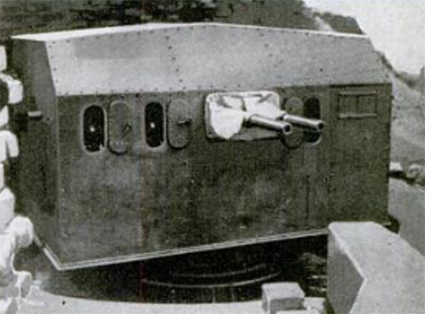 |
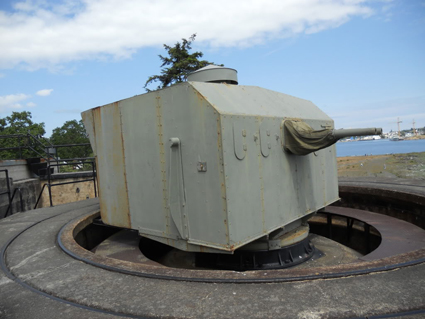 |
Exterior view of the protective revolving wraparound splinter shield - which rotates a full 360 degrees - houses twin 6-pounder gun. Their range is over 5000 yards. Six soldiers can fit inside the turret. |
This is a modern day picture of the exact gun used at Gemo Island. The wraparound splinter shield provides protection. (picture taken in England) |
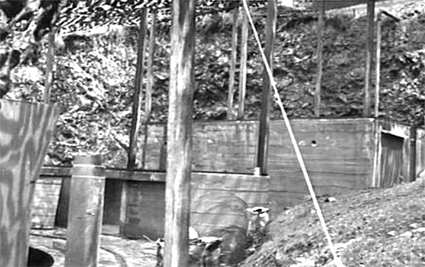 |
 |
Magazines and gun splinter shield at the twin 6 pounder gun pit, Gemo Island - constructed by the 8th Army Troops Coy and conveyed by a small trolley to the site - 15 April 1944. (AWM 72237) |
Another photo of the magazines and gun splinter shield at the twin 6 pounder gun pit, Gemo Island. The gun pit is constructed of reinforced concrete. Photo taken 15 April 1944 (AWM 72236) |
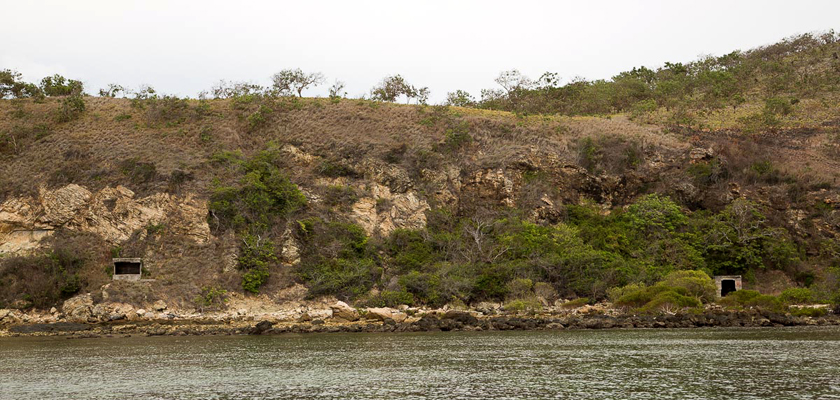 |
This photo shows both structures and their relation to each other. (Jason Pini) |
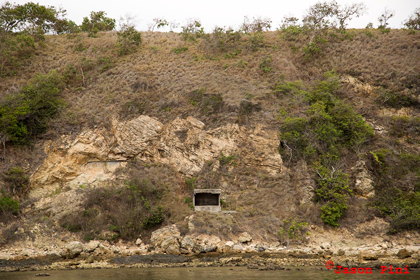 |
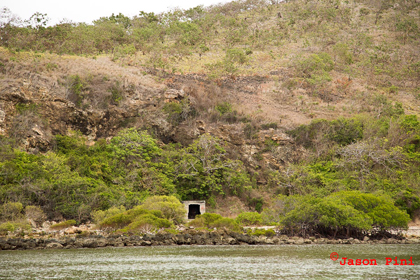 |
This is the southern CASL (searchlight) shelter on Gemo Island. It is almost on the beach. It would have been easy to resupply these two structures from the Jetty. (Jason Pini) |
Not sure why the front entrance is such an odd shape on the northern structure. (Jason Pini) |
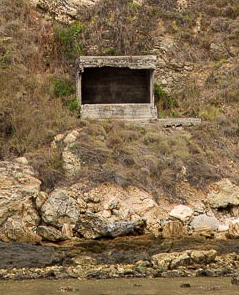 |
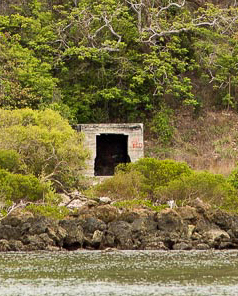 |
The southern Coastal Artillery Searchlight (CASL) shelter. |
The other structure is 70 m to the north. Its function is not certain but is likely to have been a cable hut (see comment below). |
Comment on the hut (above, right). Dr Nelson Lawry [pers. comm., 15 March 2015] said that the building was likely to have been a cable hut: "The odd-shaped front opening could have allowed personnel to close the upper narrower portion with a door (or set of doors), while leaving the lower, somewhat wider part open for the marine cables to enter, but that's just a guess."
As to whether the building could have been used as an indicator loop hut, a controlled mining hut or a power house, he said:
"The northernmost building on Gemo is (in my opinion) too small to be a power house and is too close to the water. A power station was fairly largish, and needed both a generator room and a muffler (silencer) gallery.... and did I mention WINDOWS, so not to asphyxiate the crew? We know the indicator loop originated and terminated at the station on Paga Hill; Gemo Island did not have one. Likewise the mine fields: no mining casemate, mine storehouse, mine dock, or other such facilities on Gemo. In my experience, the cables handled by a shoreside cable hut were for communication only. I'm thinking you would need large cables indeed to push sufficient juice to run one or more searchlights from a power station across the channel. Was there one opposite the gun battery? I think one might expect a power station to have been built into the gun battery and thus powering by cables the CASL down the shore."
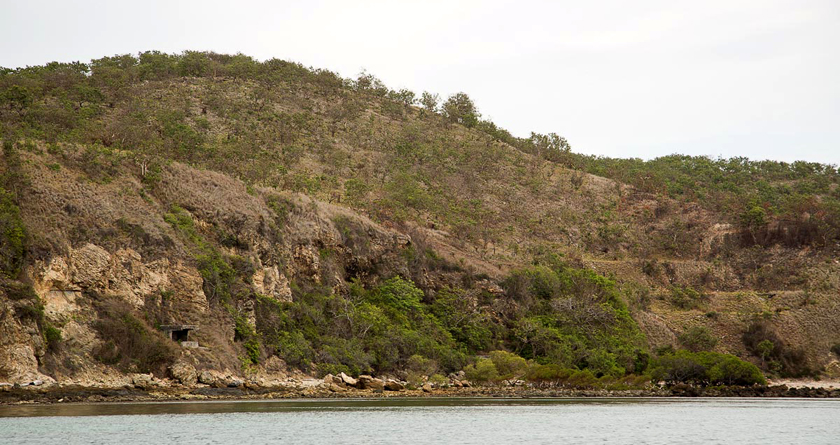 |
A more side on view of the southern searchlight shelter. The northern structure is to the right but is hidden from this angle. The gun emplacements on top of the hill can't be seen from the water. (Jason Pini) |
BARGE WRECK ON LOLORUA ISLAND
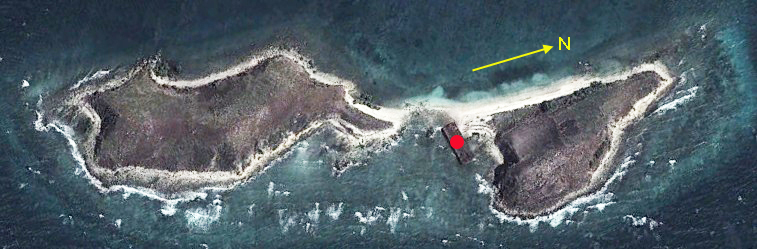 |
Lolorua Island is located 400 m to the south of Gemo Island. The red dot in the image marks the position of the barge wreck. |
_850W.jpg) |
1: Picture of wreck and the Southern part of Lolorua Island (near Gemo Island), taken from the top of the Northern hump of the Island. Kell Nielsen |
_319H.jpg) |
_319H.jpg) |
2: "Lolorua Island as seen from the Gemo Island side as we were approaching." Kell Nielsen, August 2007 |
3: "Here, I am standing under the pointy end of this barge wreck stuck fast on the beach between the two humps of Lolorua Island." Kell Nielsen |
_319H.jpg) |
_319H.jpg) |
4: Close-up of the rusting deck of the wreck.This area is an artist's dream. |
5: Rusting bollards with cliffs of Northern Lolorua Island in the background. |
_850W.jpg) |
6: "Another picture of the beach of Lolorua Island as we were leaving." Kell Nielsen, August 2007 |
_319H.jpg) |
_319H.jpg) |
7: Rusting winch at tail end of barge. Kell Nielsen, 2007 |
8: This picture was taken from on top of the wreck looking straight onto Gemo Island. There are two wooden ship wrecks. The one closest was an illegal Indonesian fishing boat. The top red dot on Gemo Island shows where the gun emplacement is located. There are also two pillboxes on the beach below shown by the lower red dot. Some of the pier supports are still visible. Kell Nielsen |
BOERA BATTERY
The Boera battery was constructed by the 8th Army Troops Company, Royal Australian Engineers, in July 1943. It consisted of a range-finding station, gun pits, magazines and ammunition cupboards. The gun pits were placed to defend the northern and western entrances to Caution Bay and to repel any land attack. The mobile 155 mm field guns were of US origin and were on 'Panama' mounts. They had a range of up to 19 km (see note below). Up to 40 rounds were fired during artillery practice sessions. There was also an anti-aircraft gun emplacement at the rear (eastern side) of the battery. Visitors need to be aware that there are unexploded ordnances (but excluding the general direction of Boera village some 500 m to the south) and Boera villagers continue to retrieve projectiles in the broader area.
There is also a fuel dump north of Lea Lea village.
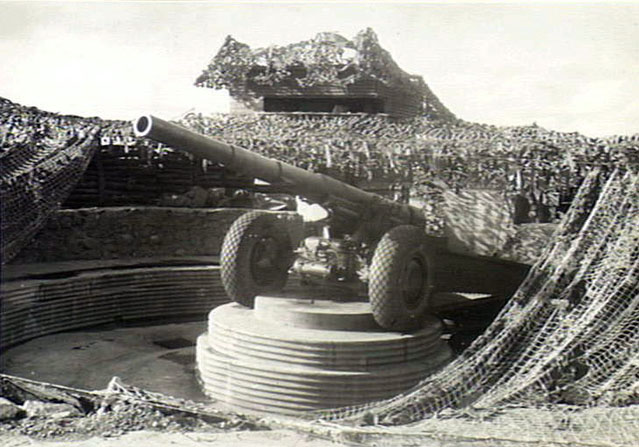 |
No. 2 Gun photographed 15 April 1944. Single 155mm GPF (Grande Puissance Filloux) Gun of USA origin was emplaced at this location in gun pits with a trolley to rotate the gun and camouflage net covering. It was constructed by members of the 8th Army Troops Coy, Royal Australian Engineers. Triangulation for fire was laid out on July 6, 1943 and the guns test fired on the following day with the first round fired from this gun at 15:07 hours. Today, this Panama mount is empty, but has a metal carriage for the rear of the gun to be rotated around. The gun pit is made from large stones and concrete to make up the walls. The control tower can be seen at the rear. Several covered bunkers are located behind the gun for shell storage. AWM 072250. Please note: the AWM caption calls the gun in this photo a "Howitzer". See the comment below regarding the difference between the 155mm GPF and 155mm Howitzer. |
RANGE OF A 155mm GPF GUN
A comment from Dr Nelson Lawry
| "My uncle was a member of D Battery, 8th Coast Artillery (in those days, most of an American seacoast regiment's firing batteries manned fixed concrete defenses, but one battery in each such formation, in this instance, D, was armed with mobile 155mm GPFs). The battery's four GPFs were laid out initially behind sandbags and under camo netting, until the Engineers could get up to this remote outpost on the Maine coast to build Panama mounts. Many years later, I asked my uncle about the range and accuracy of their GPFs, and he said that a range of 10 miles/16 km was well within their comfort zone. In his opinion, the battery could have hit fairly accurately for another mile, give or take, so say another 1 km. Beyond that range to the gun's maximum reach at 12 miles/19 km, no guarantees! But, emplacing such guns way above sea level (as at Boera) would increase both their maximum and effective ranges." |
HOWITZER VS GPF GUN
Comment by Dr Nelson Lawry
"The AWM is wrong in this instance (as in, even the sun has spots). There were two American field guns, both of 155mm bore (a little more than 6 inches), which provided with armor-piercing shells could serve more than adequately as mobile coast artillery pieces, and thus get around the fixed-in-concrete nature of most purpose-built seacoast guns. They were the GPF (Grande Puissance Filloux), designed and built in France for use in WWI, and later built by the United States as its Model 1918, and the late 1930s M1 gun, a more powerful and suitable weapon. It comes as little surprise that the U.S. Army wanted most of its new M1 155mm guns for use by its mobile field army (mostly in Europe, but also in the Pacific). At first in the European Theater, some American 155mm gun units were attached to the British Army, but with time, as production of the M1 continued, a certain number of these guns were provided outright to the Brits. I believe the same obtained with U.S. Marine artillery outfits in the Pacific Theatre. In that theater, not a few of these M1 155mm guns were used as coast artillery pieces, in the event the IJN came calling. So, what about the older GPFs, no longer satisfactory for ground combat in either theater?
Now just when you thought you had it right, there is this caveat. No country in the world developed the 12-inch seacoast mortar more than did the United States. Beginning in 1890 and progressing through WWI, the U.S. designed and built three different models - M1890, M1908, and M1912 - for harbor defense use. The first two models were squat little guys of 10 calibers length (10 x 12 in = 10 feet in length), but the final model, the M1912, was 15 calibers (15 feet) long, lengthwise closing in on a howitzer - oh oh! - that could hit at 19,300 yards, no slouch. The advantage of such high trajectories is that one could send large shells crashing through relatively lightly armored decks and turret tops; the disadvantage is that they were slow-loading and the fire control complicated, such that firing such pieces - call 'em mortars or howitzers - accurately at the fast-moving warships of WWII was close to impossible. Although these high-trajectory seacoast weapons did fearful execution in and around Manila Bay in 1942 firing high explosive rounds at enemy infantry on the ground and in landing craft, they would have had a more difficult job against modern, rapidly moving and maneuvering enemy warships, and indeed the Philippines campaign of late 1941 - May 1942 was their final gasp. Attached is a photo-drawing of the Model 1912 12-inch mortar, identical to the four in Battery Craighill, Fort Hughes, Manila Bay, which fired at Japanese landing barges in early May 1942 as they approached Corregidor. This piece is, one admits, getting pretty close to a howitzer in length." |
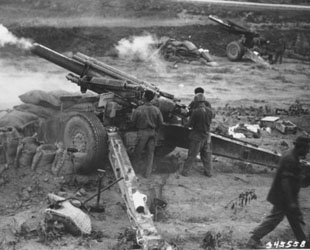
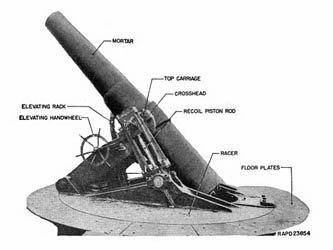
NOMENCLATURE OF ORGANISATIONAL UNITS
A further note about nomenclature of organisational units in the US Army
compared to British/Australian (BY Dr Nelson Lawry):
"Whereas British and American coast defense regiments were pretty much the same size in terms of personnel, thereafter things differed. British coast artillery regiments were divided into batteries, their American counterparts into battalions; British batteries were divided into troops, American battalions into batteries. Thus in British usage, an artillery battery is roughly equivalent in size to an infantry battalion, but in American usage, an artillery battery is roughly equivalent in size to an infantry company. And I did write "roughly": at least in U.S. service, the number of personnel varied widely, e.g., B Battery manning the two 12-inch guns of Battery Smith would have been FAR larger in manpower than C Battery manning the two 3-inch RF guns of adjacent Battery Jones. Finally, note that when speaking of concrete and steel battery structures, British Commonwealth usage places "Battery" after the specific name, e.g., Changi Battery at Singapore, while American usage places "Battery" before the specific name, e.g., Battery Craighill in Manila Bay. All of those essential differences specific to national origin, above and beyond harbour defences versus harbor defenses, must be kept in mind when writing of such fascinating stuff." |
Return to Port Moresby Harbour Defences - Main Page