NAVAL & ARMY FORTIFICATIONS AT MORETON ISLAND
This is the story of the
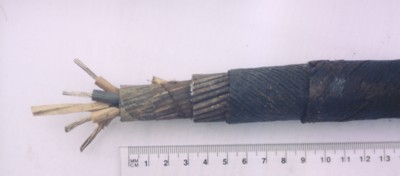
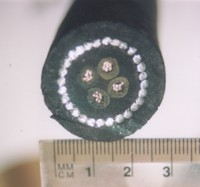
Royal Australian Navy's indicator loop
and controlled mining stations and built during WW2 as part of the Royal Australian Navy's anti-submarine harbour defences
on Moreton Island. They were located at Comboyuro
Point (Bulwer), Cowan Cowan and Tangalooma on Moreton Island, about 35 km
north of Brisbane, Australia. The story includes a report on the army
fortifications Fort Cowan and Fort Rous
also on Moreton Island.

 |
If you worked there or have any feedback please email me: Dr Richard Walding Research Fellow - School of Science Griffith University Brisbane, Australia Email: waldingr49@yahoo.com.au |
Click here for more details of:
Overview of Moreton Bay naval fixed harbour defences.
RAN 4 Indicator Loop Station Bribie Island
Fort Bribie and RAN No. 2 Mine Indicator Loop Station
Indicator Loops
around the World (Home Page)
How an indicator loop works
Indicator Loops - an overview (YouTube, 70 minutes)
OVERVIEW
There were several naval installations
on Moreton Island:
RAN 7 Indicator Loop and ASDIC station at Bulwer, 1 mile
south of Comboyuro Point;
RAN 2 Controlled Mining and Guard Loop Station at Tangalooma;
RAN 3 Controlled Mining and
Guard Loop Station at Cowan Cowan.
There were also army batteries at Fort Cowan and Fort Rous as well as a
temporary 'Letter Battery' at Comboyuro Point and 2/2 Guards Battalion troops
providing security for the forces stationed on the island.
MORETON ISLAND AT A GLANCE
Moreton Island is a unique island wilderness with sparkling clear water and white sandy beaches. It is one of the few untouched areas of natural wilderness along the East Coast of Australia. Moreton Island is situated just 35 kilometres from Brisbane in the Moreton Bay Marine Park. The island is 98% National Park, protecting the flora, fauna, sandy coastline, freshwater lakes, wetlands and forests. Moreton is 38 km long and 19,000 ha in area. It is one of the largest sand islands in the world. Moreton Island provides a fragile north easterly boundary for Moreton Bay. The island supports an amazing variety of vegetation. Its white sandy beaches, clear sparkling water and delightful fresh water lakes make Moreton a popular destination with holidaymakers, campers, fishermen, bush walkers and naturalists. Historical researchers and heritage tourists will find an enormous variety of wartime forts to explore, as well as seeing first-hand the remnants of the mid 1900s whaling industry.
 |
 |
 |
| The wrecks off Tangalooma today | Cape Moreton Lighthouse today | Comboyuro Lighthouse - about 1905 |
Moreton Island was once occupied by the Ngugi Aboriginal people but European settlement began in 1848 with the building of a pilot station near Bulwer on the North-western side of the island. At the northerly tip of Moreton Island is the Cape Moreton Lighthouse. The lighthouse was erected by tradesmen, assisted by 35 trusted civil prisoners. Its construction is of sandstone blocks quarried on the Island. The Cape Moreton light was first lit on 14 Feb 1857 to the appreciation of hundreds of sightseers who had travelled by boat to join the celebrations. It was Queensland's first lighthouse.
Comboyuro Lighthouse: To the west was the Comboyuro Lighthouse, established in 1877 and manned by a lightkeeper on £96 pa and increased to £108 pa. On 1st October 1902, the Inskip Point Pilot Samuel James Reilly was transferred from Inskip Point to Comboyuro Point as lightkeeper and remained in this job until 1915 on an annual salary of £96. In 1915 the Commonwealth Government took over responsibility for all lighthouses. Reilly died in October 1919 at the age of 80 - making him the oldest and longest serving lightkeeper in Australia.
From August 1920 and during the war the Comboyuro Point Lighthouse was operated by Charlie Waye, accompanied by his wife Doris, son Norm and two daughters Joy and Dot. The children studied by correspondence but used to travel to Brisbane once a year for four weeks to catch up on their schooling, visit relatives and have medical checkups. The lighthouse began as a "Comboyuro Point Light" - a lightroom erected in 1863 with large kerosene burners. Up until then, navigating into Moreton Bay around the northern end of Moreton Island meant "lining up the extreme bushes at Comboyuro Point and pass one cable-lengths distant". In 1867 a new lighthouse was built to replace the old light room. With the increased shipping into Brisbane, a higher tower with a new and powerful condensing apparatus was built in 1874 but this had to be shifted 200 ft inland in 1890 because of encroachment of the sea. Erosion continued and it was further shifted 366 ft inland in 1905 (see photo above). The cottage remained in position for 12 months then it too had to be shifted. This is how it appeared for the next 50 years - right through WW2 when Charlie Waye was the lightkeeper. He left for Hook Point in 1945.
In 1954 it was converted to "gas automatic, unattended" and the services of the lightkeeper were dispensed with. After considerable erosion the lighthouse was discontinued in October 1960 and the North-East No. 2 buoy (about 1 km north at the entrance to the NE Channel) took over. At the same time this buoy was converted to gas and showed a flashing white light. Finally, the Comboyuro Lighthouse collapsed into the sea later that year. The Lightkeeper's cottage - which was about 500 yards inland from the lighthouse - was a 4 bedroom weatherboard house with galvanised iron roof, verandah, big dining room and lounge. It was dismantled in the 1960s. An era had come to an end. All that now remains are two mango trees and a Brazilian cherry tree about 40 m to the west of where the house once stood.
 |
 |
 |
| Dot, Joy, Arthur and Norm Waye with their collection of sharks' jaws. About 1940. | Lightkeeper Charlie Waye drying sea-mullet on the verandah of the lightkeper's cottage. About 1935. | Looking North from Comboyuro Point Lightkeeper's Reserve 20 August 2005 |
Coastal Fortifications: During the early stages of World War II coastal fortifications were built at various locations on Moreton Island - most notably Cowan Cowan on the western side of the island and the Rous Battery on the ocean side. These were part of the system of defence of the port of Brisbane. Most of the fortifications were controlled by the Army, but the Royal Australian Navy also operated a system of defences at Woorim (Bribie Island) and Comboyuro Point (Moreton Island). The is the story of the naval defences at Comboyuro Point: the indicator loop hut, the power huts, the cables and the men who worked there. It was officially know as RAN 7. Other seaward defence stations on Moreton Island were RAN 2 at Tangalooma and RAN 3 at Cowan Cowan.
RAN 7: COMBOYURO POINT (BULWER)
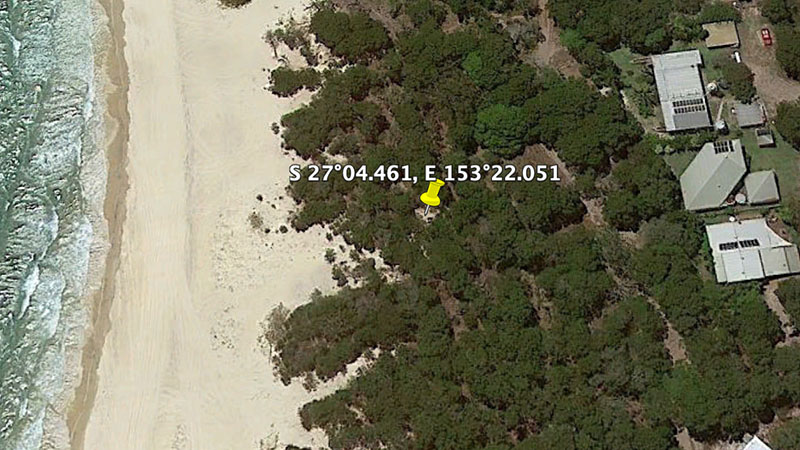 |
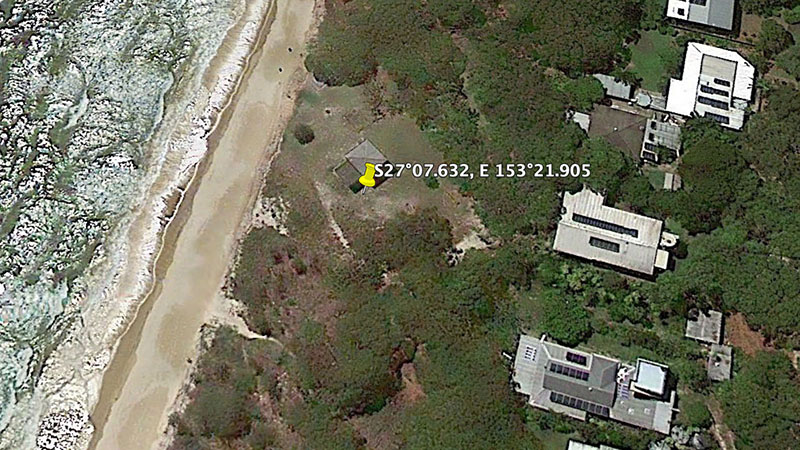
| Location of Comboyuro Point RAN 7 Loop Hut at Bulwer on Moreton Island. (Google Earth) |
 |
 |
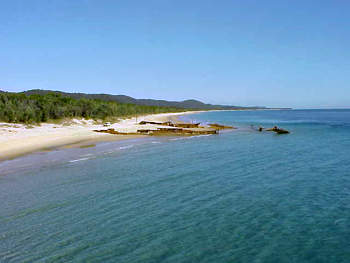
| Aerial photo of the Bulwer Wrecks (looking South). The RAN7 Loop station is behind the foredune to the left. There is a sandy track to Bulwer township about 250 m North of the wrecks. | Comboyuro Point, Moreton Island. The RAN7 station is about 1½ km south (to the right) of the Point. |
Comboyuro Point was chosen as a strategic location for Moreton Bay harbour defence. The naval station was at Bulwer about 1½ km south of the point and submarine detection ("indicator loop") cables ran between the Bribie Island RAN No. 4 Naval Station 16 km across the passage at Woorim to come ashore at Comboyuro Point. Only the nearest (one) of the four loops was monitored at RAN7. As well as indicator loops, the navy had a series of Harbour Defence ASDICs (HDAs) in the shipping channels. These have become known as SONAR devices. The three ASDIC oscillators were suspended from tripods out in the bay and monitored from the naval stations. RAN7 looked after one of the HDAs, the other two being under the control of RAN4. For more information on these forms of detection go to the Indicator Loop and Harbour Defence ASDIC pages.
The naval defences at Comboyuro included an indicator loop hut, a power hut and an accommodation hut - all at Bulwer. The loop hut was a concrete building with 12" thick walls and measured 18' x 12'. The diesel generator hut was of similar construction and a similar size. The accommodation hut was 90' x 18' with a skillion roof, concrete stumps, a wood floor and heavy duty 6" corrugated fibro roof. There were also three 1000 gallon tanks and a 4000 gallon tank. The initial cost of the station was ₤4188. It sold at auction on 2 June 1945 to Mr R. A. Gunderlich of South Brisbane for ₤100.
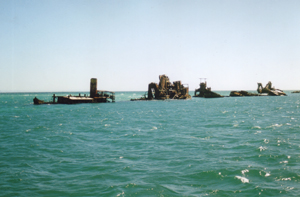
The photos below show the wrecks off Bulwer in 2004 (facing West over Moreton Bay). The main ship was the Kallatina, a steel steamer of 628 tons which was Built at Glasgow in 1890 and bought from the State Government by John Burke Ltd. It operated on the northern Queensland run from 1921 but was scuttled in 1931 to form a breakwater at Bulwer, Moreton Bay, Queensland. During WW2 sailors from RAN7 would swim and fish around the wrecks. A favourite pastime was to spear fish - mainly Butter Bream (Diamond Fish) and Hardyheads - with lengths of steel reinforcing rod. Hand-grenades were found to work well - the fish just floated to the surface.
 |
 |
| The rusting remains of the 646 ton Kallatina - a passenger and cargo ship scuttled in 1931. The ship Mt Kembla is to the right. Location: S 27°04.050, E153°22.017. | In 1942 and 1943, RAN7 sailors used go fishing off the "Bulwer Wrecks" . The Hopewell - scuttled in 1930 - is in the foreground. In the background is the 716 ton Mt Kembla - also scuttled in 1930 - as it appeared in 2004. It was 180' long and built in England in 1885 for Mt Kembla Coal and Oil Company. |
History of the Bulwer Wrecks
The Bulwer Wrecks were scuttled on the beach at Bulwer, Moreton Island by Robert Alexander Gow, known to people associated with the island as Bert and later in life as Pop. The wrecks were to provide shelter for Gow's 40 foot (12 metres) launch Maringo named after his mother Mary Ingles Gow. The shelter of the wrecks facilitated the safe unloading of materials necessary to build a house on his first lease which Gow acquired in 1928 and after that the food and other provisions needed for the many holidays his family reputedly enjoyed at Bulwer. There are many fond memories throughout the Gow family, of time spent at Bulwer, particularly of the fishing. If you didn't like fishing you were obviously a "ring-in". The tradition still continues today (2008) with Bert's youngest son Alistair, his wife Norma and their family holidaying regularly at the property at Bulwer.
When World War II broke out Bert held a contract with the army to carry stores from Brisbane to the fort at Cowan Cowan. He travelled to the island every day for eighteen months until the navy took Maringo from him for the war effort.
Photos supplied by Alistair Gow:
 |
 |
| Taken just before Kalatina being manoeuvred into position. | Kalatina being manoeuvred into position around the bow of the Mt. Kembla - 1931. |
 |
 |
| Final resting place: L to R: Kallatina, Mt Kembla and Hopeful. | Bert Gow (kneeling), His wife, Madge (Margaret), their first son Graham and an unknown person to the left of the group. In the background, Maringo is moored next to the Mt. Kembla wreck. Photo taken in the early 1930s. |
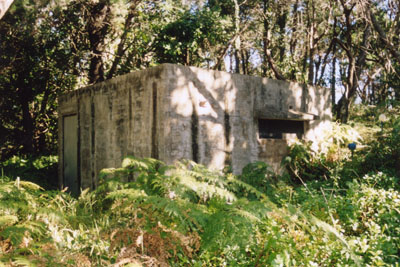
THE LOOP CONTROL HUT
 |
 |
The Loop Hut is amongst the she-oaks on the dunes. It is very hard to see. It was much more obvious in 1943. |
The RAN 7 "Loop Control Hut" in 2004. It measures 18' x 12' and the entrance is at the rear. Location: S 27°04.461, E 153°22.051. The observation window on the NW corner has a concrete hood overhead. The hut is almost directly opposite the Marsh St/Strand intersection and 70 m towards the beach. |
 |
 |
| Loop Hut - doorway | Loop Hut - observation window looking Southwest. |
 |
 |
| Generator hut - doorway | Generator hut - vents in ceiling and northern window. |
 |
 |
| The RAN7 Generator Hut is right beside "The Strand" roadway, about 100 m N of the Marsh St intersection opposite the Kookaburra Court holiday house: S 27°04.448, E 153°22.081 about 75 m SW of the Loop Hut. Photo taken 4 July 2004. | Generator hut - fuel storeroom |
Construction of the Loop Hut, Generator Hut and accommodation began in May 1943 and was inspected by a number of people from RAN4 at Woorim. They included Lt Laurie Harvey, Lt Oswald Jarvis, Lt Bill Alderson Smith, Les Passtoors (AB), Geoff Batchelor (AB) and 'Dinger' Bell (AB). Construction was complete by September 1943 and it began operating immediately. First staff to be stationed there were Lt Bill Alderson Smith and ratings Ron Smith (AB) and Ray Young (AB). The three of them returned to RAN4 at Woorim after a short time and and were replaced by S/Lt Tom O'Byrne, S/Lt Neil Walford, Les Passtoors (AB) and Max Towell (AB) who began duties at RAN7 on 13th September 1943. Geoff Batchelor was transferred there in December 1943. Next to arrive was the cook - 18 year-old Rex Goodrick from Hobart who learnt his trade at HMAS Cerberus ('Flinders Naval Base'). Rex later went to RAN9 at Pinkenba for 2 months before rejoining a real ship. He was always embarrassed about the food he served up "all I could get were army rations from Fort Cowan Cowan - it was real shit" he said recently.
VISITING THE LIGHTHOUSE: RAN7 sailors used to walk the mile to the Comboyuro Lighthouse in the evening as guests of the Lightkeeper Charles "Charlie" Waye and his wife Doris (nee Hislop). Sailors recall playing card and board games in mid-1943 with Charlie Waye and his two daughters Joy (aged 15) and Dot (aged 13). Their oldest son Arthur (aged 17 in 1943) had left the island in the late 1930s to become a fisherman at Maryborough and their youngest son Norman (aged 11) was rarely seen although he did visit the naval station from time to time. Mrs Waye and the girls used to spend all afternoon cooking for their guests. Some soldiers and sailors also used to visit from Cowan Cowan station further south. To supplement their income, Charlie Waye used to catch sharks - mostly Grey Whaler, Bronze Whaler, Grey Nurse, Hammerhead and Blue Shark - and render down their liver for oil. The girls were required to help Charlie pull the sharks in to the beach. Afterwards, he would tow the carcasses out to sea because of the stink.
The oil was sent in kerosene tins on the pilot vessels John Oxley and Matthew Flinders to Brisbane where Tom Ludlow would repackage it for sale (some say as Cod Liver Oil). Doris Waye would sell coloured sand in bottles to visitors. Seaman Ron Smith still has a bottle which is marked "Doris Waye, Combyuro Light House, Time taken one and a half hours, Price six shillings." Sailors don't remember the lighthouse as they only visited at night. But they do remember the two fearsome guard dogs chained beside the path to the house. By 1944, the girls were getting to their late teens and the Wayes decided it was time to move the family to the mainland. Mrs Waye and the two girls went to Maryborough to be near Arthur, leaving Charlie and Norman to fend for themselves for another 12 months. Where to next?
The visitors book for the Inskip Point Light and Signal Station has an entry on 1st February 1946 written by the Inskip Lightkeeper's wife Ada Walding: "Charles Percival Waye, Comboyuro Point Lightkeeper arrives to take up position as Lightkeeper at Hook Point Light and Signal Station Fraser's Island. Accompanied by Norman Arthur Waye, Comboyuro Point." Charlie must have had the sea in his blood. His grandfather John Waye was Staff Commander with the Royal Navy - and recipient of the Crimean Medal - who later in life performed duties with distinction as Royal Navy Harbour Master in Halifax. After the Wayes left Comboyuro, Jock Charles was appointed Lightkeeper before he was transferred to Karumba (near Normanton in the Gulf of Carpentaria).
For more details of the Inskip Point Light and Signal Station (including its relationship to Hook Point lightstation) please click the link.
 |
 |
 |
 |
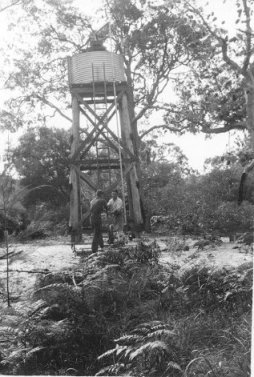
| Ron Smith and Frank Ramsay pumping water at the Moreton Island water tower (RAN7) - 1943 | Ray Young was one of the submarine detectors (SD) who helped set up RAN7. Here he is in one of the lagoons behind the Control Hut. He said "we were well and truly lost by this time". |
 |
 |
| The HDA and Loop Control Hut at Comboyuro - photo taken from the beach in 1944. Note the camouflage. | The Loop Hut as it appears today (4 July 2005). The beach is only 40 m away. |
 |
 |
| The inside southern wall of the Loop Hut today. The door has been bolted shut to stop vandals. The RAN7 ratings tell me that the graffiti is not theirs and they never knew of any Amanda. The telescope post is in the right foreground. | Lt Bill Alderson Smith and Ron Smith (AB) at the accommodation barracks at RAN7, 1944. |
The barracks building at RAN7 consisted of a "T" shaped hut 77' long and 18'6" wide with a top of the T being 30' long and 18' wide. Inside were the officers' and ratings' quarters, mess and kitchen. The walls and floor were T&G hardwood and the roof was corrugated AC.
Watchkeeping ceased at 2.25 pm on 3rd August 1944. All gear was transferred by barge to the naval store HMAS Moreton at Pinkenba. On 11th August RAN7 officially closed down and three weeks later Commander Eddy RN, Colonel Craven, Mr Hudson (Allied Works Council) and the XDO Lt Thompson visited the site to check that all was secure. On 24th January 1946 the accommodation building was sold for £100.
RAN 2: TANGALOOMA
Prior to WW2 there was nothing at the present site of Tangalooma. In late 1942 the Civil Constructional Corps built some masonite huts in a small grassed, flat area where the present resort buildings at Tangalooma are located. The CCC also bulldozed a sandy road from Tangalooma across the island to Rous Battery on the ocean side of the island. A jetty was also constructed in early 1943 from turpentine logs dropped off by the ferry from Brisbane to Cowan Cowan. Two 155 mm guns and a tractor for Rous Battery were dropped off by barge on 29 March 1943. The RAN2 naval station at Tangalooma was established on 13 September 1943 and consisted of two underground concrete rooms for the controlled mining operation. One was the control hut and the other was the power room. The accommodation consisted of an officers' quarters and mess, a ratings' recreation room, a ratings' sleep/ablutions hut, a septic tank and pits, a 1000 gallon water tank and a 12' x 12' store room. None of these buildings remain and the Tangalooma Wild Dolphin Resort has taken over the site. |
 |
| The flensing deck of the Tangalooma Whaling Station - 1958. | The jetty up to
the flensing deck - 1958. Photos: R. Walding. |
 |
 |
| The beach at Tangalooma, facing North. | The Controlled Mining huts were located on the left in this photo (just to the South of the Tangalooma jetty). This photo was taken from the Tangalooma Wild Dolphin Resort in 2005. |
Tangalooma RAN 2 Naval Station was responsible for the controlled minefield in the nearby shipping channel. If an unidentified ship (i.e. submarine) was detected on the "guard loop" (a simple version of a "Indicator Loop" but with just 2 legs instead of 3), the minefield could be set to active and detonated when the ship passed by. Details of the protocol for this process follow:
Operation of the Controlled Mining Stations at Cowan Cowan, Tangalooma and Fort Bribie
The men stationed at the Controlled Mining stations had to perform daily and weekly tests on the equipment to make sure it was in good working order and had to record perturbations ("perts" - the swings of the galvanometer spot due to the tides) every 5 minutes to the hour. These had to be recorded in the log book. At the end of each watch, the Handbook of Controlled Mining Confidential Book (CB) had to be mustered and had to be locked in a CB chest and then placed in a locked cupboard.
The guard loops were to the north of the mine loop so that if a submarine entered the bay it would cross the guard loop first and alert the CM operators. If a swing was detected on the guard loop, the operator would close the control switch to start the 300V generator and then ring one long bell to the power hut. The operator would then ring the Battery Observation Post (BOP) and report "Mines to Active" and would say the number of the guard loop giving the swing. He would then check to see if the correct voltage was showing on the voltmeter. Then they had to wait.
If a swing was detected on the mine loop after a swing on a guard loop it meant that a submarine had passed over the loops. The operator would then report to the BOP "Mines to Active" again, shift the selector switch to the number of the mine loop involved and fire the mines as the galvanometer spot crossed it's zero after it's first displacement. He would then ring the BOP and say "Mines to Active, mine number XX fired". After 5 seconds, the firing release lever would be released and the selector switch replaced. If there was just a swing on the guard loop they took no chances. The operator would fire anyway. After a firing took place, the fuses in the mine cable would be replaced. Of course, if a boat was sweeping for mines in the area, they should have told the XDO of the fact.
Seaward naval defences at Tangalooma consisted of:- Officers Sleeping Quarters and Mess: a good quality building measuring 80' x 18', lined and sealed with 3-ply and good quality light shades;
- Ratings Recreation Room and Mess: a good quality building measuring 100' x 18', lined and sealed with 3-ply and good quality light shades; also containing a galley, store and laundry measuring 36' x 18' in an L-shape to the main building.
- Ratings Sleeping Quarters: a 40' x 18' accommodation hut with a skillion roof, wood floor and wooden walls;
- A small hut approximately 18' x 12' with fibro roof and walls;
- Officers Kitchen: a prefabricated hut fitted with a stove;
- Another prefabricated hut;
- Two galvanised iron buildings: 12' x 18';
- Two-1000 gallon tanks;
- A well with a 4000 gallon tank;
- Hand pumps;
- Rex and Metters stoves.
 |
 |
| A panoramic view of Tangalooma Wild Dolphin Resort as it was in 2004. The RAN2 Naval Station was located in the centre of the photo. | A view looking down the Main Channel outside Tangalooma. The RAN2 controlled minefield was located in this channel. |
By the time the Japanese threat to shipping in the area had subsided, the navy decided that the buildings were not worth demolishing for transport elsewhere so they were prepared for auction. An assessors report on 16 September 1944 showed a total cost for the buildings of £4400 in 1942. They were sold at auction to Captain A. K. Bennett of Ascot for £275 in 1946. There were also defence buildings but no bids were made:
Observation Post Electric generator hut Storeroom (oil): 12' x 12'.
COWAN COWAN - RAN 3
There were two defence establishments at Cowan Cowan during WW2: the Australian Army's "Fort Cowan" (Cowan Heavy Battery) and the Australian Navy's "RAN3" harbour defence establishment.
Cowan Cowan started its life as a pilot station for the Queensland Department of Harbours and Marine on 1st August 1848 being transferred there from Amity on North Stradbroke Island. This occurred because the condition of the South Passage (between Stradbroke and Moreton Islands) continued to deteriorate and more and more vessels used the North Passage around the northern tip of Moreton Island at Cape Moreton. The two pilots, nine boatmen and others were housed in wretched conditions. In the early 1860s - just after separation from New South Wales - housed lights with large kerosene reflectors were erected at Cowan Cowan, Comboyuro Point and North Point on Moreton Island. In 1867 the height of the Cowan Cowan light was raised from 18 ft to 34 ft to improve navigation in Moreton Bay. At the same time a new Comboyuro Point lighthouse was built. Further improvements were made in 1883 when the Cowan light was intensified with vertical condensing prisms. By 1898 the light and the lightkeeper's cottage were being threatened by encroachment of the sea and by 1901 they were within 10 ft of the sea. They were moved 635 ft across a creek 40 ft wide to protect them. |
| The old Cowan Lighthouse |
However, by February 1939, the Department of Defence Military Board (Melbourne) had requested that the Commandant of the Ist Military District (Brisbane) Major H. D. Wynter make a submission on the state of Moreton Bay defences. He suggested that the proposed budget of ₤13100 be withheld subject to a decision on whether Cowan Cowan or Caloundra was more suitable. He said that Cowan Cowan needed upgraded roads ₤6000 and a better water supply (₤1500 for a well). He said the disadvantages of Cowan Cowan included isolation, that the guns didn't cover the entrance to Moreton Bay, that Pearl Channel was beyond the reach of searchlights, and that there were not the usual amenities of a established community. He suggested that the main defences of Moreton Bay be located at the northern end of Bribie Island (2 x 6" guns) and that Cowan Cowan be just the examination battery (with one 6" gun).
On 27 February 1939, the Military Board wrote back and said 1 x 6"
gun was suitable for Cowan Cowan and not to entertain any thoughts about a
battery at Bribie Island (unless invaded). Then on 21st June 1939, the
Military Board wrote to the Commandant of the 1st Military District asking if
one or two guns were needed. He replied on 13th July 1939 that one 6" gun was
sufficient but that a second gun emplacement should be prepared. Major
H. D. Wynter wrote back on 19 March 1940 to suggest (again) that Bribie Island
be developed as principal defence of Moreton Bay. Attempts at
establishing a battery at northern Bribie Island were not going well and
arguments continued.
On 24th August 1939 the British government informed Australia that continued
hostile overtures by Germany toward Poland would lead to war and Australia
immediately sent troops to Darwin, installed 6" guns at Port Kembla and called
up some militia to help permanent garrisons at coastal forts. On 1st September
1939 Britain advised Australia to adopt a precautionary war stage and the next
morning military districts received orders to man coastal defences (but with
permanent troops only). Soon after, Australia declared war on Germany and Army personnel were moved to Bribie
Island and a second six inch battery in Moreton Bay (besides Cowan Cowan) was
commenced. It was only intended to be temporary and meagre resources were used
in the most efficient way possible. Colonel J S Whitelaw arrived at Bribie on 14th October 1940 as OC
Coast Defences, Northern Command. He designed the layout of the fort and
recommended its completion. By the beginning of 1942, it had finally been
decided that Fort Bribie should go ahead as the main defence establishment,
mainly on strategic grounds (closer to the shipping channel). Whew, finally!
ROYAL AUSTRALIAN NAVY "RAN 3" NAVAL STATION
 |
| Location of RAN 3 Naval Station at Cowan. (Google Earth) |
 |
 |
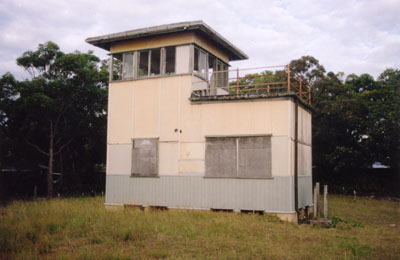
RAN3 Control Tower at 25 Dorothy Newnham Street, Cowan Cowan:
S27°07.632, E 153°21.905. The building measures 25' x 13' and is made from
fibro asbestos cement walls, corrugated asbestos cement "Super Six" roof,
wood floor, fibro ceiling and partitions. Also called the Port War Signal
Station (PWSS) until that role was taken over by Caloundra. |
View out to Moreton Bay from
the PWSS. Note the bolt in foreground to secure the flagpole stays. |
 |
 |
Concrete bolt to secure the stays from the
PWSS flagpole. Measures 45 cm square.
|
Fort Cowan water tank at
southern end of fort. |
 |
 |
RAN3 Observation Hut lying on
the beach about 60 m NW of the Controlled Mining "Power Room".
The hut was up on posts and ratings had to enter through the opening in
the base. |
Steel ladder inside the Observation Hut. |
The Cowan naval station was located within the perimeter
of the Cowan Battery and it was responsible for the two
controlled minefields: one in Pearl Channel (called M11)
and one in the main channel off Cowan Cowan (M5). There
were a total of 16 mine loops and 6 guard loops, some of
which had tails 3½ to 4 miles long. These minefields were
laid on 27th June 1942 in "Operation Edward" by Capt John
Campbell RN in the cableship Atreus. The old
minefield was removed and a new controlled minefield
was laid on 9th June 1944.
Two naval areas in the Cowan perimeter were:
1. A signal station or "Control Tower" south of the
jetty which had two stories and a flag deck, generator
hut, fuel store, workshop and living quarters. This acted
as the Port War Signal Station (PWSS) until its relocation
(the role, not the building) to Caloundra in 1942.
2. The naval station (RAN3
proper) which was at the southern end of Cowan Battery. It
consisted of:
a concrete underground mine control hut; a concrete generator hut (the "Power Room") a concrete observation post 1650 yards away, all of which cost £4188.
The living quarters consisted of:Officers' sleeping quarters, mess and kitchen (90' x 18' ) half weatherboard and half fibro; Ratings' recreation room and mess (130' x 18'), half weatherboard and half fibro; Ratings' sleeping and ablutions hut. Original cost £4570.


Naval observation hut
Glenn Tibbets wrote regarding the observation hut located on the side of Round Hill behind Cowan Cowan. "I was last there approximately 50 years ago as a 9 to 10 year old. Access to the hut was, as I recall, a lot easier back then as there was a simple plank boardwalk across the "swamp" to the foothills and the vegetation I'm sure was much more sparsely spread on the slopes. We finally made it back to the hut on 31 November 2019 on our third attempt within a few years. It was incredibly hard going as most of the vegetation was chest high and tightly knotted. We apparently only travelled about 2.25 km yet it took the best part of 5 hours for the round trip." All photos by Glen Tibbets.
 |
 |
Observation hut. Location: 27°07'55.5"S 153°22'35.6"E -27.132091, 153.376560 |
Observation hut |
 |
 |
| View over Moreton Bay from the observation hut | The concrete instrument pillar inside the hut |
 |
 |
| The roof of the hut is 12 inch (30 cm) thick reinforced concrete |
Water tank. Location: 27°07'39.5"S 153°22'25.6"E or -27.127651, 153.373769 |
 |
 |
| Observation window | Entrance to the hut |
 |
 |
| Instrument rack | Underground cable exposed on the surface |
After the war the RAN3 naval buildings were put up for sale. The Observation Tower (Port War Signal Station) was valued at ₤512 for sale on 15 October 1946. It consists of a bottom floor with two 12' x 12' rooms, HW floor, timber frame, FAC walls and ceiling. Inside was a porcelain galvanised iron sink and basin. The top floor (the "Signal Platform") consists of a 12' x 12' deck covered in malthoid with a bitumen finish. Around the sides is a galvanised rail. The signal room itself was also 12' x 12' with glass sliding sash windows all round. It also has a HW floor, HW timber framed walls, FAC lined and ceiled. The Oregon mast was 65 ft high with two signal yards and 8 steel wire guys. Two fire extinguishers were located inside. The building was sold for ₤512 to the Post Master Generals Department but they realised it was too expensive and cancelled the sale. The price was reduced to ₤400 and sold to the Department of Public Works on 5th June 1947. It is now heritage listed by the Brisbane City Council.
My thanks to Trevor Hassard, Manager of Tangalooma Island Resort for his help in locating some of these fortifications.FORT COWAN (COWAN HEAVY BATTERY)
 |
NAMES. Moreton
Island, Qld. 13 November 1943. Officers Group Of The
Brisbane
Fortress, The 2/2nd Australian Headquarters Guard Battalion, And The Cowan
Heavy Battery, taken at Fort Cowan. They are, Left To Right: Standing:
Nx132831 Padre J. Dineen (1); Qx45287 Lieutenant J. T. Flaherty (2);
Nx6375 Captain D. J. Kiss (3); Qx44591 Captain G. A. Hafner (4); Nx135094
Lieutenant C. H. S. Walsh (5); Nx128607 Lieutenant O. B. Dewar (6); Vx3642
Lieutenant R. P. Jolly (7); Q123364 Captain N. L. Hall (8); Vx88123
Lieutenant R. Brockhouse (9); Nx102458 Lieutenant W. B. Wane (10); Ngx117
Captain K. C. Watkins (11). Seated: Nx132769 Captain A. C. Leslie (12);
Nx35014 Major L. C. T. Sedgwick (13); Qx55160 Sister D. R. Knox (14);
Qx41376 Colonel G. P. W. Meredith (15); Qf124909 Sister G. C. Whitehead
(16); Nx45 Lieutenant Colonel Donald James Lamb, E.D., (17); Qx34586 Major R. H.
Jamieson (18). AWM 060090. Note: the
honourific "E.D." attached to Lt Col Lamb stands for
"Efficiency Decoration". It was earned before WW2 by 20 years commissioned
service in the militia.
 |
 |
| The camouflaged Close Defence Battery Observation Post in 1939 | The CDBOP is now a private residence in Jessie Wadsworth Street at Cowan Cowan. It was on 10 m high stumps which were removed many years ago. |
 |
 |
| The Fort Cowan army settlement in 1939. The jetty was 300' long with a head of 57' x 15'6" and made from HW decking on HW runners and concrete piers. It also had a 910' railway line of 2'3½" gauge. The crane on the head was a Hodkinson No. 1799 one-ton crane. | Some of the staff quarters in 1939. |
 |
 |
Fort Cowan - North Gun 1939 |
Fort Cowan - North Gun 1982 |
 |
 |
| Fort Cowan - North Gun 1992 | Fort Cowan - South Gun 1992 |
 |
 |
The No. 1 (Northern) Gun
Emplacement: S27°07.490, E153°21.938. Photo 2004. |
The No. 2 (Southern) Gun
Emplacement: S27°07.528, E153°21.926, about 70 m from the No.1 gun. Photo
2004. |
 |
 |
| Northern side of the Southern Gun in October 2005. Both emplacements have become quite dangerous and the National Parks & Wildlife Service is considering options to make them safe. Locals have also improved safety by felling decaying concrete and removing rusting steel poking out of the structure. | Plate taken from the Southern Gun. This was one of eight six-inch guns on the first HMAS Sydney which fired upon and beached the German ship Emden in November 1916. This plate is on display at the Tangalooma Wild Dolphin Resort in the restaurant bar where many Moreton Island arteacts are preserved. |
 |
 |
| Blastproof tube separating gun floor from artillery store | Underneath the gun floor. |
 |
 |
| Gun Crew
standing by the 6 Inch Gun a Fort Cowan, 1st Australian Military District
Fixed Defences,
Queensland
Lines of Communications Area - 13 November 1943. Shown: Sergeant Rogers
(1); Gunner J. B. Purvey (2); Gunner J. C. Rigby (3); Bombardier G.
Cousins (4); Gunner S. P. Dunn (5); Gunner T. E. Whale (6); Gunner E. J.
Gorrie (7); Gunner E. C. Earley (8); Gunner T. W. Pocock (9); Warrant
Officer Ii J. D. Ryan (10). AWM Copyright
060072. |
Gun Crew
Standing By The 6 Inch Gun at Fort Cowan, 1st Australian Military District
Fixed Defences,
Queensland
Lines Of Communications Area. Shown: Sergeant Rogers (1); Gunner J. C.
Rigby (2); Gunner T. E. Whale (3); Gunner E. C. Earley (4); Gunner J. W.
Pocock (5); Gunner E. J. Gorrie (6).
AWM
Copyright
060073. |
 |
 |
Looking out from the No.2 gun
over Main Channel and Pearl Channel where the controlled mines were
located (3 July 2004). Skirmish Point on Bribie Island is to the right in the
distance. |
The cartridge and shell
hatches at the No. 2 gun emplacement. Fuzed (live) shells would be hoisted up from the
shell store below and passed through the right-hand hatch to the gun crew
on the gun floor. Cordite cartridges would be sent up
through the left-hand blast-proof hatch. Taken 3 July 2004 |
 |
 |
|
A camouflaged ammunition
magazine in 1939. It is located at: S27°07.527, E153°21.955 which is about
50 m behind (east) the No. 2 gun. |
The same ammunition magazine
today behind the No. 2 gun. It has been converted into a holiday shack
(even the roof vent remains). The three other magazines have been
similarly converted. |
 |
 |
Southern Coastal Artillery
Searchlight (CASL) post. Building measures 6.1 m long by 3.4 m wide.
Location S27° 07.697', E153° 21.878'. |
Corporal
H. E. Sevington of The 2/2nd Australian Headquarters Guard Battalion,
cleaning a searchlight At Fort Cowan, 13 Nov 1943. AWM Copyright. |
 |
Side view of the CASL. |
 |
 |
The bush as it is today at Fort Cowan Cowan
just in front of the hospital. |
There was 2125 ft of 4" Fibrolite sewerage pipe at Fort
Cowan Cowan, as well as 500' of cast iron and 1150' of earthenware
sewerage pipe. A real hit with the visitors. A piece of
lead-covered telephone wire comes out of the ground nearby (being held up
by Clair). |
FORT ROUS (ROUS BATTERY)
On 20th July 1942, the Army decided to put a second 155mm battery at a
position south of Cowan Cowan so as to be able to engage a enemy naval unit
attempting to bombard the proposed cruiser berths in the lower reaches of the
Brisbane River or the anchorage off Mud Island in Moreton Bay. So began the
construction of Rous Battery on the ocean side at southern end of Moreton
Island. It was nearing completion when 'O' Battery (a 155mm 'Letter' Battery)
under the command of Major R. K. 'Ken' Fullford arrived to assume duty.
Officers included: Major Fullford as the Battery Commander, Capt. R. H.
'Bobby' Burge, Battery Captain; Lt B. I. 'Bruce' Wilson, Gun Position Officer
(GPO); Lt R. H. 'Russ' Ward, Section Commander, WO2 H. 'Bert' Harvey, Battery
Sergeant Major (BSM) and S/Sgt M. Dyson-Smith, Battery Quartermaster Sergeant.
On the 9th August 1943, 'O' Battery marched out for Cape Endaiadere, New
Guinea and a patrol from 2/2 Aust HQ Guards Battalion provided a security
picquet at Rous. Rous Battery was put on a maintenance basis as of 24
November 1943.
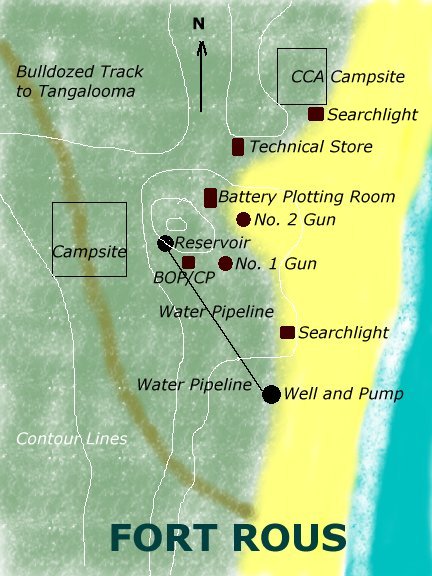 |
Map drawn by Richard Walding from sketch by Brig. Ken Fulford (BC Rous 1943).
The road between Tangalooma and Rous was started on 13 Oct 1942 and took 2 weeks
to complete. The two guns were dropped off at Tangalooma on 29th March 1943 and were
taken by Caterpillar tractor to Rous the next day. |
 |
Brigadier R. K. (Ken) Fullford was Battery Commander of 'O' Letter Battery at Rous from its beginning on 21 March 1943 to 8 August 1943 when the battery departed for Buna (New Guinea). Brigadier Fullford joined the Australian Garrison Artillery in 1934 and, as a junior NCO was "called out" with his battery to man the 6-inch guns at Middle Head (Sydney) at the outbreak of the war. He was appointed as a lieutenant in the Royal Australian Artillery (Militia) (Heavy) in May 1940 and was promoted to major in December 1942 at the age of 24 while Battery Commander of Illowra Battery (Port Kembla). 'O' Battery was disbanded in May 1945. After the war Fullford joined the Australian Regular Army and was Commanding Officer/Chief Instructor of the School of Artillery, later to become Commander Northern Territory Command and finally Director of Manning where he received his OBE. He retired in 1973. The photo opposite was taken of Brigadier Fullford in 1979. He passed away in Northern NSW on 15th October 2006. His assistance with this part of the webpage is gratefully acknowledged. |
 |
 |
|
The 155 mm Rous No. 2 gun being set up in 1943. It shows the gun in travelling position with the tractor still hooked in. Note that the central pivot plate is not in place, merely the holding down bolts. The person wearing the pith helmet is Major Fulford directing the operation. |
Looking seaward from the same position as in the photo to the left: 25 August 2005 |
 |
|
| Northern Gun Emplacement - undermined. The guns were breech loading 155 mm M1917A1, registered numbers 1372 and 1140-2 on carriages 155 mm Guns M3, numbers 604 and 516-2. |
 |
 |
| Author surveys Northern (No. 2) Gun Emplacement - August 2005 | Northern Gun Emplacement: S27°15.582, E153°24.975, Elevation 26 m |
 |
 |
| The gun mount "cheese" at Rous Battery. | Example of a 155mm coastal gun on it's concrete mount similar to that used at Rous Battery. This photo shows a 155mm m1917 heavy artillery positioned at a gun pit of the Boera Heavy Battery Port Moresby, New Guinea in April 1944. AWM 072247. |
 |
 |
The Artillery Store served as
the technical store housing the tools, spares, test equipment, oils,
paint, grease and cleaning gear. |
Artillery Store - internal,
looking west. The artificers worked here keeping the armament serviceable.
Measure 24' x 17'. Two rooms, each of about 15' x 9'6". Walls 9" thick
concrete. Steps at both ends. |
 |
 |
Track up to Command Post |
Looking out to sea through
Command Post window |
 |
 |
|
Command Post entrance: S27°15.562,
E153°24.847, Elevation 69 m. Measure 4200mm x 4300mm, 2400mm high inside. |
Observation window in Command Post. The
rangefinder in here was a Barr and Stroud 12 foot. There were also two
Azimuth Instruments - US high grade telescopes for observing vessels and
indicating their bearing from the instrument. |
 |
 |
Battery Plotting Room entrance: S27°15.609,
E153°24.908, Elevation 31 m. |
Escape tunnel beside Battery
Plotting Room |
 |
 |
Battery Plotting Room interior.
The Plotting Board and range/tangent elevation converted were both US
instruments. Measures 20' x 15'. |
Steps to Battery Plotting Room. |
 |
 |
| Water tank beside Command Post. S27°15.633, E153°24.857, Elevation 66 m. The tank is 7100mm in diameter. | Southern (No. 1) Coastal Artillery Searchlight (CASL): S27°15.761, E153°25.058, Elevation 19 m. In here was a 150 cm Sperry searchlight with a 4-wheeled generator trailer powered by Hercules gasoline engines. |
 |
 |
The Northern Flank Observation Post in
1982. It is about 4 km north of the main camp and 8.8km south of Middle
Road. Elevation 24m. S 27°13.914, E 153°24.977.
An arrow engraved on the roof points due North. |
And in October 2005. The FOPs were not manned while
'O' Battery was at Rous. It measures 3.5 m x 2.9m. The walls are 9" thick
and it has a height of 2.0m inside. |
 |
 |
Northern FOP as seen from the beach. The
structure is about 24 m above sea level and has excellent vies up and down
the beach. There is a 360mm x 360mm concrete pillar inside in the north-east
corner for mounting of the binoculars. |
The No. 1 (Southern) Gun is hard to find as
it is covered in scrub. It is directly below the Command Post. There is a
steel rail of diameter 16' around the outside. The 900 mm wide steel mounting plate in the
centre had 8 bolts to hold the gun secure. There was a steel rail around the
outer edge of the concrete. The two gun emplacements cost
£22700 in November 1942. Location:S27°15.638,
E153°24.928, Elevation 58 m. Taken 8 October 2005. |
 |
 |
| The No. 1 Gun shell store - interior photo facing towards the beach. The shell window measures 750mm high x 500mm wide. | The magazine (left) and shell store (right) for the No. 1 gun. Each room measure 14' x 9'0". |
Unofficial Nominal Roll of the men of 'O'
Battery (courtesy of Major Fullford)
'O' Battery was formed officially on 3rd January 1943 at
Glenfield Camp near Holdsworthy, NSW.
| Anderson, C.A. (Claude) Anderson, R.R. (Bert) Archer, J.L.'(Snowy) Archer, W.G. Arnett, P. (Pete) Banville, C.E. (Tiny) Barnes, A.W. (Blue) Beckhouse, A.G. (Arthur) Bevan, W.J. (Bill) Blow, C.D. (Chris) Boyd, K.A. (Bogga) Bracken, A.M. Bridge, B.A. (Cappy) Bryant, L.M. (Bluey) Buckland, N.E. (Norm) Burge, R.H. (Bobby) Bush, ? Campbell, W.H. (Hilton) Chamney, W. (Snow) Clark, JW. Clarke, S. Cockburn Campbell, T. (Tommy) Collins, Ken Colreavy, M.F. (Maurie) Cork, A.A. Croft, E.J. (Teddy) Crosby, R. Datson, R.K. (Ray) Derrick, C.L. (Dick) Derrin, W. Dickson Battye, A. Doman, L. (Len) Dunning, C.H. (Charlie) Dyson Smith, M. (Dyson) Eaton, R.C. (Dick) Elven, A. (Little Darkie) Elven, A.J. (Big Darkie) Erbacher, T.E. (Theo) Evans, D.F. (Ocker) Evans, L.G. (Laurie) Faulkner, A.C. (Abby) Fedder, I. Fitzgerald, D.T.M. (Fitzy) Follington, A.G. (Alby) Foster, A.L. (Lennie) Freeland, F.A. (Freddie) Fullford, R.K. (Ken) Furner, B,C. (Bruce) Fyfe, A.G. (Alf) Gibson, A. (Hoot) Gibson, 0. (Ollie) Glass, R. (Rudi) Godden, Tom |
Godwin, K.G. (Ken) Godwin, V.G. (Vic) Grainger, R.H. (Harry) Grantz, A. Gregg, T.A. (Tommy) Haddon, R.S. (Sam) Hamilton, A.J. Hansen, H.C. Harvey, H.H. (Bert) Hennah, J.F. (Jack) Henry, H.J. (Hal) Howden, S. Howley, A.F. (Athol) Hunter, P. (Perce) Hurd, E.J. Ingersoll, R. (Bob) Jenkins, D.C. (Doug) Jennings, T.D. (Tom) Jesse, M.K. Keen, S. Kennedy, S.W. Kent, R.T. (Darkie) Knott, H. (Happy) Lane, L.R. (Sandy) Lane, N.W. (Noel) Laskie, J.M. (Jack) Laurie, W.A. (Nude Nut) Lindsay, J.M. Lippelgoes, J.W. (Jack) Mallitt, G. C. (Gordon) - RAE Malone, J.A. (Jack - "Mother") Marsh, S. (Sid) Marshall, R.G. (Gordon) Mason, F.C. (Fred) McDonald, Don McDonald, F.S. Miles, D.W. (D'Arcy) Miller, R. (Bob) Moffit, H. Morgan, J.A. (Jack) Mullins, Cyril Napier, J.A.B. Nelson, R.F. Owen-Jones, C.E. (Charlie) Pankhurst, C.A. (Claude) Parker, K. Perrin, W.J. (Bill, [Smash]) Pickette, Hilton (Snowy) Pickup, L.J. Poore, N.A. (Trigger) Quirk, Rex (Illabo) Rapmund, C.H. (Charlie) Reilly, Dermott Roberts, M.G. |
Robertson, H.E. (Harry) Rose, R.C. (Ray) Rubie, F.,'Fred, [Red]) Rutter, Dinny. Ryan,E,(Ted) Sawyers, A.H. (Alan) Seers, W.T. Seinor, A.A. (Athol) Seinor, Carl Seinor, R. (Roy) Shepherd, ? (Happy) Simpson, Chris Simpson, Jack Singleton, M.S. (Singo) Skene, J.A. Smith, G.A. (Sandshoe Jack) Smith, L.G. (Les) Smith, W.G. (Bill) Snelson, E. (Erme) Stanford, F.C. (Bill) Stanmore, D.R. (Don) Stevenson, C.R. (Roy) Strang, D.D. (Don) Sullivan, D.F. (Danny) Swanston, G. R. (George [Swannie]), Tange, R.J. (Ronnie) Tarry, L.E. (Les) Thomas, AW.G. Thompson, K. (Keith) Tighe, W. Toms, E.V. Trotter, A.G. (Arthur) Tuckerman, J.R. (Ray) Tugnett, L.W. (Lucy) Urquhart, Jack Veal, R.H. (Ron)Walker, R.A. Walker, T.N. (Tommy [Orra]), Walters, F.G. (Fidgety Fred) Ward, R.H. (Russ) Watt, Barry Webster, W.J. Weldon, C.E. (Clarrie) Wheeler, E. (Poor Eric) White, J.P. (Jim, or Nana) Wild, W. (Bill Bowyang) Williams, R.H. (Ray) Wilson, B.I. (Bruce) Wilson, C.M. (Max) Wilson, Cliff Wilson, J.I. (Jack) Wilson, S.H. (Siddy) Wilson, W.T. (Bill) Wood, J.E. Wynter, H. (Harry) Zurvas, R. |