
ROYAL AUSTRALIAN NAVY HARBOUR DEFENCES
RAN No. 302 - NEWCASTLE
Prior to World War 2, there were only three
Australian ports considered essential for harbour defence by the British
Admiralty: Sydney, Darwin and Fremantle. By 1939 the Admiralty
approved a plan for the Royal Navy and Royal Australian Navy's role in the defence
of these three ports. However, after Japan entered the war in December
1941 and, more importantly, with the Japanese midget submarine attack in Sydney
Harbour on 31 May 1942 the need for additional harbour defences on the eastern
coast of Australia became vitally important. In early July 1942, additional harbour
defences were approved in principal by the navy and were soon installed. Their harbour defence proposals consisted of
controlled mining of harbours as well as anti-submarine indicator loop
installations to work in conjunction with the Army's gun batteries. The 'Loops',
as referred to, are long lengths of armoured cables laid on the seabed in
shipping channels designed to detect submarines passing overhead. Controlled
minefields are those in which enemy vessels are detected by indicator loops and
the mines detonated electrically from the shore station. More details
of how Indicator Loops work can be found on my How an Indicator
Loop works webpage. Other Loop installations can be seen on the Indicator Loops
around the World. This webpage is mostly concerned with the Indicator Loops
at Newcastle, a large, strategically important industrial city on the mid New
South Wales coast of Australia about 100 km north of Sydney (see map below).

 |
If you worked there or have any feedback please email me: Dr Richard Walding Research Fellow - School of Science Griffith University, Brisbane, Australia Email: waldingr49@yahoo.com.au |
LINKS TO SOME OF MY RELATED PAGES:
Indicator Loops - an overview (YouTube, 70 minutes)
Indicator Loops around the World (Home Page) How an indicator loop works Oban Bay (Scotland) indicator loop station United States Navy Indicator Loop Receiving Station
THE EARLY DAYS
The military
history of Newcastle commenced in 1801 when the officers and men of the New
South Wales Corps were sent to the settlement together with the British
convicts they were sent to guard. Guards were still coming to Newcastle in
1833 when a detachment of the 4th Regiment of Foot (The King's Own Regiment)
arrived by steamer. Paid part-time militia forces commenced in NSW in 1845
when an Act of Council authorised a rifle regiment with a troop of cavalry
and a battery of artillery to support it. However, these units were raised
and paraded in Sydney and for the next nine years no more units were raised.
It was the outbreak of the Crimean War with Russia in 1854 that led to a
resurgence and establishment of more volunteer forces in Sydney. The beginnings of harbour defence at Newcastle began in 1855 when the
Newcastle Volunteer Rifle and Artillery Corps
was formed by local Citizens
in response to fears of a Russian attack in the colonies. At that time
Britain was fighting a war against Russia in the Crimea. In 1866 the
Corps received two, 32 pounder smooth bore guns, which were mounted in
earth-work emplacements on Signal Hill to protect the Newcastle Harbour
entrance. Continuing hostilities between England and Russia concerned
the colony of New South Wales and they requested the British Imperial
Government to advise on their fortifications. Major-General Sir William
Jervois RE, CB, KCMG, Governor of Straits Settlements was
appointed by the Secretary of State
to undertake this work. Their report, on 4th June 1877,
recommended that three 9 inch Rifle Muzzle Loading and four 80pdr guns
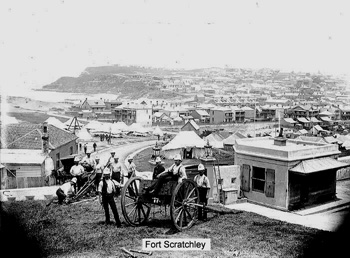
be emplaced on Signal Hill. Colonel Scratchley became responsible for
the detailed planning of this fort, later to be named Fort Scratchley.
 |
 |
| Fort Scratchley - late 1800s | Fort Scratchley flagstaff - today |
NSW NAVAL BRIGADE - 1863
Newcastle harbour defences by the navy began soon after the formation
of the
Newcastle Volunteer Rifle and Artillery Corps in
December 1855. The NSW Colonial Navy had just acquired its first
warship - the 60 ton vessel The Spitfire that at 61 feet
mounted a single 32-pound gun. On the 1st May 1863,
the Governor of New South Wales issued a proclamation forming the NSW Naval
Brigade, however, there remained much uncertainty about the role of Colonial
Naval Forces. The British Imperial Government had disallowed a Colonial Navy
Act passed by the Victorian parliament in 1860 to allow the formation of
Naval Services and this threw the Service into a uncertain role.
However, not to be daunted, the Naval Brigade sought volunteers and formed
three companies, each of 40 men, in Sydney. This was soon increased to four
companies and a (fifth) company at Newcastle was authorised in September 1863. This
date marks the beginning of naval defences in Newcastle. It was made
up mainly of time-expired Royal Navy petty Officers and ratings and
the task of the Naval Brigade was to man the ships owned by the
colony in the time of war. This local company of the naval
brigade became skilled at field gun exercises, and built a timber
rowing of fourteen oars boat large enough to carry 100 men.
Using its own power within the harbour this gun-boat was towed by a
steamer for trips up the Hunter River. The position
of the Naval Service was clarified by The Colonial Naval Defence Act of the
Imperial Government in 1865. Being land based, no ships were available and
most of the volunteer officers were drawn from government employees. The
first commander of the NSW Naval Brigade was Captain Francis Hixson
RN, Superintendent in Charge of Lighthouses in New South Wales.
 |
 |
 |
Francis Hixson
with his wife Sarah and three of their four surviving sons (all in
the NSW Naval Brigade) and daughters Ann, Mabel and Florence.
State Library of NSW |
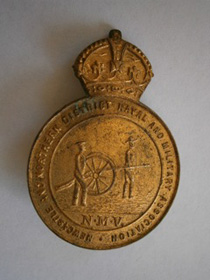
Obverse reads "NewCastle and Northern District Naval and Military Association. N.M.V" (Steven Brennan) |
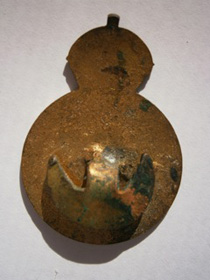
Reverse shows the clasp. If you know something about this type of badge please advise. |
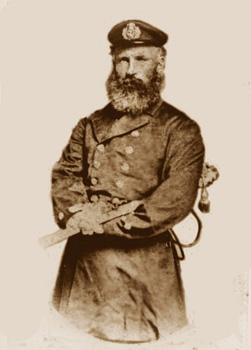
Hixson was a Royal Navy officer, born on 8 January 1833 at Swanage, Dorset, England. He joined the navy and in February 1848 as master's assistant in the Havannah, helped to survey parts of the Australian east coast, New Zealand and the South Seas and returned to England in December 1851. He then served in the Impregnable and in February 1852 joined the HMS Herald and its auxiliary ship HMS Torch under the command of Captain Sir Henry Denham FRS, in the expedition to survey and take possession of New Caledonia. While aboard the Torch Hixon's log records that they took daily soundings of Sydney Harbour for eight days before berthing at Lord Howe Island. This undoubtedly gave Hixson an intimate knowledge of Sydney Harbour. They arrived in New Caledonia to find the French already in occupation so they surveyed among the Fijian islands and along the Australian coast and went to Sydney. In 1855 Hixson became acting second master of HMS Herald. Hixson returned to Sydney on 20th August 1857 with Torch and Herald. In March 1858 Hixson made an official inspection of the colony's coast from Sydney to Jervis Bay to sound out the possibility of a fishing industry in Australia. Hixson then rejoined the Herald for one more surveying cruise to New Guinea and collected valuable scientific data from the Great Barrier Reef. In 1858 he won the silver medal of the Royal Humane Society for the rescue of a drowning seaman in Shark Bay Western Australia. Three months after the Herald's cruise ended at Sydney in May 1860 Hixson was awarded his master's certificate. At this time port control in Sydney Harbour was haphazard and the sinking of the Dunbar (1857) and Catherine Adamson made change imperative. Capt. Denham sent Hixson and a fellow senior officer to report on the best place to position lights on the headlands of the harbour.
 |
|
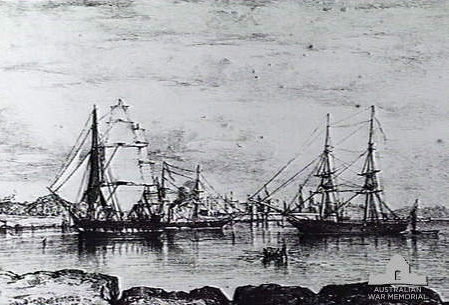
Survey Ship Herald (ex-frigate HMS Termagent), the paddlesteamer, gunvessel and auxiliary ship HMS Torch and the brig-sloop HMS Serpent in Sydney Harbour in the 1850s. AWM 302206 (photograph of a painting). |
Hixson returned home to England in July 1860 aboard the Herald for a brief period and then returned to Sydney as an officer aboard Pelorus under Commander Sidney. He served in the Pelorus in 1861 and in the Orpheus in 1862 on surveys of the New South Wales coast. Hixson's log books are said to reveal him as an able master with scientific attainments and curiosity, and as a keen observer of society in the South Pacific. On 2 November 1861 at St Thomas's Church, North Sydney, Hixson married Sarah Lord and they moved to a home in Balmain (Sydney). When Captain Robert Pockley (1823-1892) retired as Superintendent in charge of lighthouses in New South Wales, Hixson was recommended - and accepted - the post (from 1 January 1863). His responsibilities were widened to include harbours and ports for all of New South Wales, as well as Light. He resigned his commission from the Royal Navy in 1863. On 1st of May that same year he was also appointed Captain Commanding of the NSW Naval Brigade. He commanded the New South Wales Naval Brigade throughout its existence, from 1863-1902, to which was added the New South Wales Naval Artillery Volunteer Company in 1886. Under his command the brigade was able to maintain reasonable numbers, but the level of training and state of equipment gradually declined. When a New South Wales naval contingent was sent to help put down the Boxer Rebellion in 1900, Hixson was considered too old and lacking in naval warfare experience to command it. Instead, before returning to Australia, he was placed in charge of the contingent during its voyage to Hong Kong. In addition to these duties, Hixson also functioned as President of the Marine Board of New South Wales between 1872 and 1900, and was chairman of the Sailors' Home in Sydney. Three of his sons, lieutenants in the Naval Brigade, volunteered to go to China, while a fourth son was a member of the Queensland Navy.
NAVAL BRIGADE - NEWCASTLE
The Officer in Charge of the Newcastle company was
Lt David Tait Allen (from 1 September 1858) - the Newcastle
Harbour Master since 1 September 1858. Sub-Lieutenant Herbert Robert Cross
- with the Navigation Department since September 1863 - was second-in-command
(appointed 13 October 1863). Warrant Officer
appointments were Mr Horton, Boatswain, and Mr Taylor, Gunner.
Captain Joseph Henry Dagwell, Assistant Pilot with the NSW
Navigation Department was appointed Drill Instructor. Dagwell was
born in Southampton in 1830 and was leading seaman aboard HMS
Herald with Hixson during its survey work in the South Pacific
and paid off with him in Sydney in 1855/6. Dagwell is purported to
have received letters of commendation from the Admiralty and/or
other sections of the British government for certain of his actions
during a tropical storm in 1854-1855. He remained in NSW until
about 1858 when he returned to England. He married Martha Elizabeth
Cantell in Southampton on November 27, 1859 where they had a son,
Charles Ephraim Dagwell in late 1860. Martha died in 1862 and Joseph
Henry Dagwell returned to NSW in 1863 to rejoin the NSW Navigation
Service as harbour pilot and first permanent coxswain of the
Newcastle Lifeboat, Victoria I (rescue service) from 20
October 1863 until 1891. He was also appointed to the Naval Brigade
(Newcastle) as drill instructor (also from 20 October 1863). He
became its gunnery instructor (from 1867 to 1891). He died in 1899.
 |
 |
| Captain Joseph Henry Dagwell, Assistant Pilot |
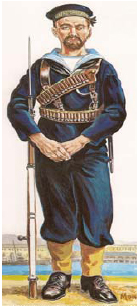
Naval Brigade Rating 1900 |
The No. 5 Company drilled on the barrack square of the Watt Street Barracks, now James Fletcher Hospital. The Newcastle Company of the Naval Brigade operated as a land based force training on a battery of 32-pounder smooth bore guns mounted on Signal Hill and two 6-pounder smooth bore guns located in barrack square. A 6th (Torpedo) company was raised in Sydney in 1873. After Scratchley's 1877 report the company was transferred to the Military Forces.
 |
|
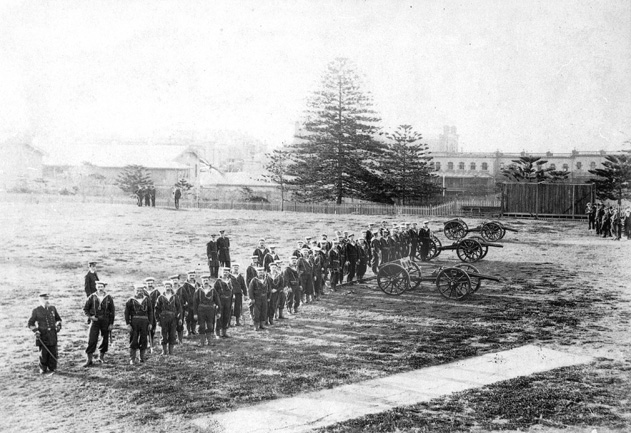
The Newcastle Naval Brigade on parade on the barrack square of the Watt Street Barracks, now James Fletcher Hospital. Cmr Frank Gardner is on the far left. More photos of the Naval Brigade can be seen on the Frank Gardner webpage. |
The colonial defence forces took part in several foreign wars: the New Zealand Maori Wars 1863, the Sudan 1885, South Africa 1899-1901 and China 1900. It was the China war that saw the NSW naval Brigade go overseas. The Royal Navy's Australian Squadron sailed to China as part of a multi-national force to suppress the Boxer Rebellion. The NSW and Victorian Naval Brigades dispatched about 500 sailors along with the cruiser HMCS Protector from South Australia and HMS Wallaroo from NSW. The Newcastle Naval Brigade supplied reservists - mainly seamen and stretcher bearers - for the third Naval Brigade contingent under the command of 22 year old Acting Sub-Lieutenant Oscar Gillam. Gillam returned to Newcastle and became Sub Lieutenant in the Naval Reserve on 6 July 1907 and full Lieutenant on 1st April 1914. Able Seaman Eli Rose died of pleurisy on 6th January 1901 and was buried in the British Cemetery in Beijing. The Queensland Naval Brigade planned to participate in the campaign, but due to funding cuts by the Queensland Government were unable to do so. Nevertheless, many members travelled south to enlist in the New South Wales and Victorian naval brigade, and served with honour.
Upon Federation in 1st January 1901, the Australian Auxiliary Squadron of the Royal Navy was created in Sydney, and the State of New South Wales saw little need to raise a large naval force and turned most of its attention to the military forces. However, the NSW Naval Forces continued with the two distinct groups: the Naval Brigade (equivalent to the Naval Reserve as we know it today) and the Naval Artillery Volunteers, (NAVs). These men were mainly employed manning the fixed defences and were more akin to the Royal Marine Artillery than the navy proper. The various naval groups were divided up into the four main defence areas: Port Jackson (Sydney Harbour), Botany Bay, Newcastle and Wollongong (Port Kembla). In Newcastle the battle plan allowed for 4 officers and 64 men of the Naval Brigade commanded by Cmr Frank Gardner from the retired list. The NAVs were not employed. Frank Gardner's connection with the Newcastle Naval Brigade dated from 1863 when he joined the ranks and rose to the post of commander from 1902 to 1907. Upon Federation he was made RANR. Cmr Frank Gardner was an imposing character in the development of the Naval Brigade. He was born on 17 December 1841 at Bell Inn, Tewksbury, Gloucestershire, England. His father died when he was very young and he went to sea with the Royal Navy at the age of fourteen years. His forays included the Crimean Peninsula, the battlefields of Sebastopol, the American Civil War and the taking of the Taku forts during the Second Opium War in China. Soon after his arrival in Australia he joined the Newcastle Naval Brigade at Fort Scratchley where he rose to the post of commander, retiring after 40 years service as one of the oldest officers in the Australian Naval Reserves. He died on the 2nd of November 1926. The link above will take you to more about Frank Gardner and the Naval Reserve at Newcastle.
 |
Officers of the Newcastle Naval
Brigade. Cmr Gardner is on the right. |
The biggest problem that faced the Naval Brigade (not just the Newcastle company) was the lack of sea training. It had been understood that the Australian Auxiliary Squadron, for which the colonies paid part of the maintenance costs and part of the cost of the construction of the ships, would be used to give training to the local naval forces but the Admiralty had other ideas. They were not particularly interested in Colonial Naval Forces, especially the part time volunteers. After 1903 the Naval Artillery Volunteers disbanded, being either transferred to the Garrison Artillery or to the Naval Brigade proper - which in turn, in 1911, became known as the RAN Brigade, along with the brigades from the other states. By the beginning of WW1 in 1914 practically all signs of the NSW Naval Forces had gone.
WORLD WAR 1 1914-1919
In 1914 Australia entered World War I. At the start of the war Australia
was a nation whose main economic activity was agriculture and natural
resource production. During the war the disruption of international shipping
and the channelling of materials to war production meant that many imports
to Australia were reduced, or no longer available. Australia began expanding
its own secondary manufacturing industries as a result, including the
development of steel production. Much of this was focused in the Newcastle
area and Newcastle Harbour assumed a new importance. Driven largely by the
appetite of World War 1, the demand for a large scale iron and steel
industry in Australia was becoming apparent. Broken Hill Propriety Ltd, (BHP),
was looking to diversify and expand its operations and chose Newcastle, in
part, because of its magnificent harbour where a steelworks was constructed
and opened in June 1915. This cemented Newcastle as a large industrial city
and made it a strategic target for Australia's enemies.
INTERWAR YEARS
1919-1939
After WW1 there was a reversion of naval policy to an emphasis on Australian
trade protection rather than preparing for invasion. The concentration of
local needs continued during the Depression and in the 1930s the RAN was
reduced to five ships and 3200 personnel. It is against this background that
the Naval Reserve trained between the wars, in Sydney, at "HMAS Rushcutter",
and were ready to be sent off in 1939 to help man British as well as
Australian ships of all sizes in all oceans.
WORLD WAR 2 - 1939 ONWARDS
During World War 2 the sea was the main transport route, bringing to
Newcastle the raw materials needed by its industries and taking away the
industry's products, as well as Hunter Valley coal. Japanese submarines
operated along the east coast of Australia from 16 May to 3 August 1942 and
18 January to 16 June 1943. They sank 18 vessels and attacked another 15,
killing 277 merchant mariners and 223 medical personnel, as well as
attacking Sydney and Newcastle. In 1940-41 German mines sunk 4 vessels,
killing 16, and a German submarine sank a vessel in 1944, killing two. It
should be clear that the defence of Newcastle Harbour was a major concern to
Government from the outset of the war in 1939. However, Australia only
possessed a few of the basic weapons essential for defence against invasion.
One of those weapons was naval mines to protect the sea lanes and ports
around Australia. Although plans had been laid before the war to commence
the production of naval mines, the first order was for only 500 mines and
was not completed until mid-1941. Australian Prime Minister Robert Menzies
had been told that Australia would need 4000 mines to cope with a Pacific
war and was reluctant to order more. But order more he did once informed
that he could no longer rely on the British fleet and must prepare Australia
for a defensive naval strategy. He ordered another 1000 mines for Australia
but also accepted international orders for a further 1400 mines. The
first minefield to be laid was at Port Moresby in June 1941 and even then
Menzies questioned why mines should be laid prior to the outbreak of a
Pacific war. Meanwhile, Port Stephens, the gateway to the vital industrial
area of Newcastle, was still without mines, as was the rest of the east and
north coast of Australia. Menzies had personal faith that Japan would not
enter the war. Nevertheless, the new Labor government of John Curtin was not
so tardy. In October 1941, they ordered another 2000 mines for the eastern
seaboard but were in no great hurry to ensure the adequate defences of
coastal harbours before any Pacific war broke out. That wasn't long in
coming. In early 1942 when Australia faced the critical threat from japanese
forces, the Port of Newcastle was protected by a range of military
installations deployed by all three services. These includes the joint arms
facility in King Edward park known as Shepherd's Hill, the naval facility
known as HMAS Maitland, located on the harbour foreshore, the coastal
artillery batteries located at Fort Scratchley, Shepherds Hill (Park
Battery) and Fort Wallace plus numerous radar warning establishments,
anti-aircraft batteries and searchlight batteries. There was also an Army
establishment known as Camp Shortland on the harbour foreshore. The coast
battery manned one additional gun at Fort Wallace, on the north side of
Newcastle Harbour. Also defending Newcastle was a battery on Shepherds Hill
and another battery on Tomaree headland at Nelsons Bay. A regiment of 40 mm
Bofors anti-aircraft guns was also deployed around Williamtown air base and
the industrial areas of the city.
HARBOUR DEFENCES 1939 - THE EUROPEAN WAR BEGINS
Just prior to the start of WW2 in Europe, Newcastle was identified
as one of the more strategic ports along the coast of Australia. On 28
August that year Lt Cmr S. W. Seymour was appointed Naval Officer in Charge
(NOIC) Newcastle and he took up his office in the Customs House on the
foreshore. A naval depot was established near Horseshoe Beach on Newcastle
Harbour and was operated as land station HMAS Penguin III from the outbreak
of war on 3 September 1939. The following day the Port Examination Service
began operations using the pilot steamer Birubi. The first ship was
examined that day at 2 am. Naval accommodation was built adjacent to the
Army's Camp Shortland at Horseshoe Beach and was occupied from later in
November 1939. The naval base HMAS Maitland began operations from 1 August
1940 and, along with Customs House, provided services for the examination
service, the naval control service (to clear ship leaving port), the harbour
entrance minefield, and control of minesweepers HMAS Uki and HMAS Bermagui
based in Newcastle. On 31 July 1940 HMAS Penguin III became
commissioned as HMAS Maitland to avoid confusion with names. During
the war it had 56 officers and 300 men. Prior to
1942,
Newcastle naval harbour defences consisted mainly of the Boom Nets and the
minesweepers.
Although the Japanese had entered the war with the bombing of Pearl Harbor
in December 1941, naval defences for Newcastle were not such a high priority
in early 1942 as the main threat to Australia had been to its north,
particularly Darwin and Papua New Guinea. The even larger bombing of Darwin
in February 1942 still didn't speed up defensive harbour measures along the
eastern seaboard of Australia. It was the dramatic entry of Japanese midget
submarines into Sydney harbour on 31 May 1942 that startled the Navy Board
(and just about everybody else). The Navy Board decided that defensive
measures needed to be improved and they set about doing this.
By 1942 they also included an Indicator Loop and the Controlled minefield. This is similar to the harbour defences in Moreton Bay (Port of Brisbane), Darwin, Fremantle and Port Moresby as well New Zealand, Britain, Kenya and most other parts of the British Empire in WW2. The technology and techniques had been passed on to US authorities after 1939 and the US developed their own identical systems upon their entry into the war in December 1941.
Indicator Loops can be used alone to detect submarines but other measures are then required to destroy it. If there is no minefield associated with the Indicator Loop a harbour defence motor launch (HDML) of some sort would be required. They would be equipped with Asdic (sonar) to track the submarine) and depth charges to destroy it. This was the set-up in Sydney Harbour. However, more commonly, a controlled minefield would be also used. Most Controlled Mining operations had guard loops about 1000 yds to the seaward side of the mine loop so that if a submarine entered the bay it would cross the guard loop first and alert the CM operators. In place of the Guard Loop an Indicator Loop could be used. The Indicator Loop (or Guard Loop) is placed on the seaward side of the Controlled Minefield and it's purpose is to alert the naval authorities to the presence of a steel vessel over the loop. If the vessel is unidentified it can be destroyed when it passes over a subsequent mine loop containing a row of explosive mines down the centre. In some places the Indicator Loop is replaced with a simpler (but less precise) Guard Loop which serves the same purpose (i.e. to give the first signal that a vessel has passed overhead). Indicator Loops (IL) are generally the 3-legged variety and are 2000 yards long with a 200 yd spacing between legs. These are suitable for ocean-going submarines (eg U-Boats and the large I-class Japanese submarines). They are not so useful for the much shorter Midget Submarines or Human Torpedoes. In this case a miniature IL may be required. This will be 500-1000 yds long and a 50 yd spacing between legs. Sometimes they may just have the two legs like a Guard Loop. In Sydney Harbour there were 6 large loops outside the harbour and two miniature loops (2-legged) inside the harbour; and it was these latter two that detected the Midget
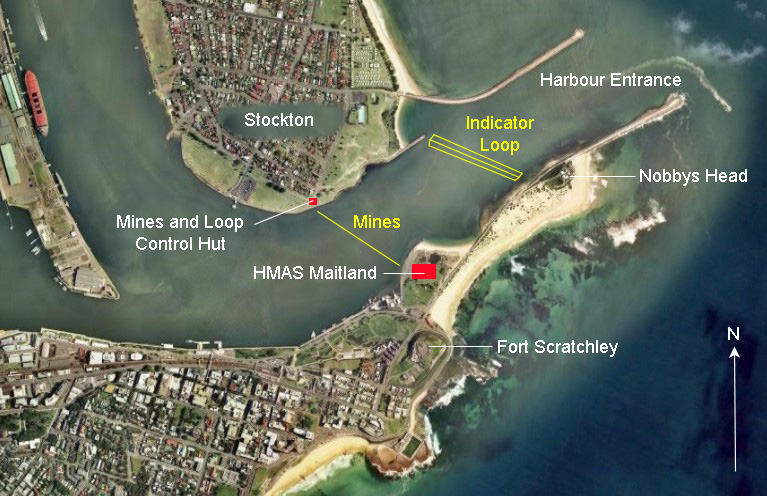
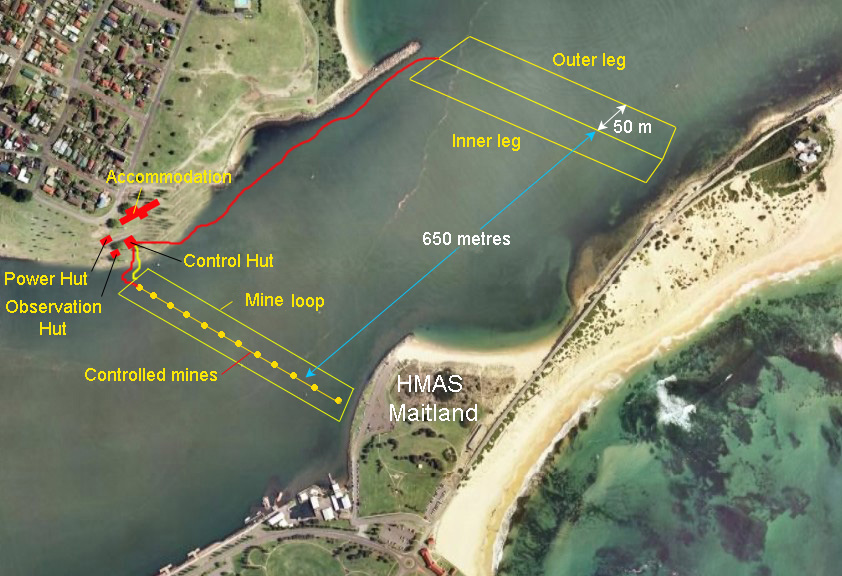
In Newcastle, a 3-legged Indicator Loop 500 yds long acted as the Guard Loop and was approved for the entrance to the harbour on a line 294°, one cable (~200 yds) from Nobbys Head. A Controlled minefield 440 yds long was approved for the harbour 3.5 cables (700 yds) on the inward side. The map below shows some of the naval buildings and defensive measures in Newcastle.
 |
|
Location of naval buildings in Newcastle Harbour as at 1942 overlain on a recent aerial photo. |
Building of the concrete power hut and concrete observation post
on the point at the river end of Pitt Street Stockton was well
under way when staff began to arrive on 8th June. On the 9th June 1942
equipment for the controlled minefield arrived from Flinders Naval Base.
It consisted of 12 mines, 5 junction boxes, mine cable - 7 pair (1000 yds), mine loop cable
- 2 pair (1500 yds), 80 sinkers (1.75 cwt each), 6 Dan
Buoys, a battery of 23 x 12V cells, switch and fuse board, generator, 80cm
range finder and bearing plate. By 16th June 1942 the observation post was
complete and two days later the power and control huts were finished. The
corrugated iron accommodation huts needed more time. The 12 mines had been laid by 20th June
by HMAS Gippsland and were ready for action on 26th June. There was a
question about whether the depth of water in the channel was sufficient
to allow vessels with a large draught to pass over the mines. The
Harbourmaster said that 24' was the minimum for deep draught convoy
vessels and as the mines were laid in 26' deep water less the height of
the mines (2 ft 3 in) that still left just enough depth for the large
ships. A 5000 ton naval fuel tank was established at Elizabeth Street,
Tighes Hill and commenced operation in March 1943. It provided
refuelling facilities for destroyers on the Eastern Fleet and naval
vessels stationed in Newcastle.
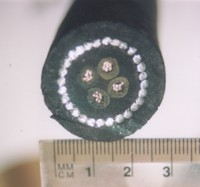 |
 |
| Cross-section of the two-pair C/M cable | Longitudinal view of the 2 pair C/M Cable |
On the 26th June 1942, the Commander of HMAS Rushcutter,
Cmr Harvey Newcomb completed his assessment of harbour defences for the
Navy Board in Melbourne. Amongst other plans he flagged (for the first
time) the possibility of loops being needed at Newcastle (as well as
Port Melbourne, Port Kembla and Port Stephens). By the 3rd July 1942, the Naval Board had further approved in principle
the installation of one indicator loop on the seaward side of the
Newcastle mines.
This was a last minute 'beefing-up' of the harbour defences and
alterations had to be made to accommodate the new equipment and
additional staff. This was finally approved (as Operation C1) by COMSOUWESPAC (headed by MacArthur) and given 1st Priority on
14th July. The cable requirements were: 2000 yds of Patt. 1989
lead-loaded loop cable (shown below) and 2500 yds of Patt. 7048 or 13139 4-core tail
cable. Images and details of the cable can be seen on my
Cablemakers webpage.
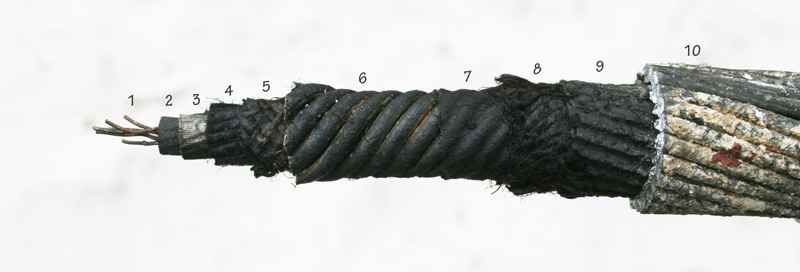 |
| The lead-loaded Adm. Patt. 1989 Indicator Loop cable. Diameter 1.35" (34 mm). The lead is shown as #6. |
The power for the Indicator Loop equipment was to come
from two power units each consisting of a
5 HP Ruston water-cooled diesel engine attached by v-belt to a
double-ended generator producing 110 V DC at
1½kW and 220V DC at 7 kW, complete with field regulators, a bedplate and
two switchboard panels (from Braybon Bros., Sydney).
The 110 V DC supply was used to charge a bank of 19 x 6 V lead-acid 85
Ah batteries from Associated Batteries Ltd. (hence the regulators to
control voltage output of the generator). This would have been in
addition to the generators for the controlled mining. The loop cable was laid on 17th
August by HMAS Gippsland. The loop was a standard 3-legged loop
500 yds long (across the harbour) with a spacing of 50 yds between the
legs. The standard spacing used to detect the large submarines was 200
yds between legs but after the midget submarines entered Sydney Harbour
it was though a smaller spacing was necessary. The Japanese Midget
submarine attack on Sydney on 31 May 1942 caused a great deal of
consternation amongst navy planners. One concern was with the ability of
the two inner loops at Sydney to detect midget submarines. One of the
'outer' loops was out of action and the depth of the water in the
harbour (6-7 fathoms) was at the limit of detectability for Midgets. The
inner loops successfully detected the three submarines as their 50 yd
spacing was ideally suited to vessels of this size. It should be noted
that there was some ambiguity in the interpretation of the loop
'signatures' (ink traces on the paper chart) and that observers were
slow to react to the submarine crossings.
Preliminary trials of the Newcastle loop in early October 1942 gave a
satisfactory result and a further test in late October showed that it
was performing in excess of expectations and progress on the huts and
accommodation should be expedited. Also in October 1942 the staff for
the Loop Station was decided. The requirement was for 1 Leading Seaman
(Harbour Defence), 4 ABs (Harbour Defence) and 4 ABs (Radio
Telegraphists). There was no need for Executive Officers as these were
already supplied for the CM station. There was also no need for an
Engineer Artificer (EA) for the same reason.
 |
|
The position of the indicator loop and its tail cable running back to the Control Hut. Also shown is the row of 12 mines and the mine loop surrounding it. The loop was a 3-legged loop with a narrow spacing between legs of 50 metres. The mine loop had only the two legs with a separate row of electrically detonated mines down the middle. |
In February 1943 a review of harbour defences around Australia
recommended cancelling hydrophones planned for Newcastle in light of the
fact that the Indicator Loop was functional. This is different to US
Navy procedures where hydrophones AND loops are used in combination.
However, the review recommended the installation of two 'Type 135'
Harbour Defence Asdic (HDA) units for the breakwater entrance. HDAs are
a form of stationary Asdic (sonar) devices that are mounted on tripods
(Dan Buoys) resting on the sea bed in the shipping channel. They are
controlled by more experience loop specialists (Ratings who have Higher
Submarine Detector, HSD, qualifications from Rushcutter A/S
School). An HDA unit can detect a submarine or surface vessel to a
distance of about 2000 yds or more. They can be also used on board ships
and Harbour Defence Motor Launches which gives them much better attack
capability. A description of HDAs can be found on my
HDA webpage. A further review of underwater harbour defences in June
1944 recommended that the HDAs for Newcastle be cancelled pending
further reviews.
OPERATIONS
Most naval harbour defence operations had an
Naval Officer in Charge (NOIC) who was responsible for the entire naval station
(HMAS Maitland). Since it's commissioning on 1 August 1940, the NOIC was
Lt Cmr Louis Claud Rowland RAN (Ret'd) - a WW1 veteran who had been placed on
the Emergency List in 1922 from war injuries and was called upon to serve at
HMAS Maitland at its inception. In addition to the NOIC there was usually an
Extended Defence Officer (XDO) who assumed day-to-day control of the mining and
loop operations. There was no XDO at Maitland but the
Officer in Charge of the Mining Service was generally responsible for mines and
loops and the Duty C/M Officer was responsible when on watch. The Mine
Control Hut was next door to the Observation Post (at Stockton). Originally the
Mine Control Hut was to be used just for the Controlled mining but at the last
minute Indicator Loops had also been approved so the building had to be extended
and additional accommodation built. On the 19th November 1942 the NOIC submitted
that the "Stockton Controlled Minefield and Indicator Loop" be allocated RAN
Maitland.
Indicator Loop
An Indicator Loop signals the presence of a steel vessel above it by the
generation of a small voltage (a process called electromagnetic induction -
first noted by Faraday in 1831). The voltage
is detected by a special galvanometer (called an Integrator) attached to
photocells and then amplified and recorded on a paper chart in the Control Hut. The line on the
chart is said to be the vessel's 'signature'. Each loop had it's own
Integrator and had to be watched 24 hours a day by watchkeepers. In the case
Controlled Mining
The mine loop is a cable laid in a elongated loop with parallel sides about 25
yards apart and has a row of mines down the centre connected in series to an
electrical cable. The mine loop is not connected to the mines. The mine loop is
connected to a 'Tail' cable back to the Control Hut on the shore. The row of
mines are connected by a similar cable back to the Control hut as well. When a
steel vessel passes over a mine loop (or a guard loop) a voltage is displayed as
a horizontally moving spot on a cathode ray oscilloscope (like a small TV
screen). When a steel vessel crosses the outer leg the spot moves to the right,
then returns to the middle of the screen as the vessel passes over the centre of
the loop, and then the spot moves to the left as the vessel crosses the inner
leg. Finally the spot returns to the centre as the vessel departs. When there
are no ships around, the spot stays in the middle. So the sequence is: (a)
centre, (b) right, (c) centre, (d) left, (e) centre. It is the "centre"
following the first oscillation to the right that tells the operator the vessel
is over the centre of the loop.
PROCEDURES
On staff in the C/M Hut are the following:
Duty C/M Officer, a Indicator Loop watchkeeper (hopefully a Rating (AB) with
Submarine Detection qualifications from HMAS Rushcutter Antisubmarine
school, such as SD (Submarine Detector) or HSD (Higher Submarine Detector). On duty as well would be a wireless telegraphist.
On the Controlled Mining operation, would be a C/M Operator (hopefully with C/M
Qualifications from HMAS Flinders) and another Rating to work the switches. The Port War Signal Station would relay
details of vessels about to enter or depart the harbour and the telegraphist
Indicator Loop
When a IL watchkeeper noticed a loop crossing
on the chart recorder on the wall, the watchkeeper would say "loop crossing" (or "ping"
if they had spent a lot of time at sea operating shipboard Asdic (sonar)
instruments). The Duty C/M Officer would do a visual sighting with a telescope
or binoculars and say one of two things: "Sub" if there was no vessel over the
loop; or "Non-Sub" if a vessel was present. If it was "non-Sub" he would check
that it
matched the expected presence of a ship. If so, he would note that the signature and
sighting in the station log. If he had a crossing and saw a ship but the PWSS had
no knowledge of it then the NOIC would be informed by telephone. If it was "Sub"
this would be relayed to the NOIC as "Sugar
X-Ray" (submarine crossing). In harbours where there was more than one
indicator loop, the number of the loop crossing would also be stated. The
watchkeeper might say "crossing on four" or "ping four" and this would be
"sugar x-ray four".
Controlled Mining
It was then the Controlled Mining staff to do their job. If an
unidentified swing was detected on the Indicator Loop the Duty C/M Officer would
order "Mines to Active" and the operator (a Rating with C/M qualifications or
training) in the
Mine Control Hut would close the control switch to start the 300V generator
in the Engine House and then ring one long bell to Engine House. He
would then check to see if the correct voltage was showing on the voltmeter.
Then they had to wait. When the galvanometer spot
on the screen for the mine loop crossed it's zero after it's first
displacement, the Rating would fire the mines and report "mines fired". After a firing took place, the fuses in the mine cable would be
replaced and the mines also replaced. Of course, if a boat was sweeping for mines in the area, they
should have told the NOIC of the fact.
The C/M Ratings in the Control Hut had to perform daily and weekly tests on the equipment to make sure it was in good working order and had to record perturbations ("perts" - the swings of the galvanometer spot due to the tides) every 5 minutes to the hour. These had to be recorded in the log book. At the end of each watch, the Handbook of Controlled Mining Confidential Book (CB) had to be mustered and had to be locked in a CB chest and then placed in a locked cupboard.
BUILDINGS
The main buildings were (1) the C/M Control Hut (13'6" square, 8'6" H) made from
12' thick reinforced concrete; (2) an Observation Post (8' x 10'); (3)
Engine House (15' L, 9'6"W, 8'6"H) made from 12" concrete; (4) Accommodation
Hut (96' 0" L x 18'0" W, 10'1" H), corrugated steel walls; lines with
three-ply, consisting of 3 officer's cabins, a ward room, ratings sleeping
quarters and a ratings mess room. Ref: MP 1855/6/19 and MP 1049/5, 12 June
1942.
LOOP STATION AND OTHER NAVAL STAFF
 |
 |
| Ratings in front of the Mine Hut. Back Row: Sydney James Ward (Steward), Ernest 'Bill' Knighton (Cook), -, Tony Herron, Frederick Newton AB WK (CM), Arthur Jones (Signalman). Front: Henry V. Ball AB WK (CM), Harold James Underwood AB WK (CM), Jim Brown, - , Foster Caleb Burton AB. | Ratings beside the accommodation hut. Note the corrugated iron walls and the old observation tower in the background. Back Row: Syd Ward, Tony Herron, Bill Brockelbank (Wireman), Lindsay Scaysbrook AB. Front: Alan Francis Cox (Chief PO Writer). |
The officers of the
C/M and Loop defences were:
WAR DIARY
During the war tests and repairs had to be
carried out on the loops and minefield.
Loops: Preliminary tests began in October 1942 and were satisfactory
(in fact performing above expectations). In November 1942, the outer leg
developed a 'sea cell', that is, a short circuit, which meant this leg of
the loop had to be lifted and repaired. In August 1943 the middle leg was
cut by a towing hawser putting the loop out of action.
Mines: Number 6 Group was reported defective on 12th January 1943 due
to a suspected parted cable. On the evening of 19th January 1943 the Number
4 Group of mines was detonated accidentally and these had to be relaid with
new mines, fuses and cables. Group 6 and Group 3 were also lifted to rectify
faults. When this is done cable and mines are often replaced.
On 11th November 1944 notice was given that as of 20th November 1944
Newcastle would no longer be a defended port and fixed armaments should
revert to 'care and maintenance'.
No submarines or unidentified crossings were made of the loop or the
minefield during the war. In December 1944 the naval loop and mining station was
closed. The indicator loop cables were lifted on 8 January 1945 by HMAS
Innisfail and the mines
and cables lifted on 10th April 1945. Not all cables were recovered. The
exact amount is uncertain but, by comparison, in Moreton Bay only about 50%
of the cable was recovered. On 12th February the CM Station had been
dismantled and was awaiting disposal.
Newcastle Industrial Heritage Association
The Newcastle Industrial Heritage Association Inc., [NIHA] is undertaking a project called 'Fortress Newcastle'. The aim of this project is to research, study and promote the critical role that the Hunter Region played in saving Australia during World War II. This includes the military operations conducted during WWII to protect the industries supporting the war, and also which industries supported the war effort and how. https://hunterlivinghistories.com/2020/06/12/fortress-newcastle-project/ provides more information.
The NIHA website can be found at www.niha.org.au. Contact nihanewcastle@gmail.com should you like more information on the Fortress Newcastle Project.
If you have any further details of Newcastle harbour defences or antisubmarine harbour defences in general (Indicator Loops and Harbour Defence Asdic) that may help with this research project please email me at the address at the top of the page.