ROYAL NAVY HARBOUR DEFENCES - HAIFA
I would like to thank my colleagues Ehud and Fabio for the research that went into the description and history of the Haifa defences, and in particular, the role of the defences in the sinking of the Italian submarine Scire. The research was published in Archaeologia Maritima Mediterranea (October 2013, p93-122) which can be downloaded here, and in Hebrew in the journal Cathedra, which can be downloaded here. My colleagues are:
Ehud Galili*, PhD. Senior researcher, Israel Antiquities Authority and Zinman Institute of Archaeology, University of Haifa, POB 180 Atlit 30300 Israel, Tel. 972 4 9841976, Fax. 972 4 6362268. Email: galilish@netvision.net.il. Ehud's publications are available at https://haifa.academia.edu/EhudGalili Fabio Ruberti, Dott. International Association of Nitrox and Technical Divers (IANTD S.r.l.), IANTD Expeditions, Via P. Moriconi 63-65, 56128 Marina di Pisa (PI) Italy. Tel. ++39 05035601, Fax ++39 05035535. Email: fabio.ruberti@tiscali.it. Fabio's publications are available at https://independent.academia.edu/FabioRuberti |
If you have further details of Haifa Bay antisubmarine harbour defences that may help with this research project please email me at the address below.
 |
Dr Richard Walding Research Fellow - School of Science Griffith University Brisbane, Australia Email: waldingr49@yahoo.com.au |
LOCATION
 |
HAIFA DEFENCES IN WWII
The Haifa area was protected by the Army coastal defence systems and by the Royal Navy.
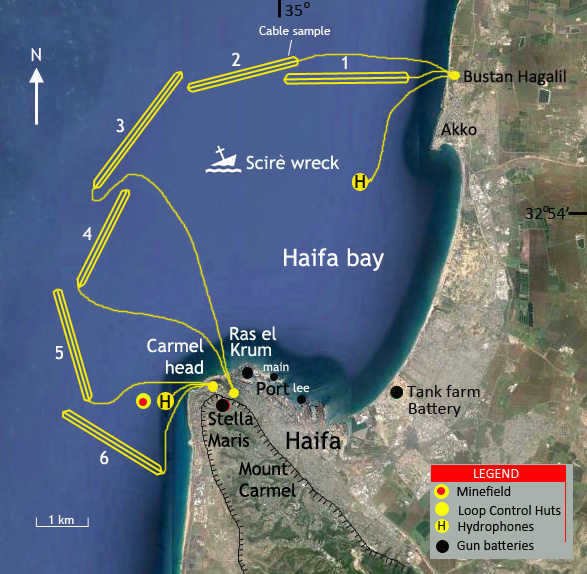 |
Figure 4. Map of Haifa Bay showing the location of the harbour defences in WWII. There were six indicator loops, each of approximately 2.5 km in length; two hydrophones and a controlled minefield. Army defences consisted of a number of gun batteries. |
Shore defences were provided by the 14th Coast Regiment Royal Artillery - 17th A.A. Brigade British Army. They included four gun batteries positioned at these locations: Stella Maris (Figs. 4, 5). They could hit a small watercraft (like the Scirè) at a distance of five nautical miles (9.260 meters); The Main and Lee Breakwaters Battery (No. 179) and the Ras El Krum Battery (No. 178) were armed with light anti-aircraft and anti-boat guns and machine-guns.
The Tank Farm Battery (No. 17) was armed with MK II medium guns. Additionally, Haifa Bay inland was covered by a net of smoke-making installations intended to mask strategic areas (i.e. oil storage and refineries) during sea or air attacks. Haifa port was protected by the Royal Navy. The area was under the command of N.O.I.C. (Naval Officer in Charge) Palestinian Ports Captain G. O. Lydekker OBE, DSC, RN. He reported to the Commander-in-Chief (CIC) the Mediterranean Fleet Sir Henry Harwood, KCB, OBE, RN. The intelligence operation against the Scirè was directed by the RN OIC (Operational Intelligence Centre). The harbour-protecting ship HMS Islay was commanded by Lt C.H.L. Clarke, RNR.
Britain build Haifa harbour as a major oil supplying base and fortify it
In March 1929 the British Cabinet considered a proposal by their Committee for Imperial Defence dealing with providing fuel oil for the Royal Navy by means of a pipeline from Mesopotamia to the Mediterranean. The cabinet noted the prospects of very large production of oil in Iraq in the future. The cabinet believed that the companies licensed to build the pipelines - the Turkish Petroleum Company and the Anglo-Persian Oil Company - could be persuaded to build the line to Haifa. That Government decided to secure the Baghdad-Haifa alignment for a pipeline that its construction was to begin by the end of 1929.1 The cabinet also allocated funds for the construction of a £1,000,000 harbour at Haifa to begin at the end of the 1929. The harbour provided for seven mooring berths and two oiling berths alongside. The pipeline was within territory completely under British influence and protection. Though there were shorter and cheaper alternative pipeline routes to the Mediterranean, the security of supply was paramount, particularly with the assured prospect of good harbour facilities at Haifa.6
The British cabinet foresaw three probable forms of attack on Haifa: shore bombardment by a cruiser, an attack by armed merchant vessels using gunfire or mines, and lastly, an attack by submarines, using either gunfire, mines or torpedoes aimed at ships in the harbour and its approaches. Adequate harbour defence against submarines involved an indicator loop system consisting of roughly eight miles of threelegged loops and nine miles of tail cable at a cost of £11,000. To these were added control stations with instruments which cost another £1,000. It was thought that a force of four anti-submarine vessels would be necessary to deal with the submarines detected by the loops. The exact design of the new harbour was not known in 1929, so a final recommendation on the type of anti-submarine defences was not made. Haifa was placed in the category of Class "C" ports: no defences were installed in peace time, but defence plans were to be prepared to meet probable war requirements".7 Until the outbreak of war, the loop cables and equipment were to be stored at the naval depot in Malta.
The struggle over the control of the Mediterranean in the thirtys and forties
By 1931 indicator loops had proved themselves with friendly ships but performance in war times was uncertain. Although it was the Admiralty's clear intention to use indicator loops extensively for the defence of harbours, and it was their policy to lay them in peacetime due to the time required for such operations, no large laying program was contemplated.8 The port at Haifa was declared open on 31 October 1933. In 1934, the Cabinet had decided to complete the defence of all ports East of Suez within five years, but the Mediterranean ports (Alexandria, Gibraltar, Haifa and Malta) and the Cape route ports would not be completed for several years after that.9 In 1937 the British Cabinet had reaffirmed that Italy was still not considered a threat to Britain and that while defences at the Mediterranean ports should be increased, no great expenditure was needed.10 During that time the Admiralty was considered its loop program. By 1938 indicator loops had been laid along the English coast and in the Far East. The Admiralty knew that other loops would be needed, should war begin, but the capacity to lay and maintain additional loops was limited by having only two cable-laying ships available, one of which stayed in home waters to look after the extensive loop defences at Dover. That left just one ship to lay more loops in time of war. In the Mediterranean, the oil pipeline to Haifa was completed in 1939 but loops for Haifa were still not even on the agenda.1
In addition to the loop systems, a device known as a Harbour Defence Asdic (HDA) - a mounted sonar device to counter the penetration of Mediterranean harbours by human torpedoes and midget submarines - was trialled at some Mediterranean ports. It was found ineffective against the small Italian midget submarines2 but suitable against the larger ocean-going submarines. With the dramatic escalation of the war, and the bombing of the Italian navy in Taranto by the British (November 1940) and the Japanese attack on us Naval Base at Pearl Harbor (December 1941), the British installed loop protection, in most harbours. 3
By 3 September 1939, Britain was at war with Germany. In early 1940 the Admiralty became seriously worried that the Germans might penetrate into allied ports and attack ships using small demagnetized submarines, against which the indicator loops were not effective. On 11 April, 1940, the British War Cabinet agreed that war with Italy was a real possibility and that defences at its Mediterranean ports of Alexandria, Gibraltar, Haifa and Malta should be brought to a state of readiness and manned.4
Assuming hydrographic surveys were up to date and loop layouts planned, there was every possibility that the loop system could have been operated within a few months. The cabinet was well aware that should Britain become involved in war with Italy, "the Germans would quickly get a grip on that country, and we should have to face German aircraft and German submarines operating in the Mediterranean".5
On 10th June 1940, Italy declared war on France and Britain and entered WWII. The Italians had the fourth largest navy in the world. However, in the Mediterranean, the Allies had a technical and operational advantage due to three factors: radar, the deployment of British aircraft carriers and highly developed information gathering and processing organizations including the Ultra secret decrypting systems.6 In response, the Italian Navy continued the development and the use of human (manned) torpedoes and others innovative underwater warfare techniques. With the British harbour defences in place and the Italian strategy to destroy British shipping decided upon, the operations between the combatants were to begin. Both sides relied on limited information for their decision-making but some good intelligence and daring manoeuvres made this interaction noteworthy.
Newly identified Underwater British defence systems at Haifa bay region.
In the seven decades since the laying of the underwater detection system that took part in the destruction of the Scirè most physical remains were expected to be lost. However, the submarine and the cables are in an underwater environment that can be somewhat protective. On land, the concrete cable control bunkers will be generally resistant to decay. However, these remains are not protected against human interference. During the 1970s 1980s tons of metal cables were salvaged from Haifa Bay by fishermen. This section details some of the finds which have escaped salvage and destruction.
Indicator loops systems in Haifa Bay region
Numerous essential parts of the defence system are known now. The electric and acoustic detection systems, as well as marine mines and their launching wagons, were recently identified on the sea floor in Haifa region. Their position indicates that they were parts of an elaborate anti-submarine system. This system reveals previously unknown details of the British defence, bearing on the last battle of the Scirè.
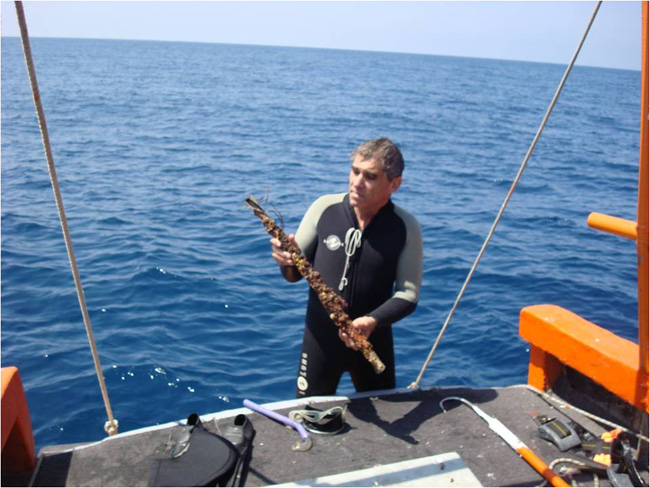 |
Ehud Galili with a sample of the loop "1989" cable from Bustan Hagalil north of Haifa Bay. (Ehud Galili) |
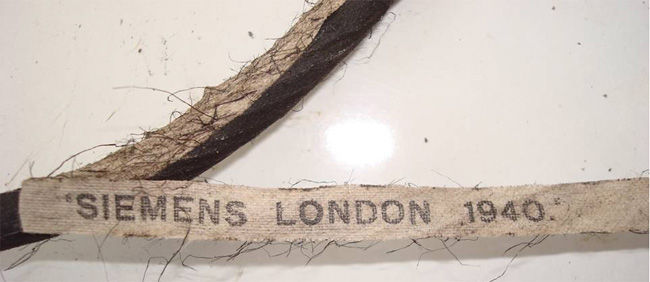 |
Fig. 7. The identification tape of the #1989 cable (E.G.). |
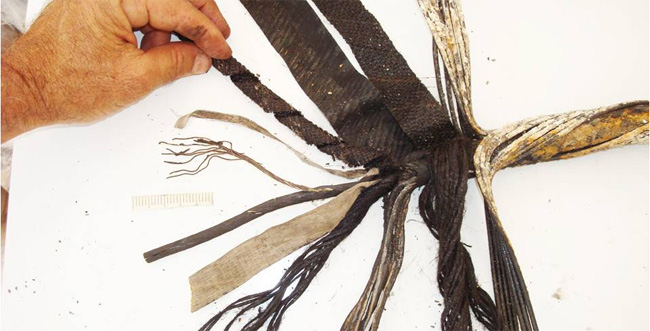 |
Fig. 8. Details of the #1989 cable components (E.G.). |
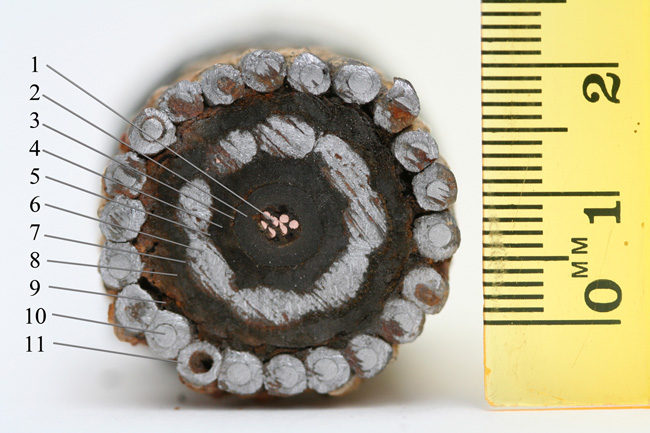 |
Fig. 9. Cross section of the cable. The "1989" cable consists of a single core of seven strands of 0.029" tinned copper wire (#1) covered with three layers of India rubber (#2 in Fig. 8) on which is attached the manufacturer's identification tape (Fig. 7). Covering this is a layer of thin (0.5 mm) waterproof tape (#3) and wound with 16 strands of jute yarn each about 2 mm in diameter (#4). The jute yarn layer is then covered with a tarred hessian mesh (#5) and a spirally wound anticlockwise layer of eight strands of 3.2 mm diameter pure lead wire (#6). These lead windings are covered with more waterproof tape (#7), 24 strands of a tarred jute serving (#8), and one more layer of hessian tape (#9). The whole is protected with a clockwise winding of 22 steel armour wires (#10), each about 1.9 mm diameter covered in pure lead 0.8 mm thick (Fig. 9). Then there is a braiding of dressed hemp yarn wrapped over hot pitch and resin (not shown), and finally a preservative coating. The final diameter is 1.35" (34.3 mm). It has a linear density in British imperial units of 6.09 tons per 2000 yard mile in air (6.8 lb per yard) or in metric units: 3.4 tonnes/km (3.4 kg/m). The cost in 1938 was ₤180 per 1000 yards (which equates to approximately ₤9000 per 1000 yards in today's money). |
Cables were located on the sea bed from Naharia to Haifa, at depths of 15-45 meters. A system of three cables was located at a depth 36 meters northwest of Akko.1 Additional two systems were located southwest of Haifa at a depth of 15-30 meters (Fig. 4).2 Sections of cables were also detected at several places in Haifa Bay. Cables laid on a rocky bottom were immediately observable, while those placed on sand had settled, overlaid by sediments, and become invisible. At the time of discovery these cables were considered to be old telephone cables. Now it is known that a triangular iron block attaching one cable at its top and three cables at its base indicate that these were British anti-submarine defence systems.3 The recent study suggests that the structure of the cables recovered from the Haifa region is consistent with what is known about cables used for indicator loop and additional underwater anti-submarine harbour defences from wwii. The cable recovered is "Admiralty Pattern 1989". According to the manufacturer's logo it was made in London in 1940, by Siemens (Figs. 6, 7). It consists of a single core of seven copper wires covered with layers of India rubber, tarred jute, hessian mesh, lead and steel wires (Figs. 8, 9).4 The lead in the cable is pure lead.1 The Admiralty used a special soft lead alloy of 4% tin to load many loop cables. It is stronger and resists salt water. As the war started the British Government restricted the use of tin to essential products, thus no tin was used for these cables.
Harbour Defence Asdics / Hydrophones
During dives near the cable systems south west of Haifa and northwest of Akko, a former navy diver identified three iron structures on the sea bottom. Such a device consists of an underwater transmitter and receiver housed in a waterproof bronze dome about 60 cm long and mounted on a tripod about 3 metres high that sits on the sea bed in a defended harbour. This device is connected to the control station on shore by armoured electrical cables. One was found south-west of Akko at 20 m depth, another was found south west of the Carmel Head at 14 m depth and a third (whole) was west of the Carmel Head at a depth of 40 m (Fig. 4).1 Cables (3 cm thick) trending coastward were attached to the two tripods. The association of these constructions with adjacent indicator loops suggest that they were part of the underwater detection system known as Harbour Defence Asdic (hda). An electrical pulse is sent from the shore station to the dome which sends a high frequency sound pulse through the water. The sound pulse reflects from any object in the water and returns to the dome, which sends the returned pulse to the control hut for analysis.2
Contact mines and their wagons
A spherical/oval mine with detection protrusions was found on the sea bottom some 1900 m south west of Haifa at 24 m depth (Fig. 4). Adjacent to the mine were five heavy duty iron wagons scattered on the sea bottom in an area of ca 50 ×50 m.1 These wagons were most probably used for carrying and launching the marine mines. No cable that could have connected the mine to a control coast station was identified. Given the protrusions, these mines appear to be "contact" mines. Mines used in "controlled" minefields had no protrusions as they were fired electronically.
Indicator loop control/observation posts
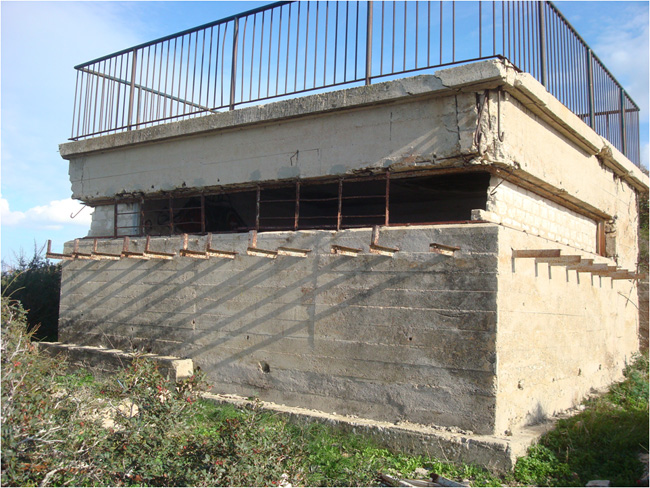
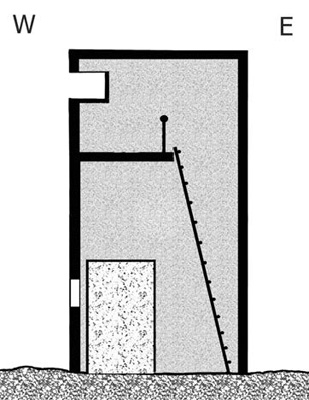
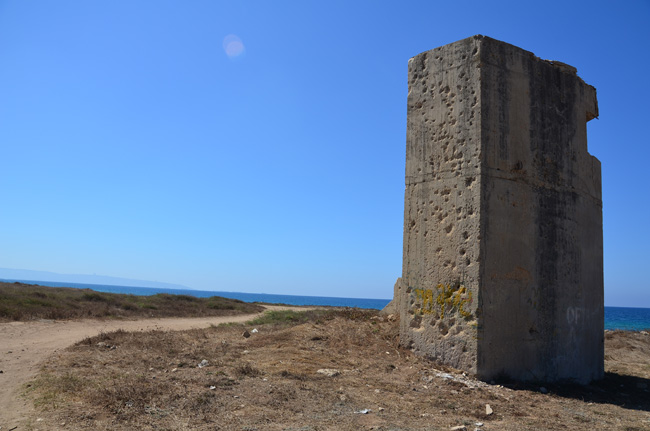
Three well-built concrete observation posts, located in Haifa and Bustan Hagalil (Fig. 4), seem to be associated with the indicator loops of the Haifa harbour defence system. Of special interest is the northernmost one in Bustan Hagalil which may have taken part in the detection of the Scirè and in producing the signal given by the British alert systems mentioned above. Haifa Bay indicator loop control/observation structure: The three-room structure (Fig. 10), partly dug underground, is situated on the steep, north-east facing slope of Mount Carmel some 660 m inland and about 90 m above sea level (Fig. 4).2 The middle room is the observer station from which the sea was optically scanned and ships seen matched up with information received from a signal station in the bay and harbour. The upper room housed the loop amplifiers and galvanometers and watch keepers. On the southern inner wall of the upper observation room there are attachments for a missing instrument panel, associated with the detection and the communication systems (Fig. 11).3 A third, basement room was used for the generator suppling power for the instruments, or as a bomb-proof dwelling-shelter.4 The structure location offers commanding view of the whole Haifa Bay region. The structure probably served as the control station of the Haifa Bay indicator loops.
Carmel Head indicator loop control/observation structure
The structure (Fig. 12) is situated on a steep, north-west facing slope of Mount Carmel, some 300 m west of the Carmel Head lighthouse. It is about 280 m inland and at an elevation of 85 m above sea level (Fig. 4).1 About 20 m north-east of this structure is a one-floor cement structure with several windows.2 It probably served as a crew dwelling and a generator room.
 |
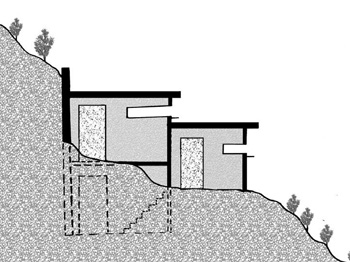 |
Fig. 10a. Indicator loop control/observation structure in Haifa. (Ehud Galili) |
Fig. 10b. Schematic of Indicator loop control/observation structure in Haifa. (EG) |
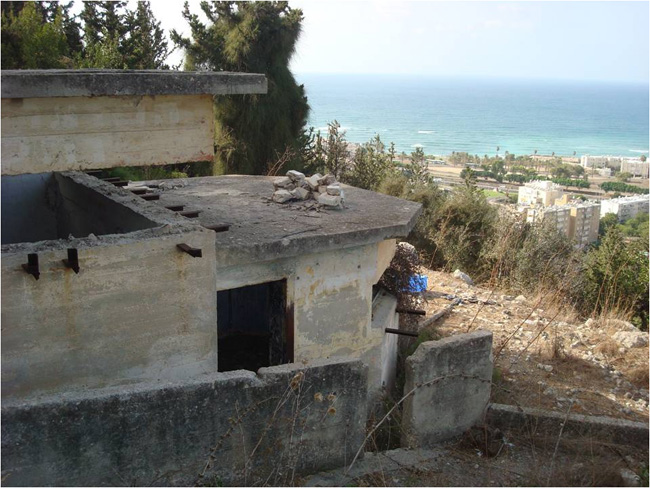 |
| Fig. 10c. Indicator loop control/observation structure looking out over Haifa Bay. (Ehud Galili) |
 |
| Fig. 11. Indicator loop control/observation structure in Haifa. The bars are for installing detection instruments (E.G.). |
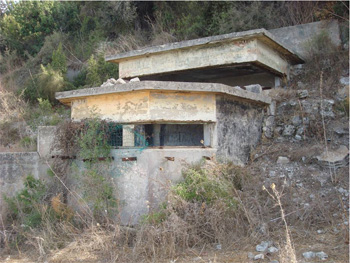
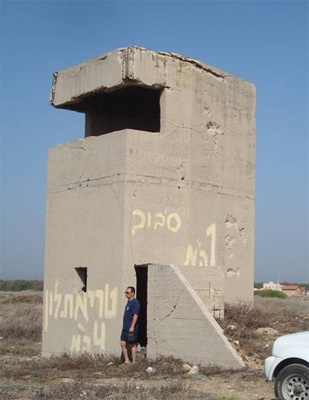
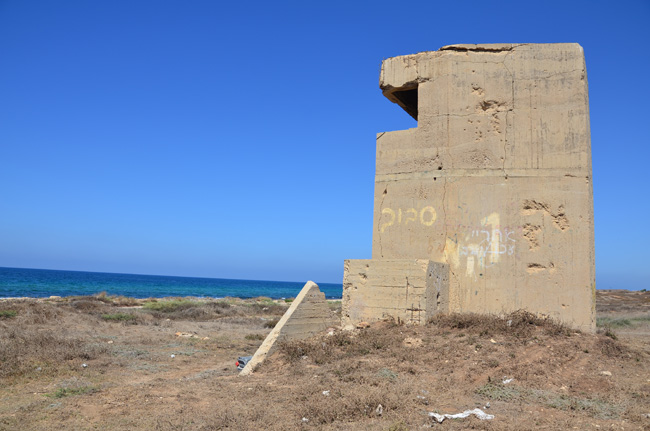
The structure (Fig. 13) is located some 58 m inland at about 2.5 m above sea level. It is a two-storey concrete tower with a trapezoid cross section.1 The indicator loop cable found out at sea opposite this structure associates it with the loop system and thus it was probably used to observe and control this loop.
 |
| Fig. 13. Indicator loop control/observation structure (E.G.). |
 |
| Fig. 13. Schematic of the Indicator loop control/observation structure (E.G.). |
Bustan Hagalil indicator loop control/observation structure
At the northern end of Haifa Bay is the Bustan Hagalil indicator loop observation post - about 17 km NE of Carmel Heads. This marks the northern end of the loop field.
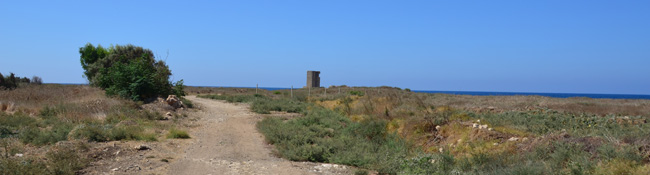 |
Indicator loop observation tower at Bustan Hagalil. Located at 32°,57',8.71" N; 35°,4',30.67" E (Uri Zackhem, 19 September 2015) |
 |
 |
Schematic of the observation tower. (Ehud Galili) |
The observation tower in 2013.
(Ehud Galili) |
 |
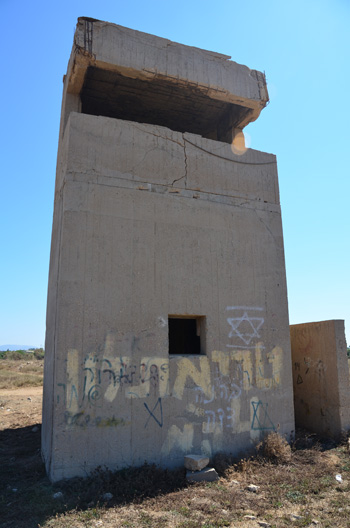 |
Dimensions 3.75 x 4.60 x 6.75 m. The reinforced concrete walls are 40 cm thick. (EG). (photo Uri Zackhem, 19 September 2015) |
The lower floor has a small (70 x 70 cm) window facing west and a door at its south-west corner, partly protected from the south and from the east with a partly buried wall. (EG). (photo Uri Zackhem, 19 September 2015) |
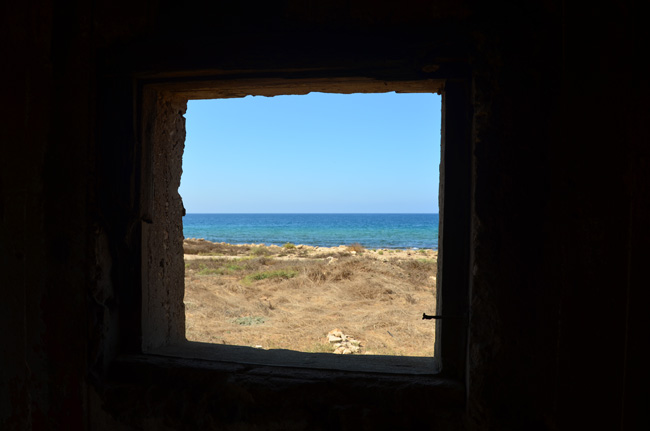 |
Through the window of the Bustan Hagalil observation tower - looking out over the indicator loop field in Haifa Bay. The second observation floor can be accessed by a 'missing' ladder. The second floor covered only part of the inner space. The second floor has a wide observation window (90 x 375 cm) pointing seaward with two expansions opening (90 x 90 cm) to the north, north-west, west and south. Description by Ehud Galili. (Photo: Uri Zackhem, 19 September 2015) |
 |
Beside the beautiful blue waters of Haifa Bay. The southern side of the Bustan Hagalil loop observation tower. (Uri Zackhem, 19 September 2015) |
 |
Rear of the Bustan Hagalil loop observation tower. (Uri Zackhem, 19 September 2015) |
The Haifa indicator loop system - layout and operation
The commonest loop arrangement by 1939 was the 'three-legged loop'.2 Maps of the layout of the loops and other naval defences for Haifa including the installation date have yet to be found. However, the loop and mining defences at Alexandria and Malta and the recent finds at Haifa enable a reconstruction of the system (Fig. 4). Given the production date of the cable, the system was placed after 1940, perhaps during 1941, when the British installed loop protection, in most harbours (see above).
 |
Endnotes
- DE BELOT, 1951, passim
- WALDING, 2005
- TERRAINE, 1989, p. 139;
- THOMAS, 1929, p. 252)
- The alignment, it noted, measured 650 miles - the steepest gradient being 2700 feet in 250 miles and syphoning 1000 feet in the Jordan Valley. The route traversed what was then, under British control, peaceful and protected territory (today's Iraq, Jordan and Palestine).
- CAB24/202, March 1929, CID Report, 13 June 1928, The National Archives (TNA), London.
- CAB24/202, March 1929, CID Report, 13 June 1928,London, TNA.
- Overseas Defence Committee Report, Paper No. C.O.S. 151.,London, TNA.
- ADM 1/9848, Maintenance of Indicator Loop and HDA Cables (refers to letter from Admiralty of 15 June 1934), London, TNA.
- CAB 24/247, 28 February 1934, page 23,London, TNA.
- CAB 24/268. 24 February 1937, London, TNA.
- ADM 1/9848,London, TNA.
- THOMAS, 1929, p.276.
- RICHARD WALDING, http://indicatorloops.com/.
- CAB/65/6/53, 11 April 1940, page 463,London, TNA.
- CAB/65/6/53, 11 April 1940,London, TNA, p. 469
- Hinsley & Stripp, 1993,
- No. 300 equipped with heavy guns, the BL 6 inch Mk VII of calibre 152.4 mm of 14450 m range, and QF 4 inch Mk V coast defence gun of calibre 100 mm of 15000 m range, both using Range Finder Mk 2.
- Located at 32°, 56', 59" N; 35°, 0', 4" E
- Located at 32°, 48', 43" N; 34°, 56' , 31" E; 32°, 47', 39" N; 34°, 56' 16" E
- Dimensions about 40 x 30 x 15 cm.
- RICHARD WALDING, http://indicatorloops.com/cablemakers.htm (n.d.).
- The "1989" cable consists of a single core of seven strands of 0.029" tinned copper wire (#1) covered with three layers of India rubber (#2 in Fig. 8) on which is attached the manufacturer's identification tape (Fig. 7). Covering this is a layer of thin (0.5 mm) waterproof tape (#3) and wound with 16 strands of jute yarn each about 2 mm in diameter (#4). The jute yarn layer is then covered with a tarred hessian mesh (#5) and a spirally wound anticlockwise layer of eight strands of 3.2 mm diameter pure lead wire (#6). These lead windings are covered with more waterproof tape (#7), 24 strands of a tarred jute serving (#8), and one more layer of hessian tape (#9). The whole is protected with a clockwise winding of 22 steel armour wires (#10), each about 1.9 mm diameter covered in pure lead 0.8 mm thick (Fig. 9). Then there is a braiding of dressed hemp yarn wrapped over hot pitch and resin (not shown), and finally a preservative coating. The final diameter is 1.35" (34.3 mm). It has a linear density in British imperial units of 6.09 tons per 2000 yard mile in air (6.8 lb per yard) or in metric units: 3.4 tonnes/km (3.4 kg/m). The cost in 1938 was ₤180 per 1000 yards (which equates to approximately ₤9000 per 1000 yards in today's money).
- Australian Laboratory Services, Brisbane, Australia. Analysis showed > 99.999% Pb.
- The locations are, respectively: firstly 32°, 54', 32" N; 35°, 02' , 12" E, secondly 32°, 49', 14" N; 34°, 56' , 35" E and finally 32°, 51', 59" N; 34°, 54' , 41" E.
- On the upper part of the 3 m high construction, there was a cylindrical metal tank (25 cm in diameter, 60 cm high) covered with a hemispherical cap at its top. While checking the cylinder with a knife it was punctured and oil leaked through the hole.
- The ship-borne version is known in the UK as asdic (for anti-submarine device) or more commonly by the American name sonar. The HDA was developed along with indicator loops in the late 1920s at HMS Osprey (Portland Naval Base, England). It was given low priority and the first model was not ready until March 1932 when placed 1000 metres off the Portland breakwater. An improved HDA was laid three miles off the same breakwater in 1934 in conjunction with indicator loops. By December 1941, the British Admiralty was worried about midget submarines entering ports (against which the standard indicator loop was ineffective). This was a concern for great alarm for the defenders of Haifa harbour as it was home to vital oil supplies and the entry of Italian submarines was unthinkable. The Type 131 HDA was not effective against these small targets so an improved HDA (Type 135) was designed by the Admiralty scientists. In cases where HDAs were installed they always had to be in conjunction with indicator loops. Usually the loops and HDAs were controlled by the same naval personnel in the same control hut. The maximum range for detecting any echo is 2.25 km.
- The mine (about 1.5-2.0 m in diameter with protrusions of about 20 cm long) and the wagons were reported by Mr Kotzer. The wagons were 200 x 150 x 15 m, with rounded ends and were scattered over an area of about 50 x 50 m. Each wagon has four solid wheels. The wheels were 25 cm in diameter. On the upper platform of each wagon was a rolling device with an iron cable rolled on it. The rolling device consisted of an iron cylinder on a rolling shaft, on which the iron cable was rolled.
- Located at 32°, 49', 34.4" N; 34°, 58', 26.4" E. There are two observation rooms (Dimensions 4 x 4 x 2.5 m and 3 x 3 x 2.5 m) with narrow, elongated windows, facing north-west, north, north-east and east. The structure is entered through massive iron frames which carried the missing iron doors. The observation rooms are on split levels connected by a narrow opening, possibly for cables and communication.
- The concrete walls of these rooms are 40 cm thick.
- (4 x 4 x 3 m), entered by a steel door, is mostly buried, having no windows.
- Located at 32°, 49', 43.3" N; 34°, 57', 58.99" E. The one-floor cement structure is 5x5 m and it has an elongated panoramic window facing south-west, west, north-west, north and north-east. The window was protected with iron plates, similar to the Haifa Bay observation structure above.
- Dimensions 7 x 7 m
- Located at 32°, 57', 8.71" N; 35°, 4', 30.67" E; dimensions 3.75 x 4.60 x 6.75 m. The armed concrete walls are 40 cm thick. The second observation floor was accessed by a missing ladder. The second floor covered only part of the inner space. The second floor had a wide observation window (90 x 375 cm) pointing seaward with two expansions opening (90 x 90 cm) to the north, north-west, west and south. The lower floor had a small (70 x 70 cm) window facing west and a door at its south-west corner, partly protected from the south and from the east with a partly buried wall.
- RICHARD WALDING, 2005, p. 28.
- ADM 186/548, Handbook for Indicator Loops, 1938 (London, TNA), p. 1.
- NESI, 2006, p.201.
- BORGHESE, 1950, p. 268.
- Ibidem.
- BORGHESE, 1950, p. 201, 265
- 14th Coast Regt. R.A. (Royal Artillery) - 17th A.A. Brigade B.A. (British Army).
- RUBERTI, 2010a.
- Ibidem, pp. 30-44)
- Interception ZIP/ZTPI/13518 Regia Marina No. 95075,London, TNA.
- Interception ZIP/ZTPI/13687 Regia Marina No. 30446,London, TNA.
- HW 1/795, Dispatch Naval Headlines N° 388, 27th July 1942,London, TNA.
- ADM 223/583 037, Dispatch O.I.C. Special Intelligence Summary, 27th July 1942, London, TNA.
- Interception ZIP/ZTPI/13956E Regia Marina No. 02581,London, TNA.
- ADM 223/583 024, interception ZIP/ZTPI/14018,London, TNA.
- ADM 223/583 029, interception ZIP/ZTPI/13760 e ADM 223/583 027, interception ZIP/ZTPI/13845,London, TNA.
- DEFE 3/847 & ADM 223/583 022, interception ZIP/ZTPI/14032, 30th of July,London, TNA.
- DEFE 3/487 & ADM 223/583 021, interception ZIP/ZTPI/14033,London, TNA.
- DEFE 3/487 & ADM 223/583 016, interception ZIP/ZTPI/14068, London, TNA.
- DEFE 3/487 & ADM 223/583, interception ZIP/ZTPI/14038,London: TNA.
- ADM 223/583 012, interception ZIP/ZTPI/14410,London, TNA.
- CX/MSS/1275/T3,London, TNA, p. 2
- CX/MSS/1275/T7,London, TNA.
- HW 5/120, interception CX/MSS/1275/T7 da riga 4 a 6: 1 JU 88 night photo of Haifa. operation still in progress. E ‘Intentions' 9/8. Photo recce Haifa,London, TNA.
- RUBERTI, 2010b, pp. 30-44
- The Mediterranean 1940 - 1943, vol. XX in GC & CS Naval History, Bletchley Park, Milton Keynes UK, HMSO, 1985.
- N.O.I.C. Palestinian Ports 2300c 10.8.42; ZTPI/13518, 13687, 13956, 14018, 14032, 14033, 14068, 14410, 16015; CX/MSS/1258/T19, 1265/T3, 1271/T23, 1275/T7)",London, TNA and The Mediterranean 1940 - 1943, Op. cit., p. 216.
- Italian Navy messages ZIP/ZTPI/13518, 13687, 13956, 14018, 14032, 14033, 14068, 14410, 16015, 13687A, 14035, 14038; 14047, 13689, 13760, 13845 (16 documents). Luftwaffe messages mainly about air reconnaissance of Haifa: CX/MSS/1258/T19, 1265/T3, 1271/T23, 1275/T7, 1259/T9, 1275/T3 (6 documents). English documents of ciphered transmission, reports to various commands about intercepted texts of messages, by the Regia Marina and Luftwaffe, CX/MSS/ZIP/ZTPI, all of which contain the following opening phrase: "From copy of a telegram seen by the source at…(Rome, Rhodes, etc.) the following report has been compiled ", ", to hide the real source of the information and deceive the enemy in case of a re-interception of the message (9 documents) [FABIO RUBERTI, 2010b]. Naval Headlines of the Naval Section GC & CS addressed to all responsible command chain most probably up to the Premier (Sir W. Churchill) and surely to the First Sea Lord, Sir Dudley Pound (2 documents). Special Intelligence Summary of the Special Intelligence OIC (Operational Intelligence Centre) (2 documents). War Diary C-in-C Mediterranean, Sir Henry Harwood, KCB, OBE, RN (4 documents). War Diary 14th Coast Regt. R.A. - 17th A.A. Brigade (3 documents). Signal messages N.O.I.C Palestinian Ports Captain G. O. Lydekker OBE, DSC, RN to Sir Henry Harwood, C-in-C Mediterranean (4 documents). Signal message from C. in C. Mediterranean to Admiralty (1 document).
- WO 169/4662, War Diary 14th Coast Regt. R.A. - 17th A. A. Brigade. Vol. XXIII, August 1942, Report on submarine incident - Duty Officers: Lieut. R.S. Walsh, R.A. & BSM. W. Richardson 10.8.42, London: TNA.
- ADM 199/648, Levant Area War Diary, 10th August 1942. Signal N.O.I.C. Palestinian Ports timed 2300C/10.8.42, London, TNA.
- NESI, 2006, p. 229.
- Located at 32°, 55', 12" N; 34°, 58' E
- GALILI, 1988
References
DE BELOT RAYMOND,. The Struggle for the Mediterranean 1939-1945. Princeton, Princeton University Press, 1951.
BORGHESE JUNIO VALERIO,. Decima Flottiglia Mas. Milan. Garzanti, 1950, p. 268. (Italian)
GALILI EHUD, Entering the submarine Scirè. El Hayam 1988, pp. 25-28. (Hebrew).
GERMANO FRANCESCO, Mimbelli ed Orsa nel Mediterraneo Orientale, Notiziario della Marina, Anno XLIII - n. 1, Gennaio 1996, Stato Maggiore della Marina, Ufficio Documentazione e Attività Promozionali (Navy Staff, Press and Promotional Office), p. 15.
HACKMANN WILLEM,. Seek and Strike, London, 1984, HMSO. HINSLEY F. HARRY, STRIPP ALAN, (eds.), The Code breakers, 1993, London, Oxford University Press.
NESI SERGIO, Scirè, Storia di un sommergibile e degli uomini che lo resero famoso, Bologna, Lo scarabeo, 2006.
RUBERTI FABIO, Lo Scirè vittima eccelente di Ultra Secret, «Bollettino d'Archivio dell'Ufficio Storico della Marina Militare», XXIV (marzo - giugno a), 2010a, (Italian).
RUBERTI FABIO, L' Epopea Dello Scirè, Sub 292. Milan, 2010b. (Italian).
TERRAINE JOHN, Business in Great waters. London, Cooper, 1989.
LOWELL THOMAS, Raiders of the Deep‘ London, Heinemann,1929.
WALDING RICHARD, Indicator loops and Anti-submarine Harbour Defence in Australia in WWII, «Journal of Australian Naval History», 2005, vol. 3,1, Sydney, Australia, pp. 1-33.