INDICATOR LOOPS OF THE ROYAL NAVY
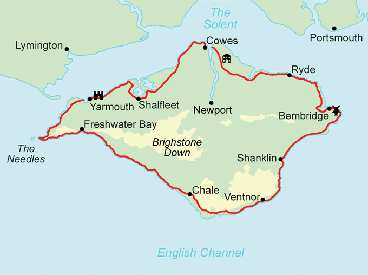
IN THE SOLENT & THE ISLE OF WIGHT
Indicator Loops are long lengths of cable laid on the seafloor of harbours to detect enemy submarines. They were developed by the Royal Navy in the early 1900s and first trialled at the end of WW1. They were then successfully deployed in WW2 in British ports both at home, in the Dominions (Australia, Canada, New Zealand, South Africa, Kenya, Ceylon, Penang) or in allied harbours (Iceland, Holland, Dardanelles).
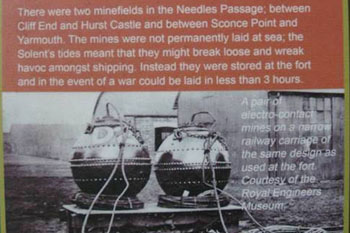
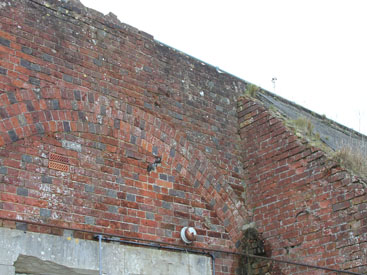
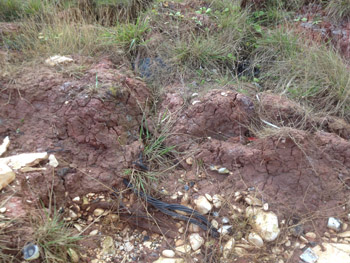
In 1938 the Royal Navy laid indicator loops across the sea channel into Spithead to detect the presence or hostile small craft and submarines. The tails were run ashore and attached to instruments in a room in the west end of Fort Bembridge. During the war three harbour defence asdic instruments were added and these were monitored from the same room. They were controlled by a naval officer called 'Extended Defence Officer, East'. If you visit the site you can make out the faint lettering 'XDO' over one of the old doors. The cable duct can also be seen in the eastern counterscarp wall. My thanks to Tim Wander for the photos and information.
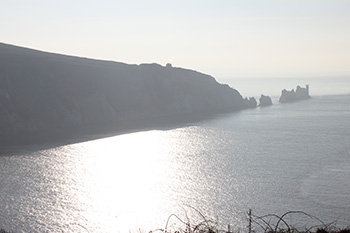
It is safe to assume that the eastern approach to the Solent would have been protected by the loop system from Portsmouth - just under 2 miles across. If another system ran North (as is suspected from eyewitness reports of engineers laying cables down to Bemridge) then the only reason would have been to protect that coast line from incursion - the main Solent estuary is simply too far away. During WW2 the whole of Culver Cliff was a huge military base - Culver and Redcliff Batteries and Bembridge Fort along with three radar stations, searchlight, AA and a huge wireless station. Any loop station there has the advantage of height, communications and firepower if needed.
 |
If you worked there or have any feedback please email me: |
 |
Tim Wander's book (above) will be released in late 2016. Details to follow. |
The loop systems dealt with in this page are:
1. Hatherwood Loop Station - looking north to protect the western entry to the Solent. Situated alongside "Hatherwood Battery" to engage enemy.
Cliff End battery - not a loop station but a mine research station. We have included it here because of the interesting underwater cables. It is situated between Hatherwood and Bouldnor Loop Stations.
2. Bouldnor Loop Station - also looking north to protect the western entry to the Solent.Part of "Bouldnor Battery" to engage.
3. Bembridge Loop Station - part of Bembridge Fort. Appears to have two loop systems:
- one most likely running parallel to the coast (SW) - to prevent landings and protect the piers and PLUTO pumping stations;
- the other heading due south to watch around the headland able to call on Culver Battery to engage
4. Culver Loops - appears to be two loops systems of Culver Battery:
- one running parallel (NE) to the 'Bembridge Ledge' - a large shallows thought to be a key invasion site;5. Portsmouth loop system - most likely running south from Southsea Castle - which has a known loop and anti submarine boom between No Man's Land Fort and Horse Sand Fort protecting east approach to the Solent. We can assume that there was gap coverage and protection for Bembridge Harbour for St Helen's Fort and a harbour loop system for Portsmouth Harbour itself.
- the second, running out to the NAB tower - 6 miles off shore Nab Tower from where there is a known loop running south. Most likely another loop heading west to close the Culver Loop just across the water (Solent)
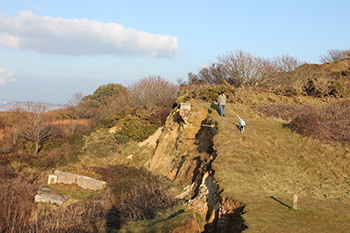
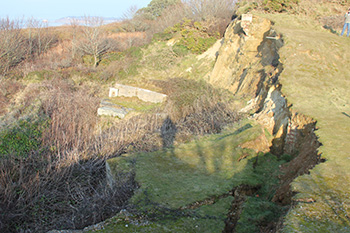
1. HATHERWOOD LOOP & BATTERY
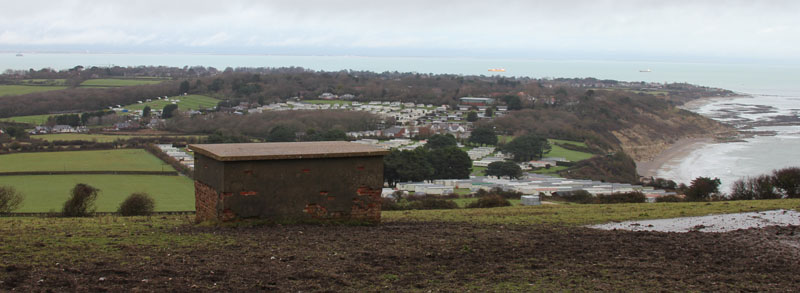
The whole battery has gone over the cliff and Steve could not find any sign of the loop system.The Disappearing Hathaway Battery |
 |
 |
| 4947. The Needles taken from Hatherwood C Battery. | 4949. Tim's dog "Patch" has been to every loop site on the Isle of Wight. He has a tale or two. Here he is on B Battery looking North. |
 |
 |
| 4950. The battery building outlines. From Left to Right Smiths Shop, Artillery Store, PF and Lamp Stores and probably the Loop Room. | 4956. A-Battery, now slipped and tumbled down the cliff. |
 |
 |
| 4960. Another view of A-Battery - now slipped and tumbled down the cliff. | 4971. |
 |
| 4963. Part of the shattered A Battery. |
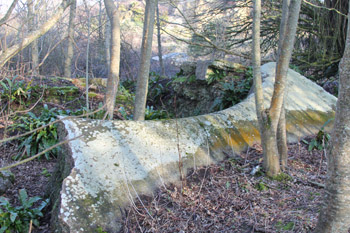
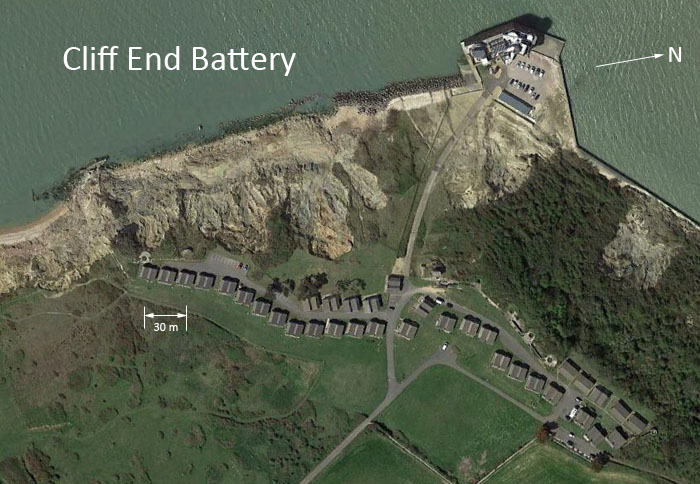
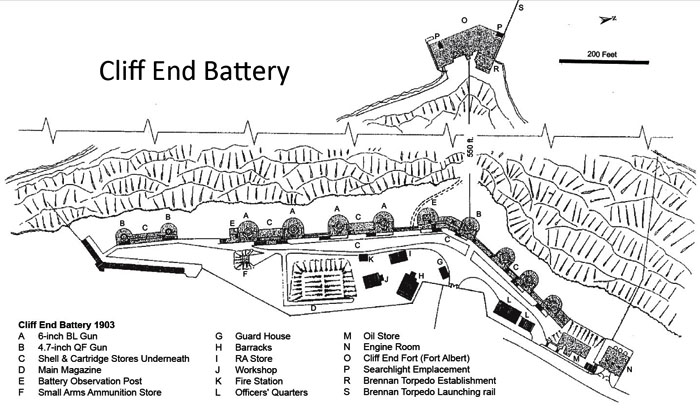
CLIFF END BATTERY & MINE RESEARCH STATION
 |
 |
 |
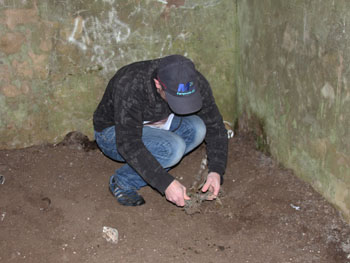
Tim Wander continued his explorations from Hatherwood Battery down towards Culver Battery but didn't expect to find anything in between. Nevertheless, find something he did - at Cliff End Battery. Here's his story:
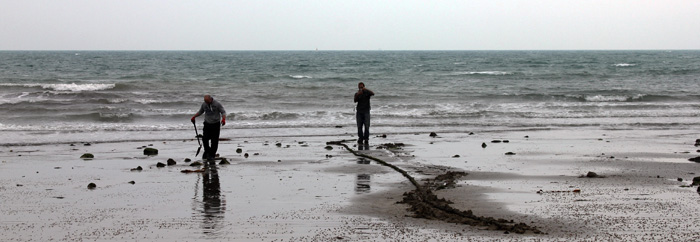
| Sunday [24 January 2016] we [Tim, Ross and Steve] wandered around Cliff End battery - which is the next one around the coast from Hatherwood (with a known loop system) that protected the western entry to the Solent. I had thought that the next line of defence was the loop system at Bouldnor battery next around the coast [see below] and then the loop controlled minefield(s) from Hampstead Point which we looked at last year - the mine servicing ramp survives here. But Cliff End battery lies between Hatherwood and Bouldnor. I have found no reference to indicator loops here but it was a centre for sea mine research along with the unarmed Fort Victoria next door. Well we turned up a huge number of cables running down the cliffs to the sea. |
 |
 |
8140 - the first set of cables seem to enter this building. |
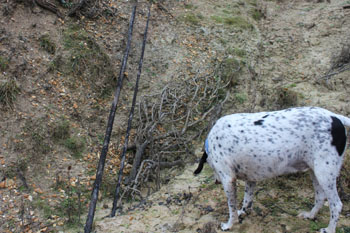
8142 - The cables here (above, to the left of Patch) could be mains power to the building. The entrance is for small people and no others - best guess is that it has something to do with mines. |
 |
 |
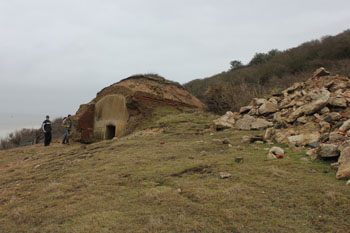
The entrance to the underground bunker. |
Inside the bunker. |
Further around the battery where the ground has slipped away there are three distinct cable groups
that run down the cliffs and out to sea.
 |
 |
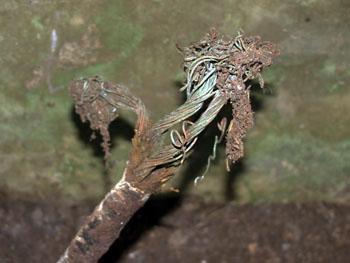
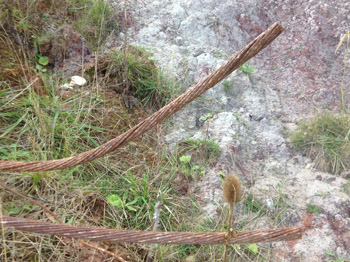
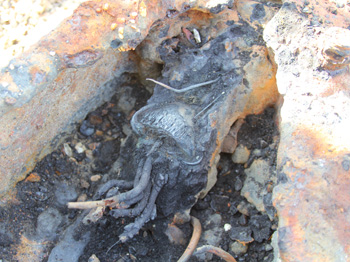
8161 - The 1st set of cables consists of three classic looking loop cables - you can't see the cores but hopefully Tim will visit with the grinder.... |
8169 - another shot of the 1st set of cables shown running down the cliff. |
 |
 |
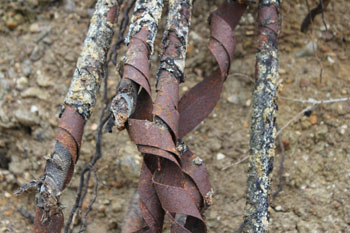
8167 - The 2nd set of cables is a group of four cables steel-band-wrapped with bitumen over the top then linen then lead then a solid copper core. (Ross had a handy saw and sectioned one). Never seen this before and may be a mine firing cable? |
8166 - one of the four cables grouped together (see opposite) |
 |
 |
A 3rd group of cables is behind Steve: two are very thick and three are thin. |
A display on the wall at Cliff End battery notes that it was a centre for sea mine research along with the unarmed Fort Victoria next door. |
FORT VICTORIA
Fort Victoria is situated on Sconce Point west of Yarmouth next door to Cliff End battery. Its position overlooks the whole of the Needles Passage and approaches to Yarmouth, and is almost opposite Hurst Castle on the mainland. Around one kilometer to the southwest lies Fort Albert.
h2g2 website: https://h2g2.com/edited_entry/A83150598
Wikipedia: https://en.wikipedia.org/wiki/Fort_Victoria_(Isle_of_Wight)
Tim Wander reports that at Fort Victoria recent storm damage has exposed new cables at the beach edge and inland. This was the Royal Navy centre for mine research from 1891.
 |
 |
Fort Victoria cables. Tim Wander (October 2016) |
Tim Wander inspecting the Fort Victoria cables. |
 |
| Tim Wander- October 2016. Tim is Curator - Science and Industry, Sandford Mill, Chelmsford; Project Manager - PLUTO Power Pavilion Restoration Project, Sandown, IOW. Historian/Curator - Hall Street Museum Group, Marconi Heritage Group, Marconi Veterans Association. |
PUCKPOOL BATTERY
h2g2 website: https://h2g2.com/edited_entry/A83150750
Wikipedia: https://en.wikipedia.org/wiki/Puckpool_Battery
Tim Wander and colleagues had been looking around Puckpool Battery for a while as it seemed like the logical place to close the Solent barrier to the sea forts. They found two in October 2016. There is some suggestion that there may have been a degaussing station at Puckpool during WW2.
 |
Cables on the seabed leading from the Puckpool Battery (Tim Wander, 9 October 2016) |
 |
 |
Puckpool cable (Tim Wander, 9 October 2016) |
Puckpool cable (Tim Wander, 9 October 2016) |
 |
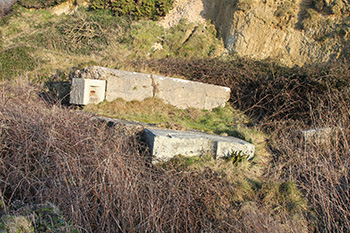
2. BOULDNOR LOOP & FORT
The Bouldnor Battery is now the HQ of the Forestry Commission and the beach is only accessible at very low tide and then with a window of safety of around 2 hours - and its mainly thick "blue slipper" mud - like quicksand.
 |
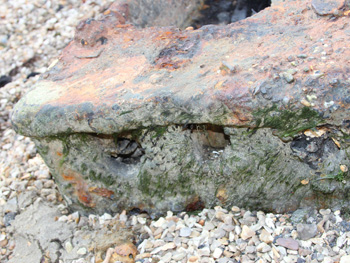
| Structures at Bouldnor in 2005 at low tide - a shingle causeway can be seen above the remains of the shore "connection" building. |
 |
The same structure at high tide in 2014. Most of the shore hut is underwater. |
 |
 |
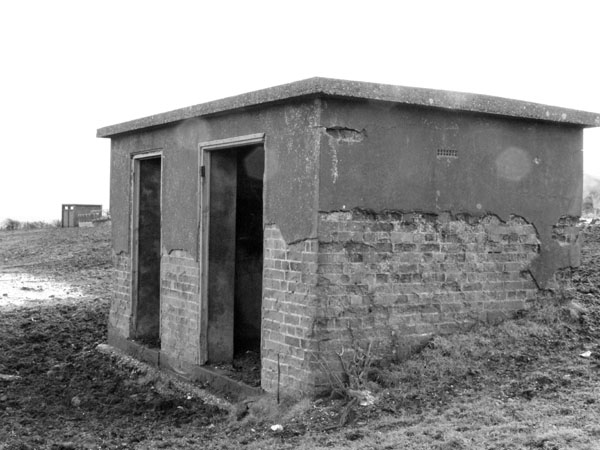
| 2760. Loop control hut. | 2762. The Loop Control Hut is about 24ft long, 12 ft wide and 8ft high. |
 |
 |
| 2763. The access slots for the loop cable. | 2764. The roof was reinforced concrete about 6-8" thick. It was covered with a waterproof bituminous layer. |
 |
| 2766. The ventilation duct at the rear. |
 |
 |
| 7117 Connection Building on beach. You can see the wall were about one-and-a-half bricks thick (about 13 inches). | 7118 Connection Building on beach. It most likely contained the junction boxes where the tail cables came ashore. |
 |
 |
| 7193. The structure just offshore. Well and truly underwater at high tide. No loop cables are visible, although there are many possibles - and some reinforcing rods thrown in for good measure. | 7098. The structure just offshore. The mud and the petrification make it somewhat hard to work out, plus the fact you may have to run quickly in thick mud. |
 |
| 7116. A part of the structure just offshore. |
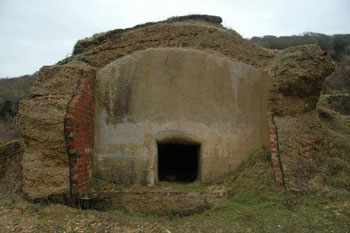
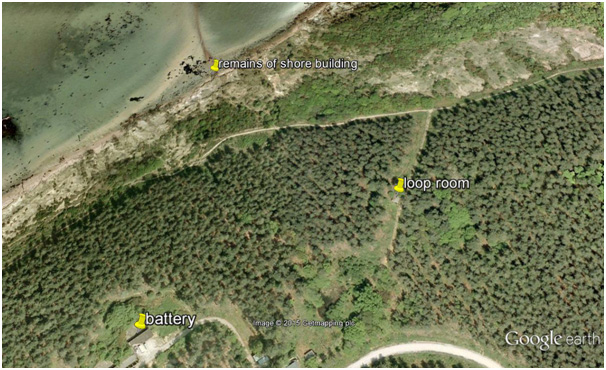
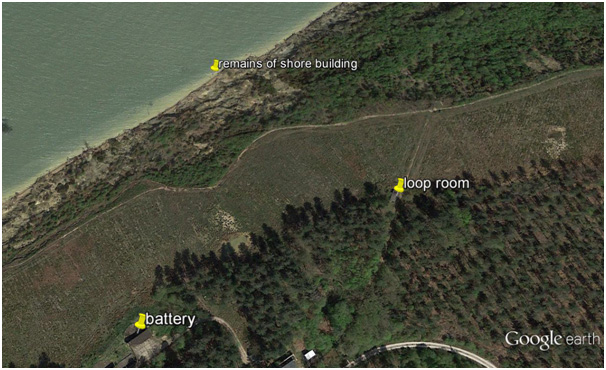
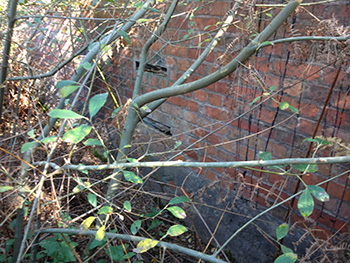
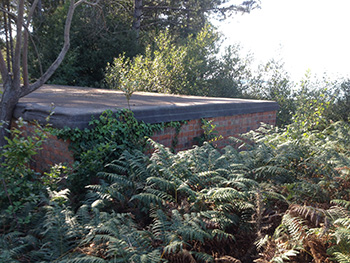
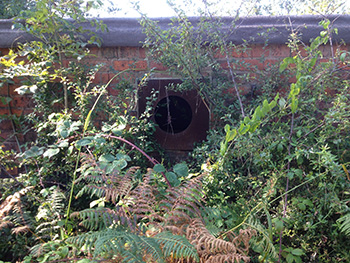
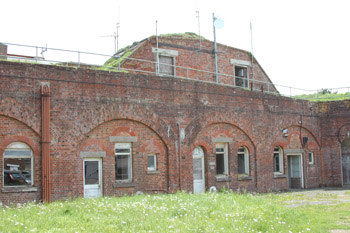
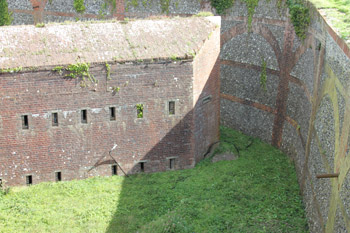
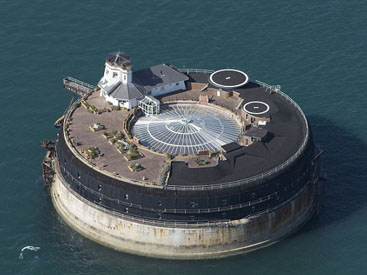
3. BEMBRIDGE LOOP & FORT ON CULVER DOWNS
 |
Fort Bembridge is located on the eastern side of the Isle of Wight in the English Channel just south of Portsmouth. |
 |
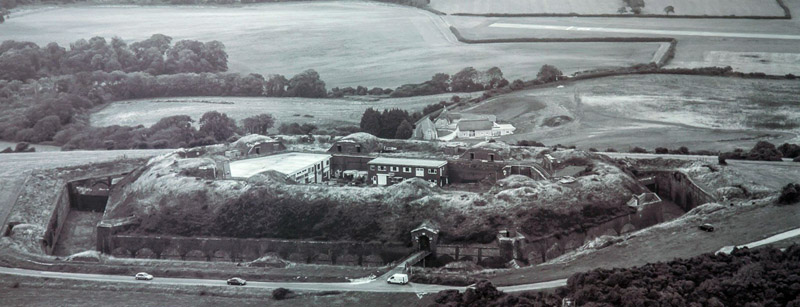 |
An aerial shot of Bembridge Fort |
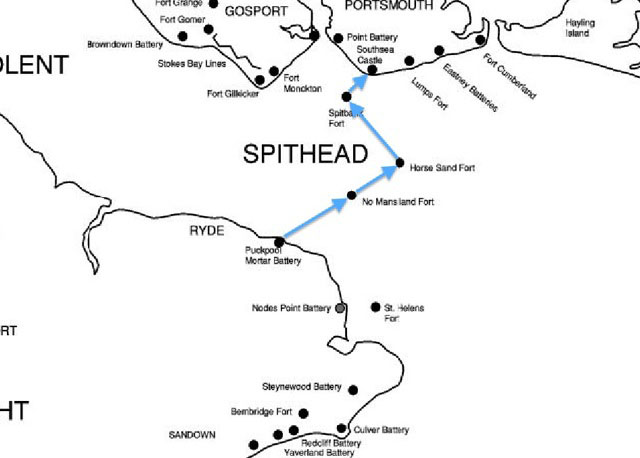 |
| There was a loop system(s) south of Portsmouth and we have to assume similar system(s) on the Solent Forts (see the chart above). Spit Fort, No Mans Land Fort, St Helens and the NAB Tower (not shown on the map but to the east of St Helens Fort which was built for antisubmarine use.) |
 |
 |
| 3908. | 6997. |
 |
 |
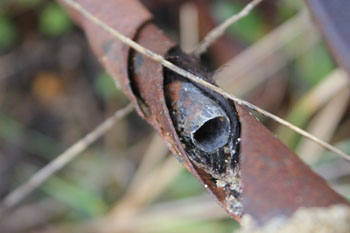
5146. A connector for the 4 core small cable. |
5149. A close-up of the 4 core small cable in the connector opposite. This could be Adm Patt 7048 cable used for tails to a indicator loop field. |
 |
 |
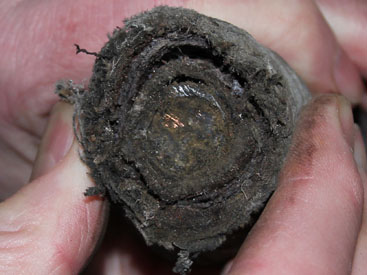
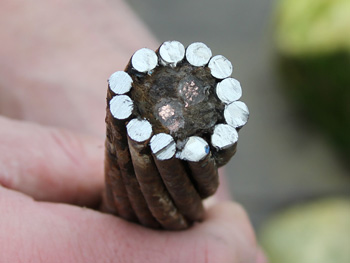
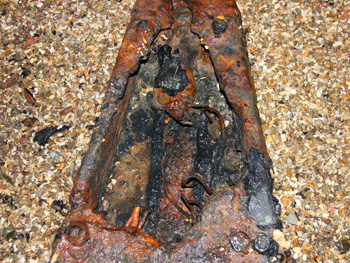
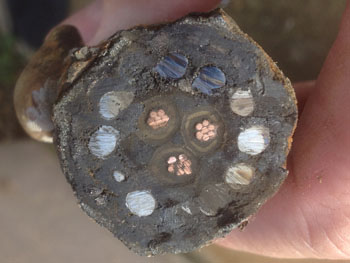
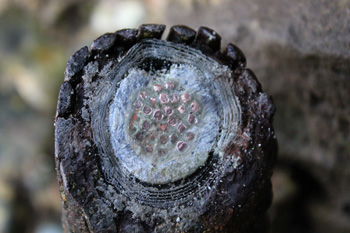
5152. Cross-section of the 4-core large. This has about 20 copper conductors in each core an has steel armour wire for protection. |
5154. The 4-core small cable in cross-section. This looks like Admiralty Pattern No. 7048 cable used as tail cable for a indicator loop field. The 7048 cable was 4 core, 7 strand with 22 strands of armour wire. |
 |
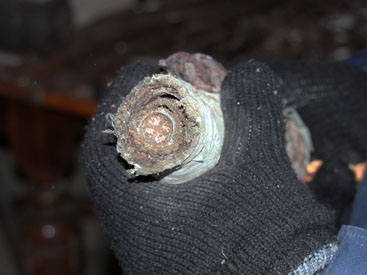
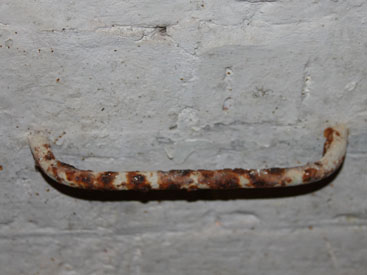
5194. The 2-core 7-strand (of copper conductors) small cable with its 12 armour wires. This looks very much like the Admiralty Pattern No. 841B cable used for Harbour Defence Asdics. |
 |
 |
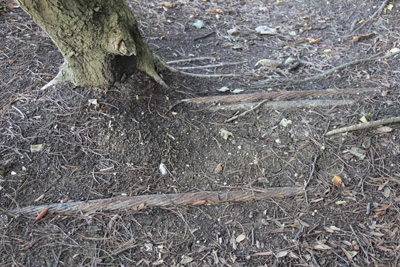
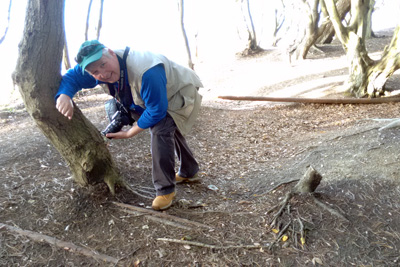
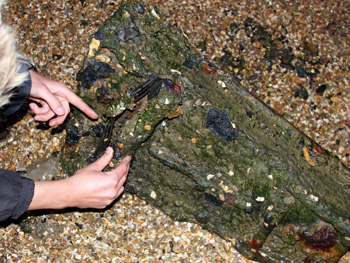
| 4141. Loop cables from Bembridge Fort. | 6206. The loop cables |
 |
 |
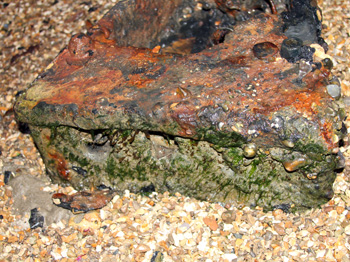
| 113. Loop cable in situ, Bembridge Fort. | 112. Loop cable in situ, Bembridge Fort. |
 |
 |
5156. A 4-core small cable in-situ that headed over the fort walls and out to sea. |
5160. The 4-core small cable in the photo opposite. |
 |
 |
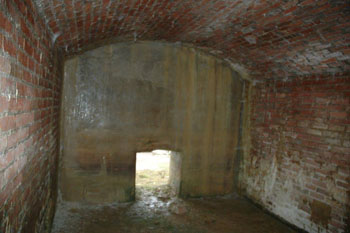
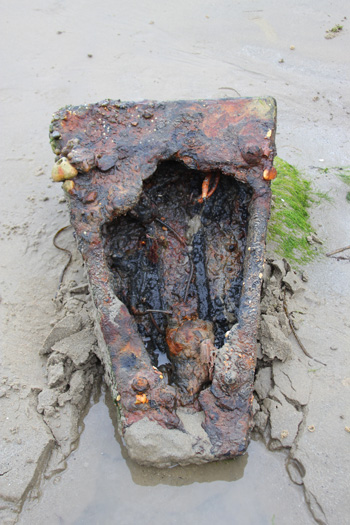
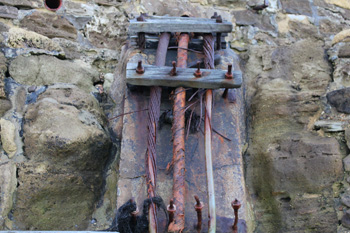
5192. When you follow that cable back into the fort it becomes 6 cables which appears to just loop over the wall and enters the underground control room. |
5191. Entrance of the 6 cables which appear to just loop over the wall and enter the underground control room. The first three are 7-core 7-strand with 22 armour wires (probably loop tail cables); the next three are 2-core 7-strand cables with 12 armour wires - possibly HDA cables. |
 |
 |
5180. In the undergroundbunker we (Tim) found 4 cables. Two must have been cut off. |
5178. The cables from the photo opposite are in situ about 4 m away and pass through the next wall. This is a 7-core 7-strand cable with 22 armour wires. |
 |
No Mans Land Fort |
 |
5181. The WREN operators room. |
 |
5190. About 6 m further along we found a line of odd brackets (possibly cable mounting). |
4. CULVER LOOPS & FORT
SUMMARY
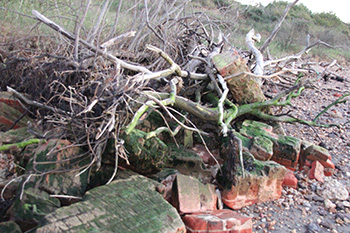
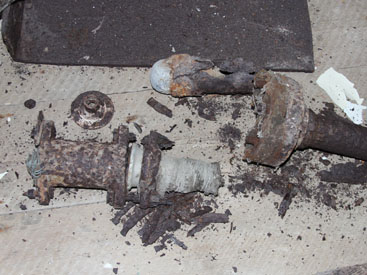
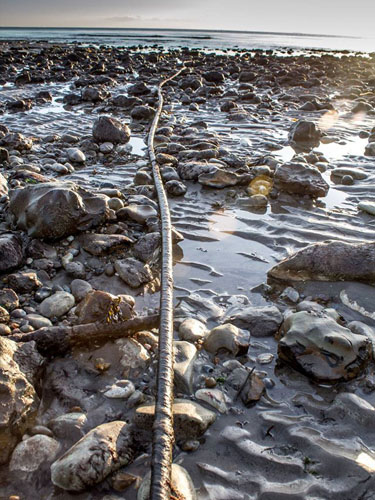
At Bembridge Fort there were three 2-core cables and three 7-core cables heading down the beach and then an unknown number of cables ran out to sea in front of Sandown and Shanklin. The three 2 core cables were most likely directly connected to three Hydrophones/HDA - so three listening buoys floating off shore protecting the beaches and piers of Sandown and Shanklin against invasion, spy drops and commando raids against PLUTO installations and the radar stations on culver cliff and the secret admiralty research station at yaverland nearby.
I assume the three 7-core cables are the tails that connected to the actual loop cables on the sea bed which is assumed to be single cored type ADM Pattern 1989. Our intrepid explorer Tim Wander has not found these but is hopeful that his son (or the local SCUBA diving club) into having a look.) These loop cables would be about 2000 yards long (just over a mile) and made of three legs spaced about 200 yards apart.
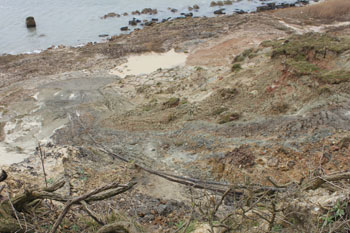
At Culver Battery there are 8 cables that run down the cliff to WhiteCliff bay below. At the beach there are two 2-core cables which, it can be assumed, connected to 2 HDA transponders off the beach protecting the huge bay from incursion as above. These cables most likley ran unbroken from the loop control hut above. We know there are three 7-core cables exiting the cliff and three of what appears to be 7-core (based on diameter alone). We can assume that these loops ran out the NAB tower 6.2 miles off shore which also had its own loops.
On the beach at low tide Tim and colleagues found two 2-core HDA cables and two 7-core cables running out to sea and one 3-core cable. The purpose of the three core cable is uncertain at the moment. The connector box is also a enigma. At one end there is a 7-core cable; at the other end there are three holes for cables - and we can assume these were 2-core but Tim is not convinced as one appears to have more. On the back of the box is another hole with the remains (outer steel) of another cable that connected in.
Disappearing History - Culver Battery |
 |
| 4389. Culver Battery Loop Room looking North over Bembridge, protecting Whitecliff Bay below and throwing a Loop barrier to the NAB Tower 6 miles offshore. |
 |
| 4422. Culver Loop Room |
 |
| 4420. Culver Generator Base, Loop Room and the Yarborough Monument. |
 |
| 4425. Culver Loop Room |
 |
 |
7506. Inside the Culver Loop Room -15 Nov 2015. |
7507. Cable inside the Culver Loop Room. |
 |
 |
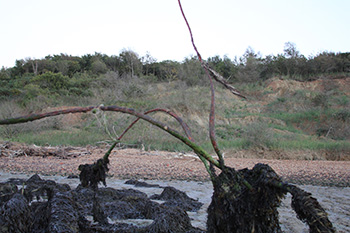
| 5505. Culver Battery Loop Cables running down the hillside toward WhiteCliff Bay | 5521. Culver cables. The 2-core 7-strand cable with its 12 armour wires. This looks very much like the Admiralty Pattern No. 841B cable used for Harbour Defence Asdics (HDAs). |
 |
 |
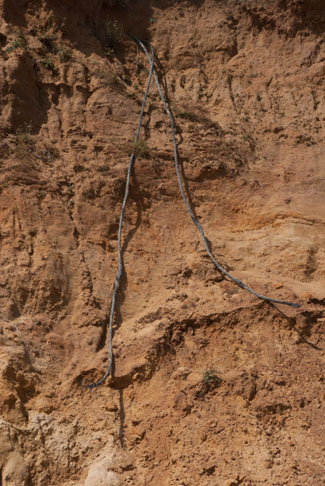
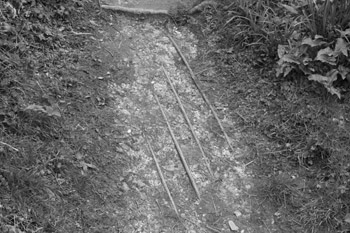
| 5515. Culver Cliff sea loop cables running down the hillside toward White Cliff Bay. There are 8 of these cables running down the hill to White Cliff Bay from the Culver Barracks loop hut. They are all the same (2-core). | This is one of the 7-core sea cables photgraphed at recent very low tide. It is one of two on White Cliff Bay heading out to the Nab Tower. |
 |
| 5513. The 8 Culver Loop cables running down the hill. |
 |
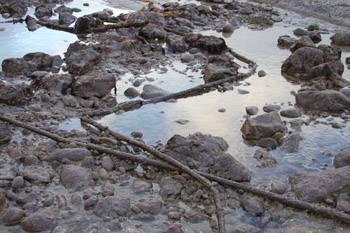 |
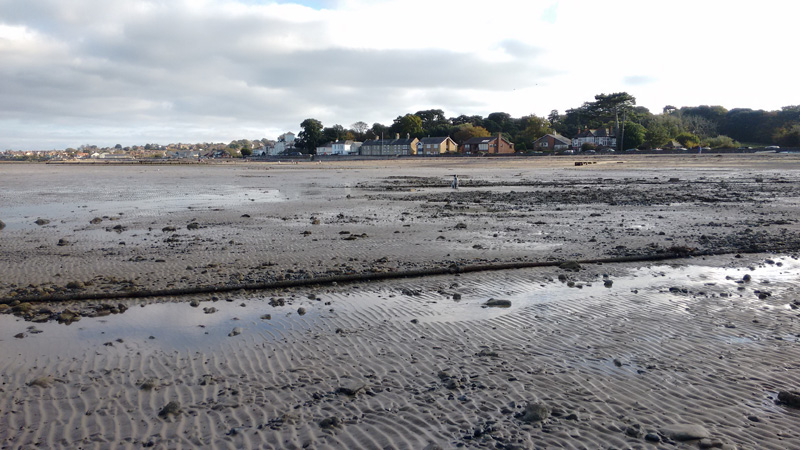
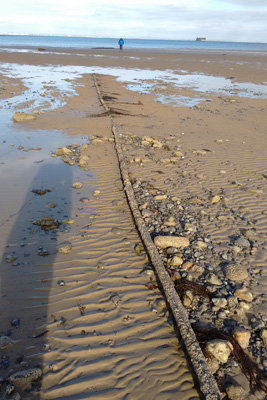
| 5547. At low tide. The 7-core 7-strand Adm Patt 660 cable for loop tails. | 5562. Loop Cables stretching across Whitecliff Bay. |
 |
 |
| 5565. Low tide. At least three loop systems, possibly four ran across to the Nab tower 6 miles of shore. | 5566. Loop Cables stretching across Whitecliff Bay only visible at very low tides. |
Latest Photos
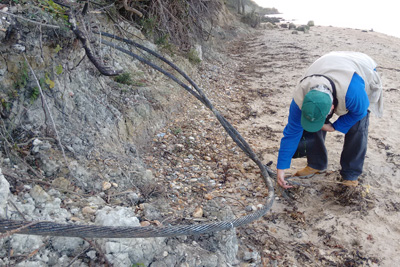
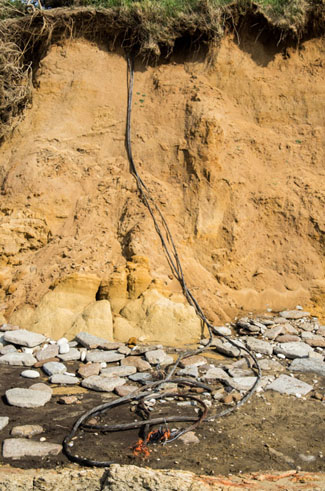
Tim Wander reports (9 October 2015): "Just been down to Whitecliff Bay - first time since last September - and the storms have now exposed the cables visible high above as they arrive on the beach".
 |
 |
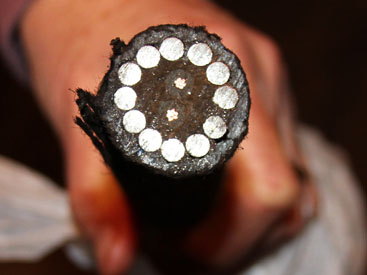
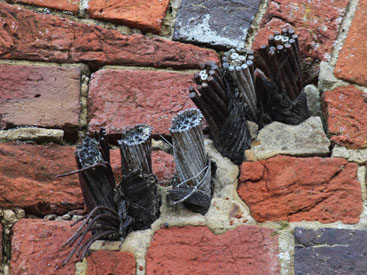
| 2830. The "7-core, 7-strand" Admilitary Pattern No. 660 loop tail cables, parts of which show the exposed rubber insulated cables inside. | 2831. You can see that the steel outer armour has rusted away and exposed the 7-core rubber cables inside. |
 |
 |
| 2833. The 6-core rubber insulated conductors are clearly visible now that the steel armour wires have rusted away. This is a land cable with 6 cores. The other land cable has 2 cores, whereas the sea cable has 7 cores. | 2834. Showing the armour wires intact. |
 |
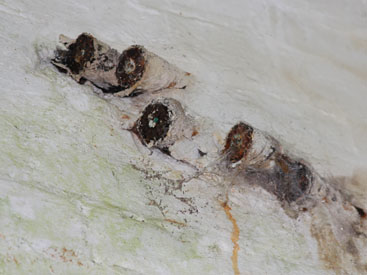
| 2836. Note the 12 armour wires enclosing the 2-cores. The outer braid of hemp and tar has rotted away. Adm Patt No. 841B. |
 |
 |
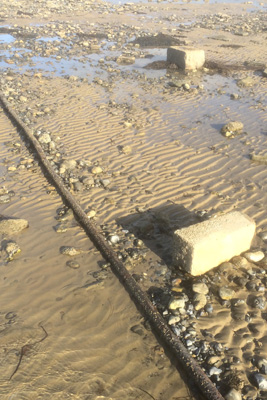
| 2849. Concrete blocks on the beach - used to keep the cables in place. | 2850. The cables are marked with arrows. |
 |
 |
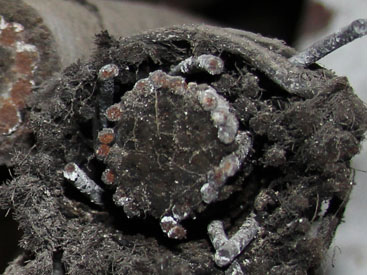
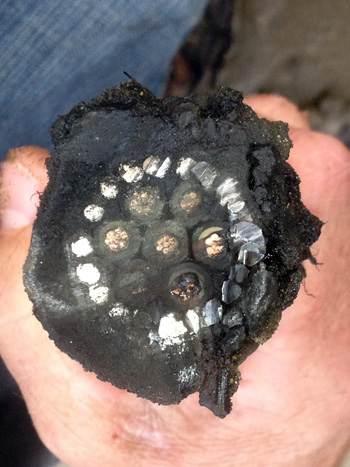
| 2851. Seven cores enclosed in rubber. Each core appears to have the typical 7 copper conductors. This is an Adm Patt. 660 cable. | 2852. Close up of the cable enclosed in the concrete above. This could easily have been a 3-core cable. |
Further Inspections - 10 October 2015
 |
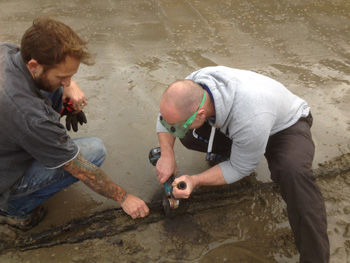
7237. The sea cable is about to give up its secrets. Steve and Ross pull up this 7-core, 7-strand, sea cable with its 20 armour wires. Heavy, man. Tim took the photo. |
 |
 |
| 2891. Ross (left) and Steve cutting the sea cable with an angle grinder. This is Admiralty Pattern 660 cable described as 7-core, 7-strand, 0.029" tail cable. | 7244. The land cable has 12 armour wires. The tarred hemp outer braiding has worn away. This is 2 core, 7 strand, 0.029" cable (Adm Patt 841B) and was probably made by British cablemaker W T Henley (London) in 1940 or so. It is also used in the HDA (Harbour Defence Asdic) setup for sending out the signal. |
 |
 |
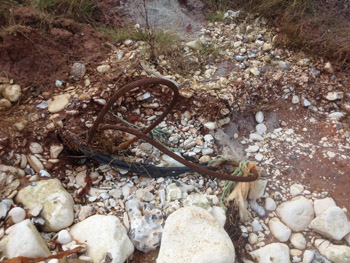
2892. The guys also dug out a sea cable and took sections of it. This is similar to Admiralty Pattern 660 cable described as 7-core, 7-strand, 0.029" tail cable. The 0.029" refers to the diameter of each of the 7 copper wires in the cores. The above cable has 20 armour wires enclosing it (unlike the Patt. 660 which has 15). This also could be a heavy-duty version of the 660 cable called the "Heavy Tail Cable". It was most likely made by Hoopers in 1941. |
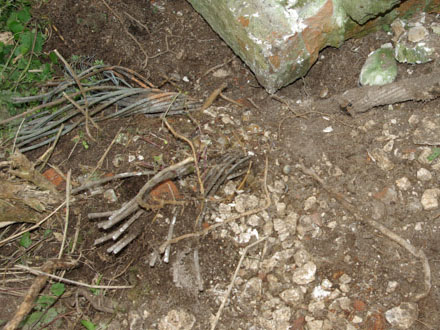
2896. Steve (left) and Ross managed to drag the Junction Box up the slope with the help of two friends - proper heavy. Tim's dog "Patch" is in the background. |
 |
 |
| 7246. In the end Tim, Steve and Ross dug the second box out (which is larger by about 6 inches in length) but was better preserved. | 7252. The Junction Box. |
 |
 |
| 7253. The base. | 7254. The main sea cable comes into the shorter end. Across the bottom are two strips, bitumen covered, into which wire runs from the main cable. |
 |
| 7236. The Junction Box nicely washed out. The box is 70cm long, 45cm across the base and 20 cm across the top and 18cm deep. On the back face there appears to be three holes across which a bar and cable ran connecting into the box. You have to assume these are earth connections inside the box. |
 |
 |
| 7249. The wiring inside is difficult to sort out. There seems to be lots of spare wires but it also appears that another cable was fixed onto the back side left corner of the box (see photo 7249 above). | 7258. Here you can see the sea cable with all 7 strands still in place. It seems to have been pushed into though another collet/cable that has many reinforcing strands (still shiny and still very sharp!) and what appears to be another cable looped back on itself - probably earthing. |
 |
| 7259. You can see the 3 cables the other end. Two of the holes still have 2-cored cables in place |
Photos - Visit on 30 October 2015
 |
 |
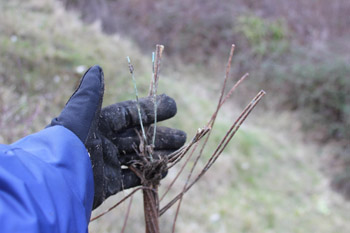
3-core cable from Whitecliff Bay - longitudinal view. (Tim Wander 30 October 2015) |
3-core cable. The diameter is about 40mm. |
Loop Cables - Video
The video shows 9 cables running down the cliff.
Further discoveries 8 December 2015
Tim, Steve, Ross and patch the dog went for an epic walk in the worst storm to hit the UK in years and had some interesting finds....
 |
 |
| 3166. They managed to sample the cables on the beach at Redcliff (Steve's better angle) that come from bembridge fort and there are two loop cables each with 7 cores. They are still looking for the other 6 from the fort. | 3196. Somewhat unexpectly they found another cable heading from Culver Battery to the south part of the headland - so that changes the story. |
 |
 |
| 7737. Some new cables turned up - at a place called seaview directly opposite one line of solent forts. Three cables heading out to sea (see opposite). | 7741. Three cables heading out to sea. They are not power lines (forts had generators) and are much thicker than other loop tails but the metal pipes match the loop pipes from Scotland. Some have said they are telephone or telegraph lines but we are not convinced. |
 |
 |
| 7753. A cleaned up cross section of one of the cables. Most likely a mine control cable as it has a large number (27) of copper conductors. Mine detonation cable takes a big current so this is likely to be for that. | 7755. About 20 feet away from the three cables is a WW2 small building, possibly the mine control hut. |
 |
| 7748. Two additional cables that head into the hut in photo above right. |
5. PORTSMOUTH HARBOUR
LINKS TO SOME OF MY RELATED PAGES:
Indicator Loops around the World (Home Page) How an indicator loop works