OF THE ROYAL NEW ZEALAND NAVY
This page details the location, construction and history of the anti-submarine indicator loop defences installed by the Royal New Zealand Navy during World War 2.
If you have any feedback please email me:
Dr Richard Walding
Research Fellow - School of Science
Griffith University
Brisbane, Australia
Email: waldingr49@yahoo.com.au

LINKS TO RELATED PAGES:
Indicator Loops - an overview (YouTube, 70 minutes)
Indicator Loops around the World (Home Page) How an indicator loop works
HARBOUR DEFENCE COME TO NEW ZEALAND
The following information comes in part from Peter Corbett's article "Auckland's Extended Defences 1939-1945" published in the Defence of NZ Study Group's journal Forts and Works, December 1997, pp8-11 which he based on his study Motutapu Island Military Structures Conservation Plan for the NZ Department of Conservation, Auckland Conservancy.
By the outbreak of WW2 in September 1939, coastal defences in NZ were in no state of preparedness. The NZ Navy Board considered various methods but cost, a shortage of materials and a belief that NZ was immune to attack hindered progress.
In 1940 the NZ Naval Board requested the advice of Cmr Harvey Newcomb (RN) head
of HMAS Rushcutter Antisubmarine School in Sydney. He travelled to
Auckland by small passenger ship and thence to Wellington by rail and to
Christchurch by plane. He gave advice on the location of indicator loops
at the three harbours. By April 1941, the NZ War Cabinet approved indicator loops across the Hauraki
Gulf channels but did not begin construction so that when Japan entered the war
in December 1941, NZ still remained unprepared. The Navy Board requested information about costs and availability of indicator loops from Australia on 26 February 1942. A patrolling Japanese submarine (I-26) was seen off Auckland in the Harukari Gulf on 13th March 1942, and very quickly loops were laid in Auckland Harbour.
At NZ's request, the Australian Naval Control Board approved the use of its
naval auxiliary ship HMAS Mernoo for loop laying in NZ. Mernoo
arrived in Auckland on 27 February 1942, completed laying the six loops by 29th
March and sailed for Melbourne two days later. By late September 1942, seven HDAs (Harbour Defence Asdics) were laid on the sea bed. The Fixed Defence Stations Puna and Emu were completed by the end of November 1943. By then the Japanese threat had abated and harbour defences became of less significance.
NZ INDICATOR LOOP LOCATIONS
Anti-submarine 'indicator loops' are long lengths of cable laid on the seabed in shipping channels of strategically important ports. They rely on the production of an induced current in a stationery loop of wire when a magnet (in this case, a submarine) moves overhead. Indicator loops were a part of the RNZN's Fixed Seaward Defence Stations. Fixed harbour defences, including indicator loops, were located at:
Auckland (Takapuna)
Wellington (Port Nicholson, Worser Bay)
Lyttelton
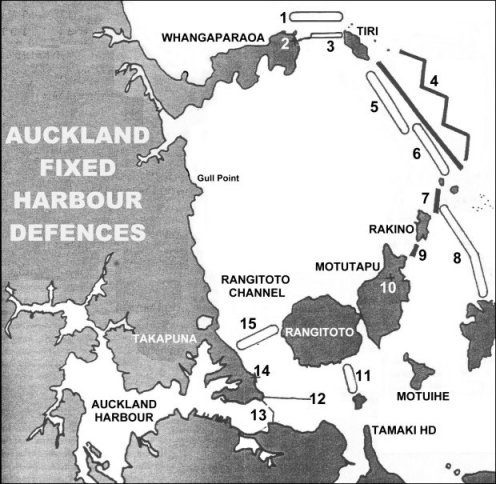
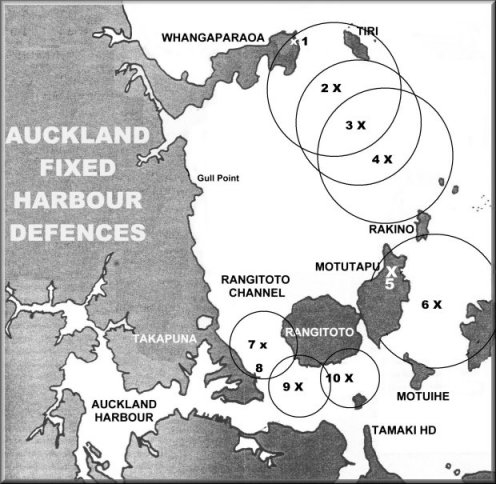
AUCKLAND - FIXED HARBOUR DEFENCES
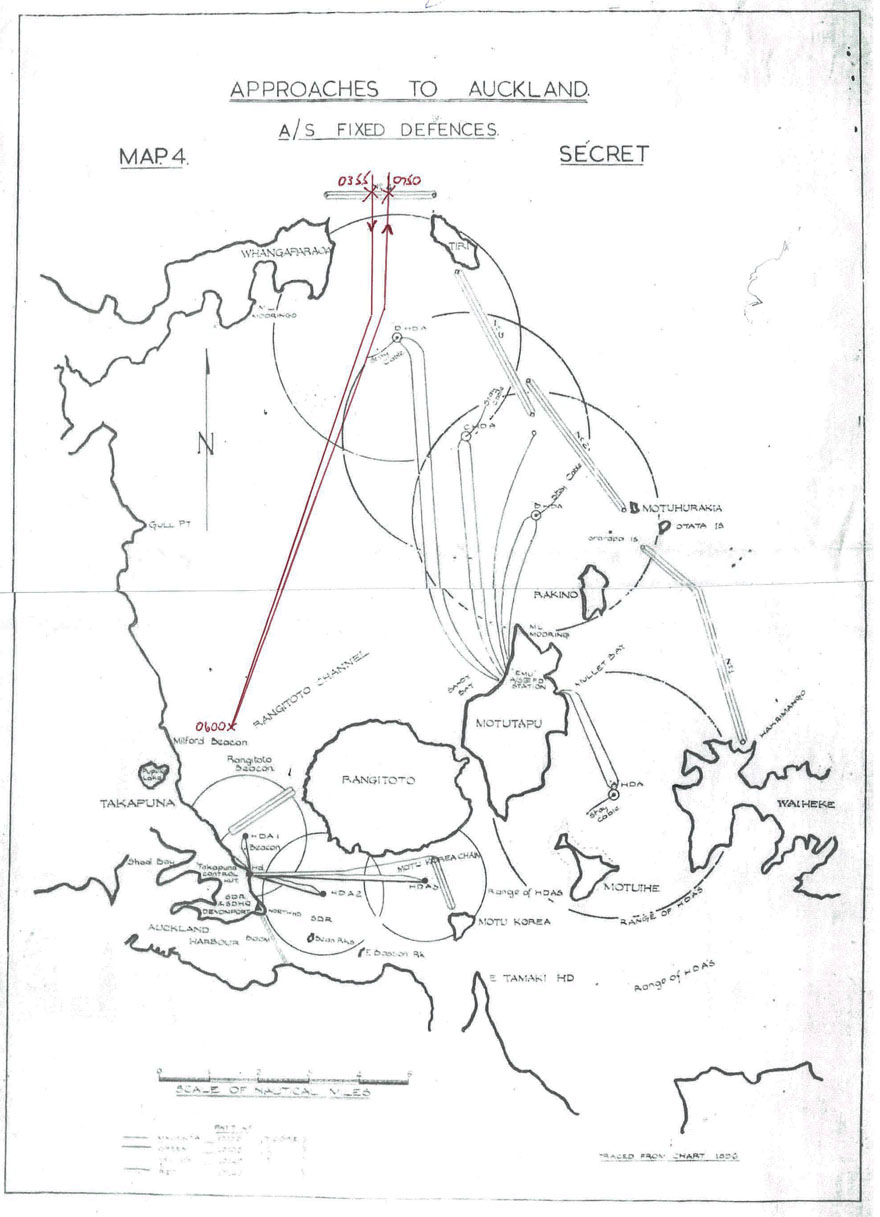
Fixed defence of Auckland Harbour was by a series of booms, controlled minefields, hydrophones, indicator loops and harbour defence Asdics (HDA). The minelayer HMAS Bungaree laid 422 mines in 3 days in Auckland Harbour. On the 25th August 1942, the minelayers Atreus and Alsey began laying a total of 8 controlled minefield (656 mines) in NZ ports. Minefield JL1 was laid in Auckland from 9th to 18th September 1942 and began operating on 24th September. Six indicator loops were installed later in 1942. The following diagram shows the location of these loops and other defences:
 |
 |
|
LEGEND:
1. No. 4 Indicator Loop;
2. Controlled Mine Station JL1;
3. Controlled Minefield - Whangaparoa Passage;
4. Two lines each of 200 of contact mines;
5. No. 3 Indicator Loop;
6. No.2 Indicator Loop;
7. 16 Contact mines;
8. No.1 Indicator Loop;
9. 6 Contact mines;
10. Emu Anti-submarine Fixed Defence Station - Sandy Bay;
11. "B" Indicator Loop (see note below);
12. Hydrophone Array;
13. Harbour Boom - North Head;
14. Takapuna A/S Fixed Defence Station (loop control hut) - Takapuna Head;
15. "A" Indicator Loop |
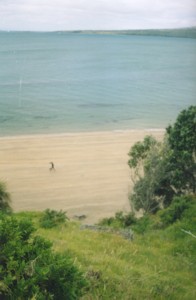
Map (opposite) Position 12: Looking
from Takapuna Loop Station over Takapuna Beach and across Rangitoto Channel
to the North end of Rangitoto Island. The loop cables would have passed down
this slope along a 2' deep trench in the beach and across to the island. |
The "B" Indicator Loop across Motu Korea Channel was made up of five small loops called MIL Loops (for Minature Indicator Listening Loop) with a total coverage of 2300 yards. They were developed by the Royal Navy to counter midget submarines and human torpedos being used by the Imperial Japanese Navy. MIL Loops used at Auckland were the conventional three-leg design but only 500 yards long (instead of the usual 2000 yards) with a spacing of 25 yards between each leg (instead of 200 yards) and an overlap of 50 yards. Spacing of loop legs should be about the same as the length of the boat being detected.
Various cable types were used: the loops themselves were lead-loaded 7 core Adm. Patt. No. 13142 (8000 yards); the tail cable from the loops to Takapuna Head was Admiralty Pattern No. 13150 (18 core, 8000 yards); and the tails from the loops to the junction box containing the main 18 core cable were made of Adm. Patt. No. 13135 (7 core,1500 yards) and A.P. 13149 (3 core, 2200 yd).
The "A" Loop across Rangitoto Channel consisted of 10 MIL Loops, each of 350 yards length and a leg spacing of 25 yards. They covered a total distance of 3050 yds. Two 18 core tail cables (AP 13150, 4000 yd) were used from the loops to Takapuna Hd. The loops were 7 core AP13142 (11500 yd) and the tails from the loops to the junction box on the near ends of the main tails were AP 13135 (6000 yd) and AP 13149 (4000 yd).
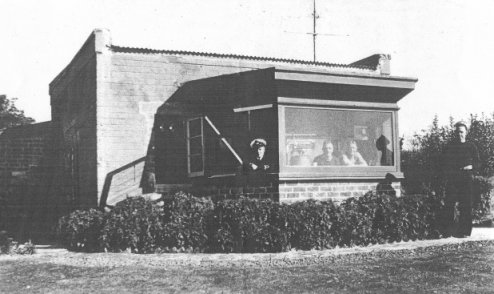
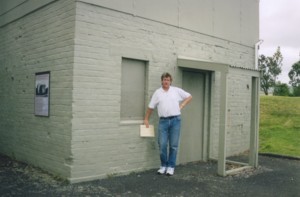
Puna Fixed Defence Station - (Loop Control Hut) -Takapuna Heads circa 1944. Photo from RNZN Museum - Serial No. ACF0019. Author inspects the building as it exists today (December 2004) - although the alcove on the front has been demolished and a top added.
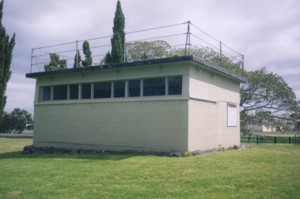
Engine Room - Takapuna Heads A/S station, November 2004 Command Post - Takapuna Heads A/S station, November 2004
Looking SE down Takapuna Beach from the headland in front of the loop hut.
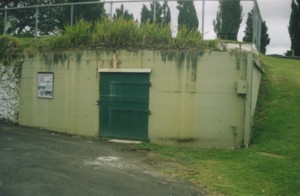
Emu - Anti-submarine Fixed Defence Station - Sandy Bay - as it looked in 1998.
The observation slots at the front of the hut are clear. At the top right is the 6 inch Battery Observation Post.


Harbour Defence Asdics (HDA) were also installed in the approaches to Auckland Harbour. These are shown on the following map. The circles indicate the range of the Asdic signal. This is about 2500 yards. A "ping" with a frequency between 12kHz and 20kHz and lasting about 1/10 s is sent out by a condensor that dumps its charge into a steel/quartz oscillator every 3 seconds. The echo of the first ping has to be received in the 3 seconds to be useful, so an object has to be no further than 1.5 seconds away to a underwater sound pulse. Sound travels at about 5000 foot per second in sea water which equates to a distance of 2500 yards in 1.5 s. The HDAs used by the RNZN were of RN and RAN design. The USN used a magnetostriction oscillator and called their HDA a "Herald" for Harbor Echo Ranging and Listening Device. They also called Asdic "Sonar".
2. "D" HDA
3. "C" HDA
4. "B" HDA
5. Emu Station
7. No. 1 HDA
8. Puna Station
9. No. 2 HDA
10. No. 3 HDA
Note: all HDAs used two cable types: seven core AS 13135 for the signal transmission and receival; and two core AS 13138 for power to drive the Asdic positioning motor located in the bell housing of the HDA dan buoys.
Movement of Japanese submarine I-22 in New Zealand waters 1942
 |
| The red line shows the probable route of I-22. Courtesy Murray Dear - July 2017. See supporting article below. |
EIGHT DAYS IN JUNEBy Murray Dear [Extract from "The Professional Skipper" July/August 2017, pages 30-32]. By June 1942 the Japanese threat to New Zealand had become acute. The Battle of the Coral Sea in May did not result in a favourable outcome for New Zealand. At the conclusion of the battle, Japanese forces were in control of Tulagi in the Solomon Islands, 1,000 kilometres closer to New Zealand. The oft repeated claim that the Battle of the Coral Sea "saved" New Zealand from invasion has no basis in fact. The Japanese regarded the outcome of the battle as no more than a speed bump in their plans to next invade New Caledonia, Fiji and Samoa with the ultimate objective of isolating Australia and New Zealand. Prior to this, the Imperial Japanese Navy intended to destroy the US Pacific Fleet in battle while seizing control of three islands in the Aleutians chain south-west of Alaska and Midway Atoll west of Hawaii. Operations AL and MI were planned for early June. In conjunction with these two operations the Japanese planned to undertake a major submarine offensive in the South Pacific. Five submarines of the 8th Squadron under the command of Captain Hankyu Sasaki were ordered to undertake operations in Australian and New Zealand waters. Sasaki was in command of the floatplane carrying I-21 (flagship) and I-29 plus the midget submarine carrying I-22, I-24 and I-27. It had been intended that I-28 would also be part of this group, but this submarine was sunk by the US submarine Tautog on 17 May. Following the 31 May — 1 June midget submarine attack on Sydney Harbour, the five submarines commenced attacks on merchant shipping. Both I-21 and I-24 continued to operate off New South Wales while I-29 was to harass shipping off Brisbane and I-27 was ordered southward to Tasmania. When undertaking historical research, the best evidence comes from primary source documents. An enquiry to the Centre for Military History, The National Institute for Defense Studies, Tokyo elicited the response that the official Imperial Japanese Navy TRM for I-22 could not be located. Naoki Kanno, a senior fellow of Military Archives at the Centre for Military History, advised that the only record held is a diary kept by Sub Lieutenant Ist Class Muneaki Hujisawa, Material Assistant to the Torpedo Officer of I-22, which "describes about New Zealand in June 1942". Unfortunately, the officer's family will not allow the diary to be copied and it can only viewed by the Centre's reading room users. Following an exchange of emails, Gerald Shone author of "U-boat in New Zealand Waters", kindly provided me with a copy of the "War Diary of Navy Office, Wellington, New Zealand" (War Diary) for June 1942 which he had used as a source for his book. A close examination of this document disclosed information that can be directly related to I-22's war patrol in New Zealand waters. On Saturday 6 June 1942 the War Diary records "D/F (radio direction finding) places enemy submarine within 200 miles of 34° S 168° E. Believed to be submarine reported off Sydney 2nd June." This places I-22 west of Cape Maria van Diemen and indicates the submarine sailed due east from Sydney. The time of this D/F report is not stated but it must be between 1847 and 2225 which are the times of the preceding and following entries in the War Diary. It is assumed that this radio message sent by I-22 was an operational report to either I-21 or the 6th Submarine Fleet Base at Kwajalein but no record has been found of this or subsequent radio messages. The submarine then clearly passed down the west coast of the North Island without incident and on the night of 8-9 June 1942 the TRM records "I-22 carries out periscope reconnaissance of Wellington". There is no evidence that I-22 attempted to enter Wellington Harbour. The War Diary records a purported sighting of a submarine at 1030 on 9 June by a military post at Mahinepua Bay (Cavalli Islands) but this can be ignored as it would clearly be physically impossible for I-22 to be there on that date. On 10 June the TRM records "At 1418, Cdr Ageta attacks a small steamer off Portland Island, but the torpedo passes under its keel. After sundown, I-20 (sic) reconnoiters Hauraki Gulf and Auckland." There is evidence that both the attack off Portland Island (south of the Mahia Peninsula) and I-22's reconnaissance of the Hauraki Gulf and Auckland took place, but clearly these events did not happen on the same day. The vessel attacked by I-22 was most likely the small motor vessel Koau which was employed on the coastal frozen meat feeder service between Tokomaru Bay, Wairoa and Napier. Several hours after the time of attack, the Koau lost her propellor when the tail shaft broke. It would appear that thetorpedo fired by I-22 may have grazed the Koau's propellor. Early in the morning after sunrise on 12 June 1942, the first American troops from the US Army 37th Division arrived in New Zealand. "The skies were grey and the water the colour of steel as five transport ships, with a cruiser in front and a destroyer in the rear, sailed into Auckland Harbour unannounced." This convoy comprised the troopships USS President Monroe, Uruguay, James Parker, Tasker H. Bliss and Santa Clara with the escort comprising the heavy cruiser USS San Francisco and the destroyer USS Farragut (my thanks to Chris Howell for this information). This raises the question, where was I-22 on 12 June? From the War Diary there is good evidence that I-22 entered the Hauraki Gulf on the night of 12-13 June. On Saturday 13 June the War Diary records "Loops between Kawau and Tiri Tiri crossed at 0355Z and 0750Z. Nothing visible". It is useful at this point to digress and examine the anti-submarine fixed defences in the approaches to Auckland Harbour. Indicator loops were long lengths of cables laid in precise patterns on the seabed which formed part of the underwater defences of a harbour or anchorage. The presence of steel-hulled vessels, both surface craft and submarines, was indicated by the swing of a galvanometer needle at a nearby shore station. By April 1941, the New Zealand War Cabinet had approved indicator loops across the Hauraki Gulf channels but construction did not immediately commence. This was the situation when Japan entered the war in December 1941 and shortly thereafter the Navy Board requested information from Australia on costs and availability of indicator loops. This resulted in the Australian cable-laying vessel Mernoo laying six loops in the approaches to Auckland between 27 February and 29 March 1942. In addition to the indicator loops, the approaches to Auckland were also protected by minefields. Between 16 and 20 March 1942 the minelayer HMAS Bungaree laid 422 moored contact mines as follows:
It will be noted that no mines were laid in the Whangaparaoa Passage between the Whangaparaoa Peninsula and Tiritiri Matangi. It is through this gap in the minefields that I-22 evidently breached Auckland's outer anti-submarine defences on the morning of 13 June 1942. It was not until September 1942 that the minelayer HMS Alsey supported by the base ship HMS Atreus laid seven loops of controlled mines and two guard loops in the Whangaparaoa Passage. It is assumed "Loops between between Kawau and Tiri Tiri" in the War Diary refers to the No. 4 Indicator Loop laid at the northern entrance of the Whangaparaoa Passage. It takes a significantly sized object to cause a big deflection in a loop galvanometer. Drifting mines and empty 44 gallon drums may cause a blip but wouldn't give a signal like a submarine or ship. It is suspected that there was a loop crossing by I-22. Everything fits perfectly. The maximum submerged speed of I-22 was 8 knots but it is more likely the submarine would be moving at say 6-7 knots to conserve its batteries. Some back of the envelope calculations indicate that I-22 would have gone southward for around 12 to 14 nautical miles before reversing course. This would place it at the northern entrance to the Rangitoto Channel. It certainly didn't enter the Rangitoto Channel as there is no evidence it passed over the "A" Indicator Loop between Takapuna and Rangitoto. This indicates that within 24 hours of the first US troopship convoy arriving in Auckland, I-22 was lurking off Rangitoto. Having expended its Type A midget submarine in the attack on Sydney Harbour, I-22 was unable to launch an attack on Auckland Harbour. Berthed in Auckland on the morning of 13 June were thecruiser San Franciscodestroyer Farragut, five troopships plus the armed merchant cruisers HMS Ascania (arrived 9 June)and HMNZS Monowai (undergoing a refit). At 1925 on 14 June the War Diary records "Submarine reported in 034°55' S 174°50' E by D/F. It is considered probable that submarine is one of the units recently operating off Sydney. Believed to be "I" class and may carry aircraft as well as midget submarine." The assumptions made were mainly correct. This D/F report places I-22 to the east of North Cape and was presumably an operational report advising that the submarine was leaving New Zealand waters for Fiji. The TRM records I-22 reconnoitered Suva on 17-18 June but inexplicably then states the submarine reconnoitered Auckland for a second time on 19 June. This is clearly not possible. On 25 June I-22 arrived at Kwajalein with I-21, I-24, I-27 and I-29, andby 11 July the submarine was at Yokosuka. Two months later I-22 departed Yokosuka for operations in the Solomons area. On 4 October the last signal was received from I-22 and the submarine was subsequently declared lost with all hands. In essence, the information in the War Diary complements the verifiable information recorded in the TRM. Had Commander Ageta proceeded directly to Wellington rather than sailing due east, he may well have saved a day's passage and probably arrived in the Hauraki Gulf on the morning of 12 June. The outcome of any encounter between I-22 and the troopship convoy can only be speculated, however it would appear that a potential naval disaster on Auckland's doorstep may have been narrowly averted. For eight days during June, shipping in New Zealand waters had been at high risk of submarine attack. Chris Howell has advised the following ship movements:
When considering these movements, it is clear that several possible encounters with I-22 were averted by good timing and/or good luck. Following the loss of four aircraft carriers in the Battle of Midway, Japan subsequently abandoned plans to seize New Caledonia, Fiji and Samoa. It was the American naval victory at Midway that ultimately saved New Zealand from any major Japanese naval attack. |
PORT NICHOLSON - WELLINGTON - FIXED HARBOUR DEFENCES AT WORSER BAY
Fixed defence of Port Nicholson was by a A/S boom, an A/S net, one set of MIL indicator loops and two harbour defence Asdics (HDA).
A controlled minefield (JL5) was laid at Worser Bay from 17
November to 3 December. It
consisted of 8 loops of 16 mines each, plus two guard loops
and became operational on 3rd December 1942. The indicator
loops and loop control hut came later: they weren't
even approved until 22 January 1943 (at a cost of
NZ£5133).
The following map shows the location of the indicator loops:
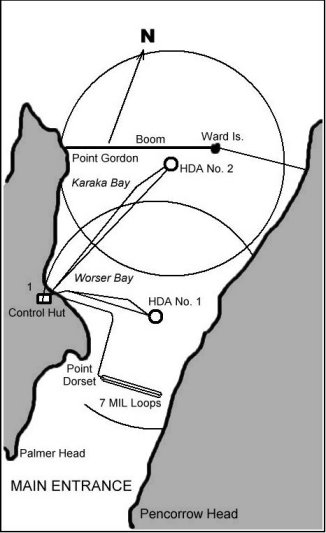
The Indicator Loop was made up of seven MIL Loops each of 250 yd and 25 yds between legs. Total coverage was 1600 yd. Loops were AP 13142 (5950 yd); underwater tails from loops to junction box AP 13135 (2000 yd) and AP 13149 (5820 yd). The shore tail was AP 13150 (3770 yd).
If you want to contact local researcher into loops and
controlled mining at Wellington, you should email loop and
mine enthusiast Alaistair Scadden
(Regional Director of the Site O local fortification and artillery web site:
http://homepages.paradise.net.nz/jascadde/index.html).
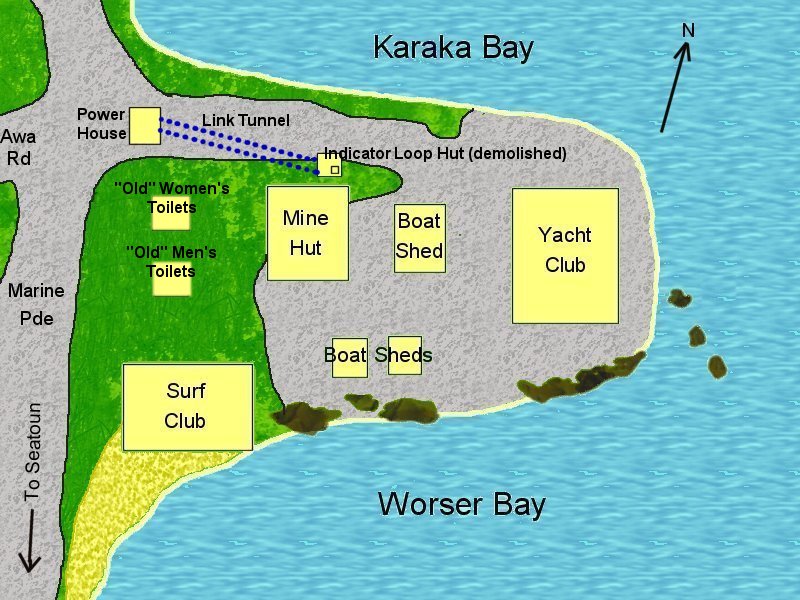
The map below is based on a map supplied by him. The archivist - and keen military historian - Michael Biggs has uncovered the following information from the files: The Indicator Loop Hut as shown below was demolished after the war. The Power House was a semi-underground room at the entrance of the car park. It too has been demolished. They were connected by a link tunnel and references in the City Drainage Files explicitly confirm this. The "Old" Gents' Toilets (since demolished) were converted into a Generator Room during the war and rehabilitated to their former use afterwards - at considerable expense.
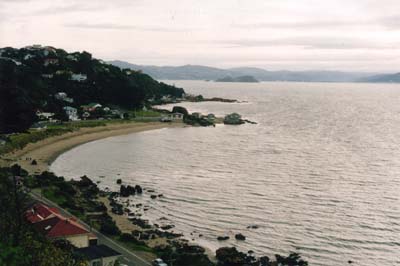
The photos Worser Bay below were taken by Alistair Scadden:
 |
 |
| View of Worser Bay taken from the southern end - looking North. The yellow building at the top end of the sand (centre of photo) is the Surf Club. To its left are the naval barracks. After the war, the navy turned these over to the RNZAF, and they served as WAAF accommodation until the early 1990s. They have since been sold and turned into budget rental accommodation. | Telephoto shot of same scene as shown to the left. The Worser Bay Yacht Clubhouse is on the right. The building in the centre is the boat shed and on the left is the Controlled Mining Station with the Scout Hut built on top. The peculiar structure in the water in the foreground was actually the base for a diving board (the board itself was removed many years ago following a fatal accident). The house on the hill at the top of the photo belongs to Peter Jackson - of "Lord of the Rings" fame. |
 |
 |
| Front view of the surviving Mine Control building. The original entrance porch can be seen, as can the hole knocked in the wall by the scouts to allow storage of boats. Prior to construction of the hall, there used to be a small concrete Observation Post on top. This was demolished by the Scouts (by hand!) in 1967 to allow the hall to be built. As Alistair Scadden says "Tough blokes, those Worser Bay Sea Scouts". | View of site from hill directly behind old naval station. The yacht club roof is visible above the trees. |
Try also: Wrights Hill Fortress Restoration Group - all about Wrights Hill Fortress which was built in the 1940s as a long range coastal battery to protect Wellington city and environs from possible enemy attack and invasion from the Pacific in World War Two.
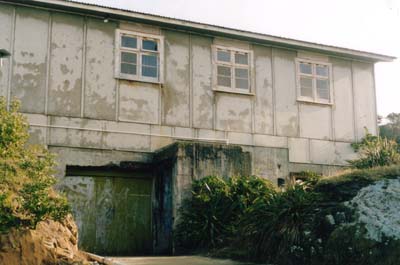
LYTTELTON HARBOUR - CHRISTCHURCH - FIXED HARBOUR DEFENCES
Fixed defence of Lyttelton Harbour was by an A/S boom, an A/S net, one set of MIL indicator loops and two harbour defence Asdics (HDA).
A controlled minefield was planned to be laid in mid-January
1943 but a change in defence strategy saw it cancelled on
9th January 1943. The following map shows their location:
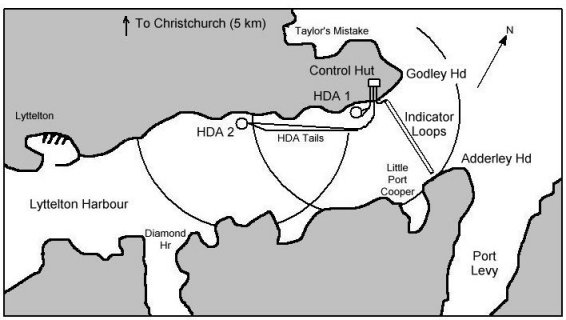
The indicator loops consisted of five MIL Loops, each 500 yards long and 25 yd between legs. The total coverage was 2300 yd. Cable types were similar to other NZ installations: shore tail to Codley Head control hut - AP 13150, 2000 yd; loops - AP 13142, 8000 yd; and underwater tails - AP 13135 (1600 yd) and AP 13149 (2200 yd).
Contacts and References:
HELP!
If you know of other WW2 indicator loop stations around the world, please contact me (Dr. Richard Walding) with some of the details so we can correspond.
I'm particularly interested in getting information from officers and ratings who worked in the loop stations or laid the loop cables. Also, many scientists were involved in the research at the Royal Navy's "Underwater Detection Establishment". Are you still out there?